

Introduction
Modern bedroom design demands furniture that balances aesthetic appeal with functional storage. Floating Cloud Bedside Nightstands deliver a contemporary floating aesthetic while providing practical drawer storage for everyday essentials.
This DIY woodworking project transforms simple lumber and hardware into a stunning wall-mounted nightstand that appears to hover beside your bed. The cloud-inspired curved silhouette creates a soft, organic contrast against the clean lines of modern bedroom decor. Homeowners who build these nightstands gain custom furniture that maximizes floor space while adding significant visual interest to any bedroom.
The wall-mounted design eliminates tripping hazards and creates an illusion of expanded room dimensions.
Quick Specs
Overall Width: 24 inches. Overall Height: 18 inches. Overall Depth: 14 inches.
Drawer Interior Dimensions: 18 inches wide by 10 inches deep by 3 inches tall. Estimated Material Cost: 85 to 120 dollars depending on wood selection. Difficulty Level: Intermediate. Estimated Build Time: 6 to 8 hours including finishing. Wall Mounting Hardware Load Capacity: 100 pounds per nightstand.
Materials and Tools
Lumber Requirements
- Poplar or Maple 3/4 inch thick plywood sheets for cabinet box construction
- Poplar or Maple 1×4 inch solid wood strips for edge banding and trim
- Poplar or Maple 1×3 inch solid wood strips for drawer face construction
- Poplar or Maple 3/4 inch thick solid wood for drawer bottom panels
- 3/4 inch thick MDF board for internal drawer dividers and backing
Hardware Requirements
- Two 32 inch full extension soft-close drawer slides
- Eight 1-1/4 inch wood screws for cabinet assembly
- Sixteen 1 inch wood screws for drawer construction
- Four 2-1/2 inch lag bolts for wall mounting
- Four heavy-duty metal wall mounting brackets rated for 50 pounds each
- Eight 3/4 inch wooden drawer knobs or pulls
- Wood glue for all panel joints
- Sandpaper in 80, 120, 150, and 220 grit
- Polyurethane finish in satin or semi-gloss
Tools Required
- Circular saw or table saw for precise crosscuts and rip cuts
- Jigsaw for curved cloud edge cutting
- Power drill with clutch setting for screw driving
- Kreg pocket hole jig or pocket hole drill bit set
- Orbital sander for smooth surface preparation
- Speed square for accurate 90 degree layout marks
- Stud finder for locating wall mounting points
- Level for ensuring horizontal alignment
- Clamps for holding assembly pieces during glue-up
Technical Layout
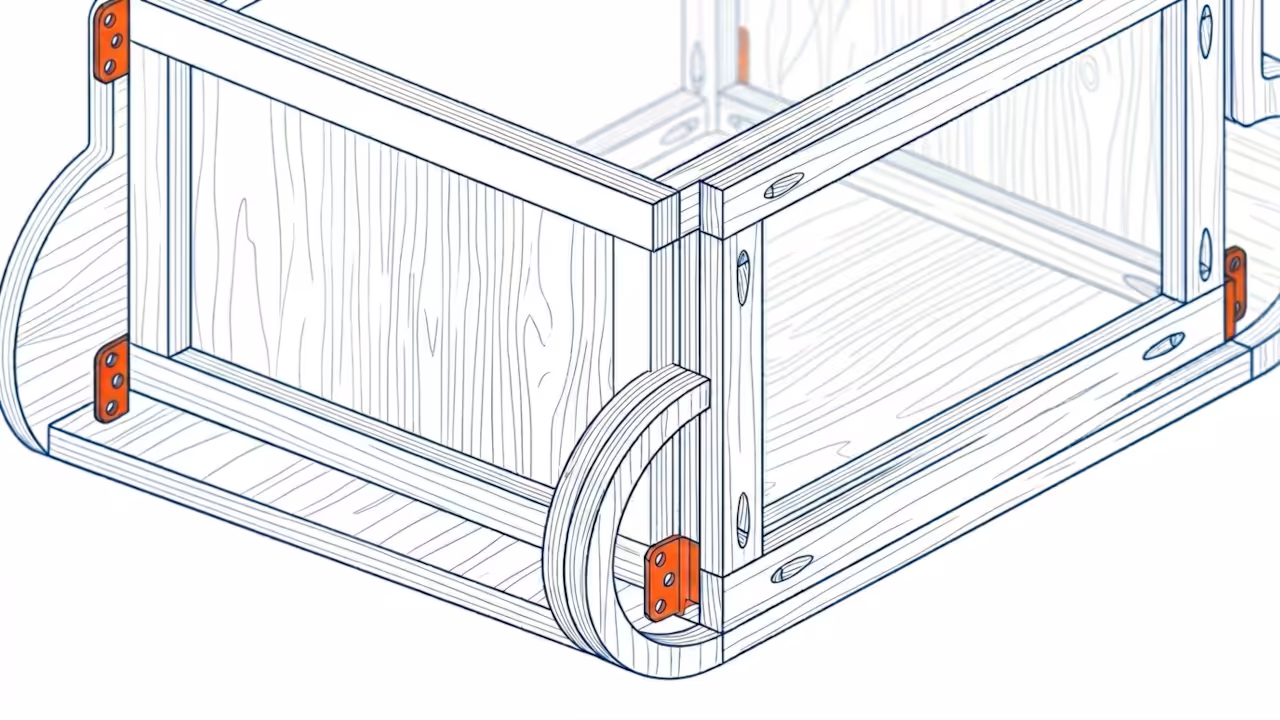
The structural framework of the Floating Cloud Bedside Nightstand relies on a precision-engineered box construction method that distributes weight evenly across the wall mounting points. The primary cabinet box measures 24 inches wide by 18 inches tall by 14 inches deep, constructed from 3/4 inch thick plywood panels joined using pocket hole screws and wood glue for maximum shear strength.
The back panel utilizes 1/4 inch thick plywood or MDF, which provides adequate structural rigidity while keeping overall weight manageable for wall mounting applications. The drawer system integrates into the upper portion of the cabinet, with the drawer box measuring 18 inches wide by 10 inches deep by 3 inches tall, leaving a 2-inch clearance above and below for the drawer slides and decorative top lip.
The cloud-shaped front profile is achieved by cutting a gentle 2-inch radius curve along the bottom edge of the front face frame, creating the distinctive floating cloud silhouette. This curved edge requires careful jigsaw work followed by extensive sanding to achieve a smooth, continuous arc.
The face frame consists of two 1×4 vertical stiles and one 1×4 horizontal rail, all joined using pocket holes at 45-degree angles for invisible connections. The wall mounting system employs four heavy-duty metal brackets positioned at each corner of the cabinet box, with lag bolts driven into wall studs to support the combined weight of the cabinet and its contents.
Proper stud placement is critical, as the brackets must anchor into at least two wall studs spaced 16 inches on center to handle the dynamic loading of drawer operation.
Pro-Tip: Use 2-1/2 inch structural screws or lag bolts with washers for wall mounting rather than standard drywall anchors. The dynamic weight of opening and closing drawers creates lateral forces that standard anchors cannot handle. Always locate wall studs using a quality stud finder and verify with a small drill test hole. For drywall installations between studs, use toggle bolts rated for at least 75 pounds each, but stud mounting remains the only recommended method for long-term reliability.
Hardware Comparison Table
| Hardware Type | Load Rating | Best Application | Price Range |
|---|---|---|---|
| Metal Wall Bracket Heavy Duty | 50 pounds per bracket | Primary wall support | 8 to 15 dollars per bracket |
| Toggle Bolts | 75 pounds per bolt | Drywall between studs | 3 to 6 dollars per bolt |
| Lag Bolts 2-1/2 inch | 100 pounds per bolt | Stud mounting | 1 to 2 dollars per bolt |
| Drawer Slides Full Extension Soft Close | 25 pounds per pair | Drawer operation | 12 to 20 dollars per pair |
| Pocket Hole Screws 1-1/4 inch | 45 pounds per joint | Cabinet assembly | 5 to 8 dollars per box |
Step-by-Step Instructions
Phase 1: Cut All Panels to Size
Begin by measuring and cutting all plywood panels to the exact dimensions specified in the cut list. The side panels measure 14 inches deep by 18 inches tall, the top and bottom panels measure 24 inches wide by 14 inches deep, and the back panel measures 23-1/2 inches wide by 17-1/2 inches tall to fit flush within the face frame.
Use a circular saw with a straight edge guide or a table saw for perfectly straight cuts. Score the veneer face with a utility knife before cutting to prevent tearout on the visible surfaces. Set all cut panels aside and label each piece with its intended position using masking tape and a marker.
Phase 2: Construct the Cabinet Box
Assemble the cabinet box using pocket hole joints for maximum strength and clean appearance. Drill pocket holes on the edges of the side panels and the bottom panel, spacing them 3 inches apart along each edge.
Apply a thin bead of wood glue to each joint surface before driving 1-1/4 inch pocket hole screws. Clamp the assembly tightly while the glue cures, checking for square diagonals to ensure the box is perfectly rectangular. Install the back panel by nailing it into the rear edges of the top, bottom, and side panels using 5/8 inch finish nails spaced 4 inches apart. The back panel adds critical racking resistance to the cabinet structure.
Phase 3: Build the Drawer Box
Construct the drawer box using 3/4 inch plywood for the sides, front, and back, measuring 9 inches tall by 10 inches deep by 8-3/4 inches wide each side. The drawer bottom panel uses 1/4 inch plywood measuring 17-1/2 inches wide by 9-3/4 inches deep, which slides into a 1/4 inch groove routed along the bottom edge of the drawer sides and back.
Join the drawer sides to the front and back using pocket holes on the inside faces, applying wood glue and driving 1 inch screws. Insert the drawer bottom panel and secure it with a few brads along the front edge only, allowing for wood expansion and contraction with seasonal humidity changes.
Phase 4: Create the Cloud-Shaped Front Profile
Attach the 1×4 face frame stiles and rail to the front of the cabinet box using pocket holes and wood glue. The two vertical stiles attach to the front edges of the side panels, while the horizontal rail spans between them at the drawer opening line.
Once the face frame is secured, use a jigsaw to cut the cloud-shaped curve along the bottom edge of the front face. Draw a smooth 2-inch radius arc from the bottom left corner to the bottom right corner, creating a gentle upward sweep in the center. Cut carefully along the marked line, then switch to an orbital sander with 120 grit paper to smooth the curve into a continuous, flowing shape. Progress through 150 and 220 grit for a glass-smooth finish.
Phase 5: Install Drawer Slides
Mount the drawer slides according to the manufacturer specifications, typically with the cabinet-side slides attached to the inside of the side panels and the drawer-side slides attached to the outside of the drawer box. Use a level to ensure both slides are perfectly horizontal and aligned at the same height.
Drive screws through the slide mounting holes into the plywood, using the drill clutch setting to prevent over-driving. Test the drawer operation by sliding the drawer in and out several times, checking for smooth movement and proper alignment. Make minor adjustments by shimming the slides if necessary before proceeding to the next phase.
Phase 6: Attach Drawer Face
Create the drawer face from 1×3 solid wood, measuring 18-1/2 inches wide by 6 inches tall to provide a 1/4 inch reveal on all sides. Attach the drawer face to the drawer box using the manufacturer provided brackets or a face frame mounting system.
The face must align perfectly with the front edge of the cabinet box and sit flush with the face frame stiles. Use a clamp to hold the drawer face in position while marking and drilling the mounting holes. Secure the face with the provided screws, then test the drawer operation again to ensure the face clears the cabinet opening without binding.
Phase 7: Sand and Finish the Entire Unit
Sand the entire nightstand thoroughly, starting with 80 grit paper on any rough surfaces and progressing through 120, 150, and 220 grit for a silky-smooth finish. Pay special attention to the cloud curve edge, using a sanding block to maintain the gentle arc without creating flat spots.
Sand all drawer faces, the front face frame, and any visible edges. Remove all dust with a tack cloth or vacuum before applying finish. Apply two coats of polyurethane using a high-quality foam brush, sanding lightly with 220 grit between coats. Allow 24 hours of drying time between coats and 48 hours before mounting.
Phase 8: Mount Wall Brackets and Install Nightstand
Locate wall studs using a quality stud finder, marking the center of each stud with a pencil. The mounting brackets should be positioned to align with at least two studs spaced 16 inches on center.
Hold the nightstand against the wall at the desired height, typically 24 to 28 inches above the floor to align with the mattress surface. Mark the bracket positions through the mounting holes, then remove the nightstand and pre-drill pilot holes into the studs. Mount the brackets using 2-1/2 inch lag bolts, tightening securely but avoiding over-torquing which can strip the wood threads. With a helper, lift the nightstand and hook it onto the mounted brackets, securing with lag bolts through the bottom mounting holes.
Phase 9: Install Hardware and Final Adjustments
Attach the drawer knobs or pulls to the drawer face, positioning them centered horizontally and 2 inches from the bottom edge. Pre-drill pilot holes to prevent the wood from splitting, then secure the hardware with the provided screws.
Test the drawer operation one final time, checking for smooth opening and closing. Verify that the nightstand is level and securely mounted by applying gentle pressure to the top surface. Install a second nightstand on the opposite side of the bed using the same mounting procedure, ensuring both units are at identical heights for visual symmetry.
Common Mistakes
Skipping the square check during cabinet assembly results in a box that is not perfectly rectangular, causing drawer binding and misaligned faces. Always measure diagonals from corner to corner and adjust until both measurements match exactly before driving the final screws.
Mounting the nightstand without locating wall studs compromises the entire structural integrity of the installation. Drywall anchors cannot handle the dynamic loading of drawer operation, and the unit may pull away from the wall over time, potentially causing injury or damage.
Failing to sand the cloud curve edge properly leaves visible tool marks and rough transitions that detract from the professional appearance. Take extra time on this visible edge, using progressively finer grit sandpaper and checking the curve by eye from multiple angles.
Installing drawer slides at slightly different heights causes the drawer to bind or hang crookedly when opened. Use a level and measure from a consistent reference point on both sides of the cabinet to ensure perfect alignment before securing the slides permanently.
Maintenance and Safety
Clean the nightstand surfaces regularly with a soft, damp cloth and mild wood cleaner to remove dust and prevent buildup. Avoid abrasive cleaners or excessive water that can damage the polyurethane finish. Reapply a protective coat of polyurethane every two to three years to maintain the finish integrity and protect against moisture damage.
Inspect the wall mounting hardware annually, tightening any lag bolts that may have loosened from vibration and drawer operation. Check the drawer slides for smooth operation and lubricate with a dry silicone spray if they begin to stick. Replace any worn or damaged hardware immediately to prevent safety hazards.
Wear appropriate personal protective equipment during construction, including safety glasses when cutting and sanding, a dust mask when generating fine wood particles, and hearing protection when operating loud power tools. Keep the work area well-ventilated when applying finishes, and allow adequate drying time before mounting the unit to the wall.