
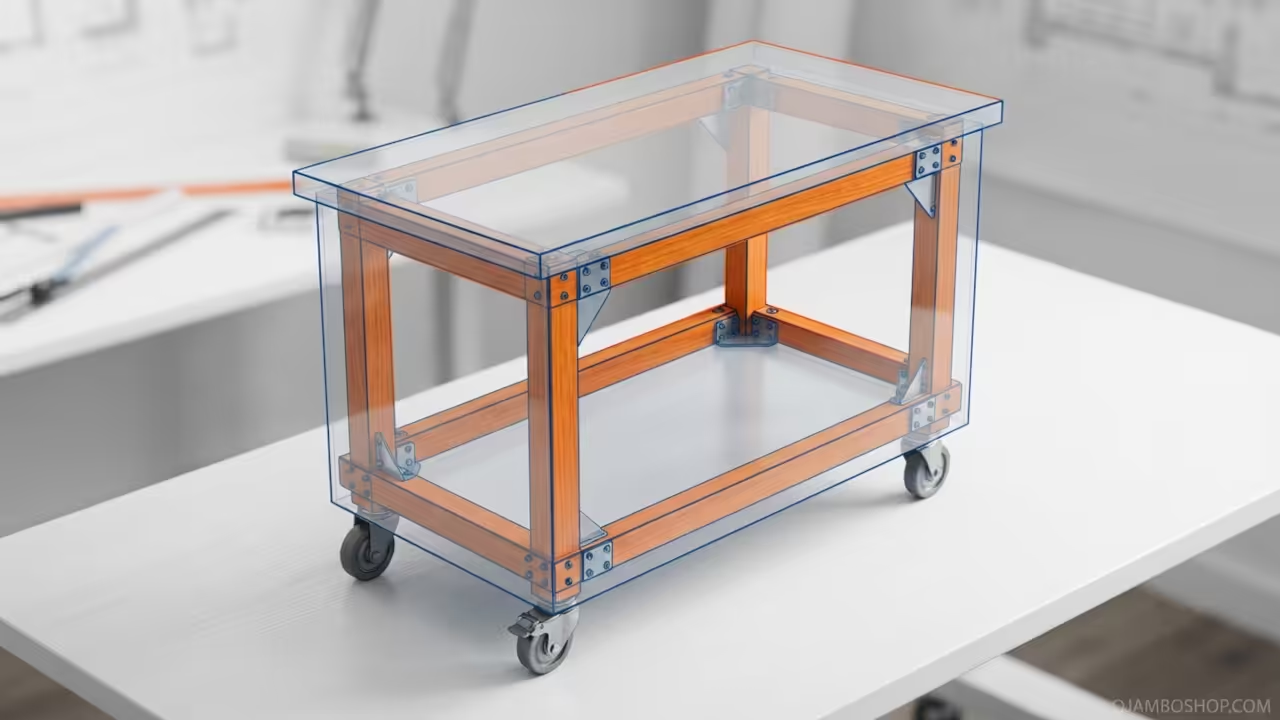
A professional grade workspace is the foundation of every successful home workshop. This mobile workbench provides the essential stability and versatility needed for demanding projects.
Investing time into a high quality workbench increases the overall value of your property. It transforms a cluttered garage into a functional production center for any craftsman.
The ability to move a massive work surface allows for better shop flow. You can reposition your primary assembly area based on the specific needs of your current project.
Quick Specs
The final dimensions for this heavy duty unit are 60 inches long by 24 inches wide. It stands at a standard ergonomic height of 36 inches from the floor.
The estimated cost for materials ranges between 150 and 250 dollars depending on lumber choice. This project is rated at an intermediate difficulty level for most DIY builders.
Expect to spend approximately 12 to 16 total hours completing the build. This timeline includes time for wood curing and final surface finishing.
Materials and Tools
You will need several pieces of construction grade lumber to ensure maximum rigidity. Purchase four 4×4 posts for the legs and six 2×4 boards for the primary framing.
A sheet of 3/4 inch birch plywood is recommended for the workbench top surface. This material offers a superior balance of strength and smoothness compared to standard OSB.
For hardware you will need a box of 2.5 inch and 3 inch wood screws. Heavy duty locking casters are essential to support the total weight of the loaded bench.
The tool list includes a miter saw for precise crosscuts and a power drill for assembly. A 4 foot level and a speed square are required to maintain perfect geometry.
You should also have a random orbital sander and various grits of sandpaper on hand. High quality wood glue will significantly increase the longevity of every structural joint.
| Parameter | Description | Value |
|---|---|---|
| Top Surface | Professional Grade | Birch Plywood |
| Leg Material | Professional Grade | 4×4 Posts |
| Casters | Professional Grade | Steel Bearing |
| Fasteners | Professional Grade | Construction Screws |
| Parameter | Description | Value |
Technical Layout
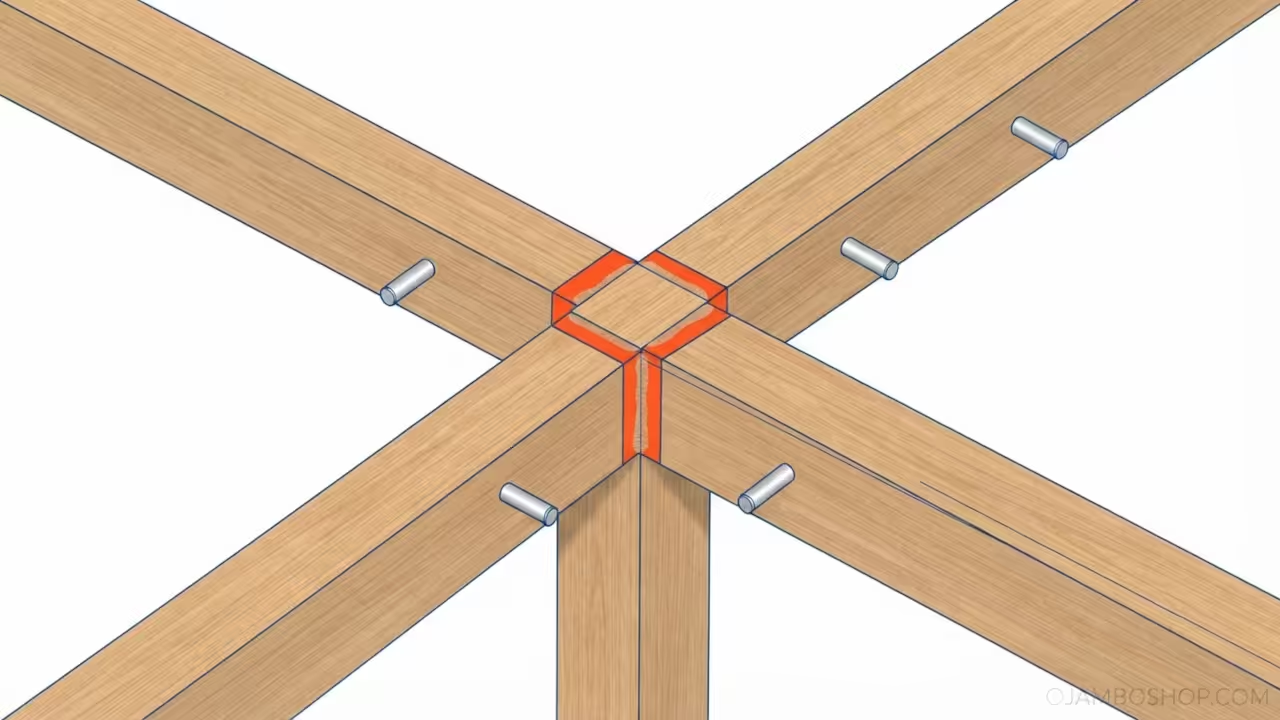
The structural integrity of this workbench relies on a dual rail framing system. The primary load is carried by the 4×4 vertical posts which are connected by a perimeter of 2×4 stretchers.
These stretchers are positioned at both the top and bottom of the legs to eliminate racking. This ensures the unit remains rigid under heavy lateral pressure during operation.
To ensure the bench does not wobble under heavy pressure we utilize a center support spine. This spine consists of three 2×4 cross members spaced exactly 15 inches apart along the length.
This prevents the plywood top from sagging when supporting heavy machinery or large slabs of wood. The geometric distribution of weight is optimized for maximum stability.
The lower shelf frame is recessed 2 inches from the outer edge of the legs. This design choice allows for the installation of oversized locking casters without compromising the footprint.
Every connection point is reinforced with a combination of structural screws and industrial grade wood glue. This creates a permanent bond that resists loosening over time.
The weight distribution is centered directly over the caster mounting plates. This alignment ensures that the center of gravity remains stable even when the bench is fully loaded.
This geometric approach converts vertical pressure into a direct load path down to the floor. The result is a rock solid foundation for any woodworking task.
Step by Step Instructions
Phase 1 involves preparing the four 4×4 legs to the exact required height. Measure and cut each post to 30 inches to allow room for the casters and top.
Ensure every cut is perfectly square to prevent the bench from leaning. This foundational step is critical for the overall balance of the unit.
Phase 2 focuses on the construction of the upper and lower rectangular frames. Cut four 2×4 members to 53 inches and four members to 21 inches.
Assemble these into two identical rectangles using 3 inch screws and wood glue. Verify that the corners are exactly 90 degrees using a speed square.
Phase 3 requires attaching the upper frame to the top of the 4×4 legs. Align the frame edges with the outer faces of the posts for a flush finish.
Drive two screws through the frame into each leg for a secure mechanical bond. Check for level across all four corners before tightening the screws fully.
Phase 4 involves installing the lower stretcher frame approximately 6 inches above the floor. This provides a critical secondary support point that prevents the legs from splaying.
Ensure the lower frame is perfectly parallel to the upper frame using your speed square. This maintains the structural cube of the workbench frame.
Phase 5 is the installation of the center support spine across the width. Place three 2×4 cross members between the long stretchers at 15 inch intervals.
This grid pattern creates a rigid chassis capable of supporting several hundred pounds. It eliminates the risk of surface deflection during heavy hammering.
Phase 6 focuses on the installation of the heavy duty locking casters. Pre drill pilot holes into the bottom of each 4×4 leg to prevent the wood from splitting.
Bolt the casters securely using carriage bolts and locking nuts for maximum stability. Test each caster to ensure smooth rotation and a firm lock.
Phase 7 requires the preparation and installation of the 3/4 inch plywood top. Cut the plywood to exactly 60 by 24 inches using a circular saw or table saw.
Secure the top to the frame using 1.25 inch screws driven from the underside. This prevents screw heads from protruding and scratching your work pieces.
Phase 8 is the final sanding and surface treatment of the workbench. Sand the top surface starting with 80 grit and finishing with 220 grit sandpaper.
Apply a clear polyurethane finish to protect the wood from spills and stains. Allow the finish to cure completely before placing tools on the surface.
Common Mistakes
One frequent error is failing to pre drill pilot holes in the 4×4 posts. This often leads to the wood splitting near the ends of the boards.
Always use a drill bit slightly smaller than the screw diameter. This ensures a tight fit without compromising the integrity of the lumber.
Many builders forget to check for squareness throughout the entire assembly process. If the frame is off by even a half inch the top will not sit flush.
Measure the diagonals of the frame to ensure they are identical. This is the only way to guarantee a perfectly rectangular workbench.
Using standard drywall screws instead of construction screws is another common mistake. Drywall screws are brittle and can snap under lateral pressure.
Always use screws rated for structural timber. These fasteners are designed to bend slightly rather than snap under heavy load.
Some users install the casters too far toward the center of the legs. This reduces the stability of the bench and increases the risk of tipping.
Keep the casters as close to the outer corners as possible. This maximizes the footprint and ensures a safe center of gravity.
Maintenance and Safety
Pro Tip for structural integrity involves using pocket hole joinery for the leg to frame connections. This method creates a much stronger joint than traditional face screwing.
It also hides the fasteners for a cleaner professional look. This technique prevents the screws from being exposed to accidental impacts.
Apply a fresh coat of wax or polyurethane to the top every six months. This creates a moisture barrier that prevents the wood from warping in humid environments.
Keep the surface clean of sawdust to avoid scratching the finish. A clean surface also provides a safer area for precision measurements.
Inspect the caster bolts and locking mechanisms once a month. Vibration from power tools can loosen the hardware over time.
Tighten any loose bolts immediately to ensure the bench remains safe to move. Proper maintenance extends the life of the caster bearings.
Always wear safety glasses and ear protection when using power tools during the build. Ensure your workspace is well ventilated when applying chemical finishes or glues.
Never overload the bench beyond the rated capacity of your chosen casters. Exceeding weight limits can lead to caster failure and sudden collapse.