
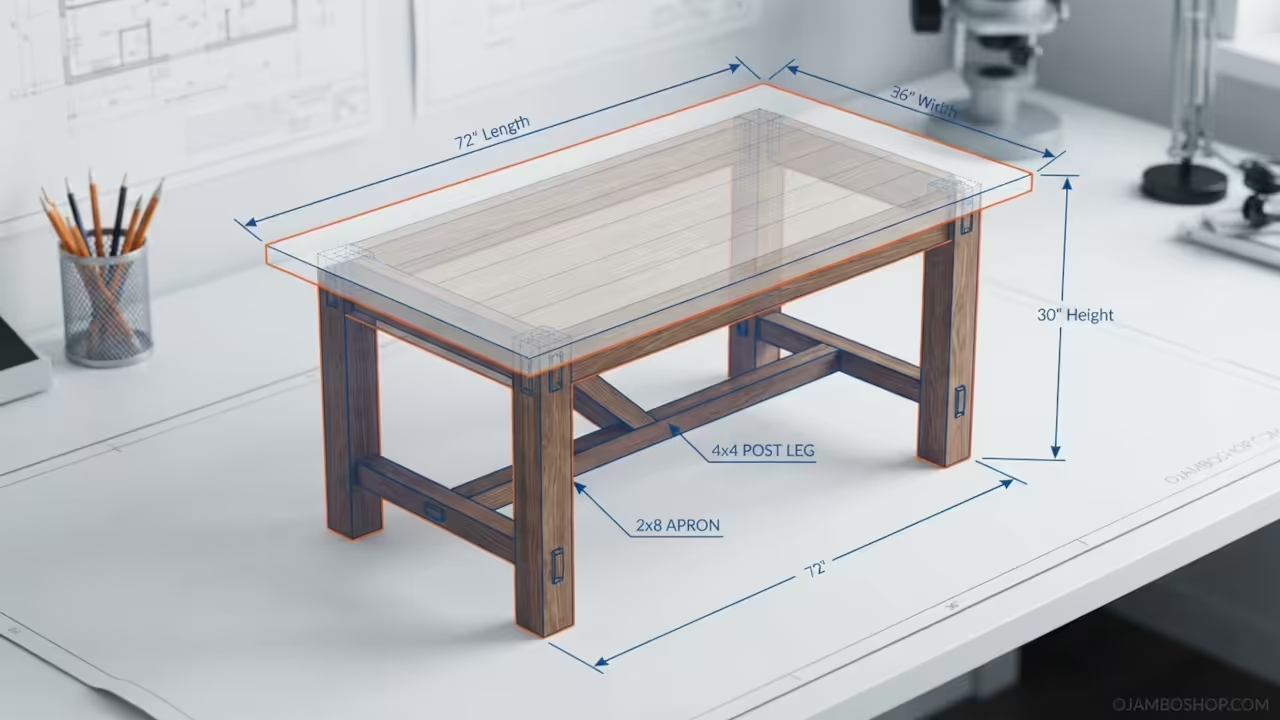
The dining table serves as the heart of the home where families gather for meals and memories.
A farmhouse style table brings a sense of warmth and rustic elegance to any interior design.
Investing time into a handcrafted piece ensures that your furniture lasts for several generations.
This specific design combines traditional aesthetics with modern structural integrity for a truly timeless result.
Quick Specs
Dimensions: 72 inches long by 36 inches wide by 30 inches high.
Estimated Cost: 250 to 600 dollars depending on the choice of hardwood.
Difficulty Level: Intermediate woodworking skills are required for this project.
Estimated Build Time: 40 to 60 total working hours.
Materials and Tools
Lumber requirements include four 4x4s for the legs and several 2x8s for the tabletop and aprons.
Ensure you select straight kiln dried boards to prevent warping over time.
Hardware needs include 2.5 inch pocket screws high strength wood glue and Z clips for the tabletop.
You will also need various grits of sandpaper from 80 up to 220.
Essential tools include a miter saw a table saw and a cordless drill driver.
A pocket hole jig and a set of heavy duty pipe clamps are also necessary.
Technical Layout
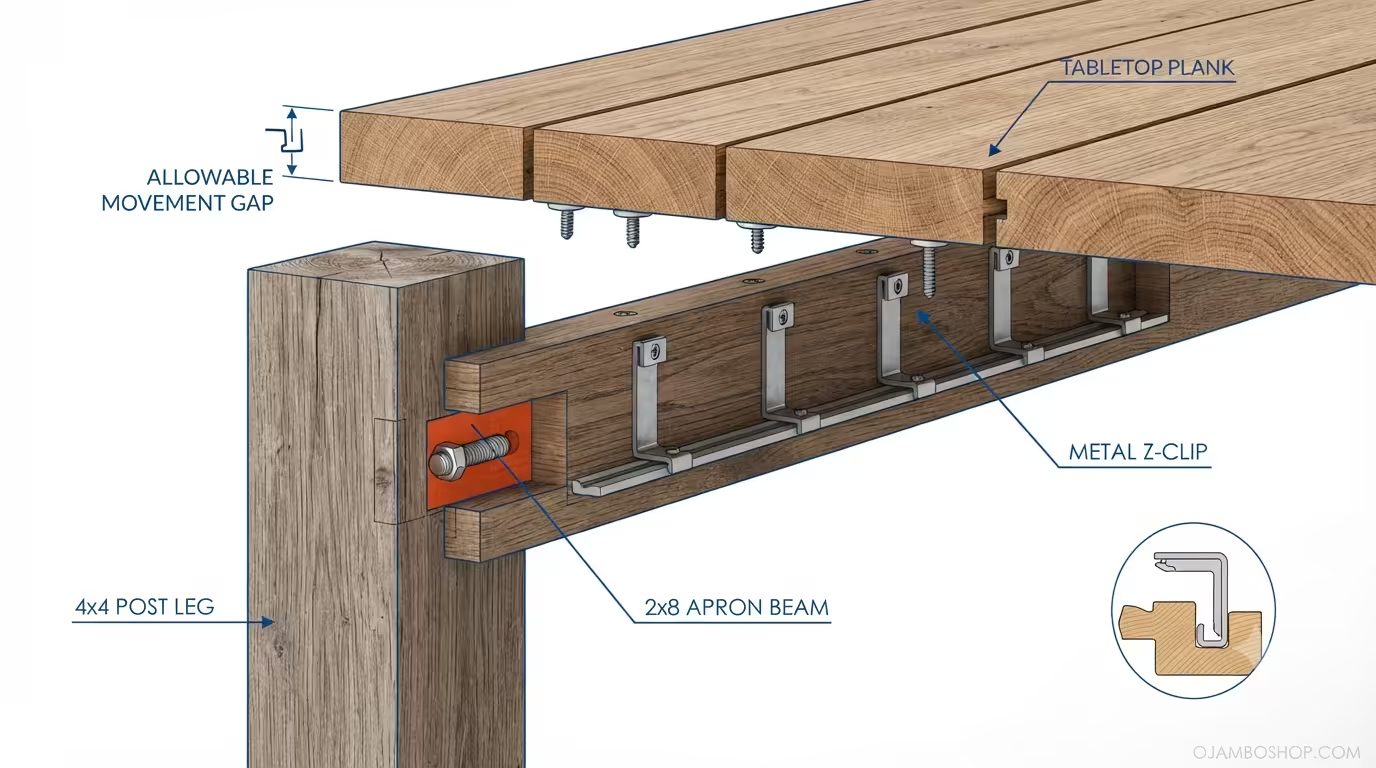
The structural foundation of this table relies on a robust apron system that connects the four heavy legs.
These aprons prevent the legs from splaying and provide the necessary support for the wide tabletop planks.
By using reinforced pocket holes or traditional joinery the frame resists lateral movement during heavy use.
This ensures the table remains rock solid even when fully loaded with dinnerware and guests.
The connection between the tabletop and the base is the most critical technical detail for longevity.
Wood naturally expands and contracts with changes in humidity and temperature throughout the year.
Using fixed screws would cause the tabletop to crack or warp as it tries to move against the rigid base.
Z clips or figure eight fasteners allow the top to slide slightly while remaining securely attached to the aprons.
Material Comparison
| Parameter | Description | Value |
|---|---|---|
| Pine | Low Cost and Wide Rustic Grain | Low Durability |
| Oak | Medium Cost and Prominent Classic Grain | High Durability |
| Walnut | High Cost and Dark Elegant Grain | Very High Durability |
| Maple | Medium Cost and Subtle Clean Grain | High Durability |
| Parameter | Description | Value |
Step by Step Instructions
Phase 1: Material Selection and Acclimation
Start by choosing high quality hardwood like oak or maple for maximum durability.
Once the lumber is brought into your workspace let it acclimate for at least one week.
This prevents the wood from shrinking or swelling after you have already cut your joints.
Check each board for excessive bowing or twisting before you begin the milling process.
Phase 2: Tabletop Plank Preparation
Rip your 2×8 boards to the final width of 36 inches total across the top.
Use a jointer or a table saw with a jointing jig to ensure every edge is perfectly square.
This step is vital for creating tight seams that do not require excessive filler.
Carefully mark the face of each board to maintain a consistent grain pattern across the surface.
Phase 3: Milling and Squaring the Top
Trim the ends of your planks to the final length of 72 inches using a crosscut sled.
Ensure all boards are cut to the exact same length to avoid uneven edges on the final piece.
Use a square to verify that every corner is exactly 90 degrees.
This precision prevents the table from looking crooked once it is assembled and finished.
Phase 4: Creating the Tabletop Glue up
Apply a generous bead of high quality wood glue to the joined edges of the planks.
Align the boards carefully and apply pipe clamps every 12 inches to ensure a tight fit.
Wipe away any excess glue immediately with a damp cloth to avoid finish blotches later.
Allow the glue to cure for 24 hours before moving the tabletop to the workbench.
Phase 5: Constructing the Leg Assemblies
Cut four heavy legs from 4×4 stock to a height of 28.5 inches.
Square the ends of each leg using a table saw to provide a clean mating surface for the aprons.
Ensure all four legs are identical in length to avoid a wobbly table.
Sand the legs lightly to remove any mill marks or imperfections from the lumber yard.
Phase 6: Building the Apron Framework
Cut the long aprons to 60 inches and the short aprons to 24 inches.
Use a pocket hole jig to drill holes into the ends of each apron piece.
This allows for a strong hidden connection to the legs without the need for complex tenons.
Ensure the pocket holes are drilled on the interior side to keep them invisible to the eye.
Phase 7: Joining Legs to the Aprons
Assemble the legs and aprons by driving 2.5 inch screws through the pocket holes into the legs.
Use a square at every corner to ensure the base is perfectly rectangular.
Double check the measurements diagonally to verify that the frame is not skewed.
Once the screws are tight the base should feel rigid and stable.
Phase 8: Attaching the Top with Expansion Fasteners
Route a small slot into the inside of the aprons to accommodate the Z clips.
Place the tabletop face down on a clean surface and center the base on top of it.
Insert the clips into the slots and screw them into the underside of the table.
This method allows the wood to breathe and prevents splitting over time.
Phase 9: Sanding and Surface Preparation
Begin sanding the entire table with 80 grit sandpaper to level any uneven glue joints.
Progress through 120 and 150 grit to remove the scratches from the previous pass.
Finish with 220 grit for a smooth professional feel across all surfaces.
Use a vacuum to remove all dust before applying any stain or sealant.
Phase 10: Applying the Final Protective Finish
Apply a high quality wood stain to achieve your desired color and depth.
Once the stain is dry apply multiple coats of a polyurethane or wax finish.
Sand lightly with 320 grit between coats to ensure a glass smooth surface.
Allow the final coat to cure completely for 72 hours before use.
Common Mistakes
Many beginners fail to acclimate their lumber to the shop environment before cutting.
This often leads to gaps in the tabletop or a frame that twists after assembly.
Over tightening clamps during the glue up phase can bow the tabletop planks.
This creates a concave surface that is difficult and time consuming to sand flat.
Using standard screws to attach the top directly to the base is a critical error.
This ignores the natural movement of wood and almost always results in surface cracks.
Skipping the intermediate sanding grits leads to visible swirl marks in the final finish.
These imperfections become highly visible once the polyurethane is applied to the wood.
Maintenance and Safety
Always wear a dust mask and safety goggles when operating power tools or sanding.
Ensure your workspace is well ventilated when applying stains or chemical finishes.
To maintain the finish avoid using harsh chemical cleaners or abrasive scouring pads on the surface.
Use a damp microfiber cloth and a mild soap for regular cleaning.
Apply a fresh coat of furniture wax every six months to protect the wood from moisture.
This prevents water rings from glasses and maintains the luster of the hardwood.
Pro Tip: To increase structural longevity apply a clear sealer to the underside of the tabletop.
This creates a moisture barrier that prevents the bottom from absorbing humidity and warping.