
Introduction
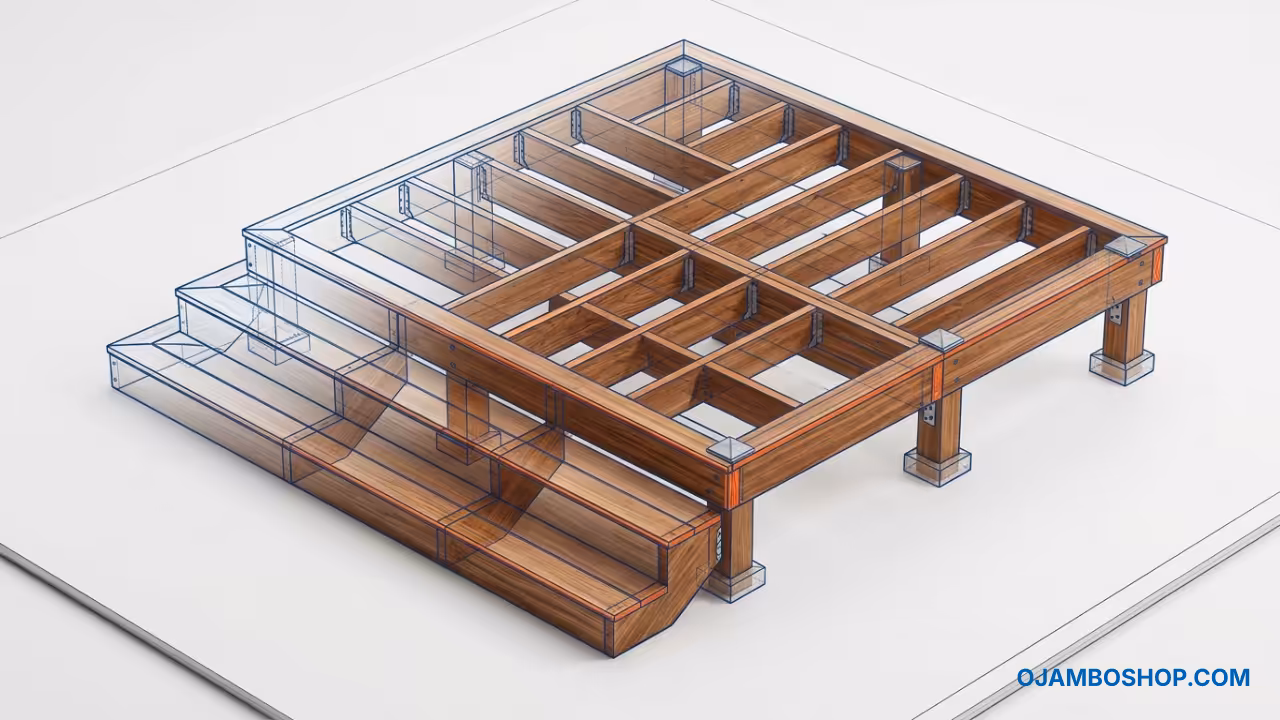
A low-profile tiered island deck transforms any backyard into a multi-level outdoor entertainment space without requiring extensive excavation or complex engineering. This floating deck design sits just above grade level, making it ideal for sloped yards, uneven terrain, or homeowners who want to maximize usable space without permanent foundation work. The tiered configuration creates distinct zones for dining, lounging, and gathering while maintaining clean sightlines across the entire structure.
The island deck concept means the structure stands independently in your yard rather than attaching to your home. This freestanding approach simplifies permitting requirements and allows flexible placement around existing trees, landscaping, or water features. Builders appreciate the straightforward framing system that uses standard lumber sizes and common fasteners available at any home improvement center.
Quick Specs
Dimensions: 16 feet wide by 20 feet long with three tiers at 6 inches, 12 inches, and 18 inches above grade. Estimated Cost: $1,800 to $2,400 depending on lumber selection and finish options. Difficulty Level: Intermediate requiring basic framing experience and accurate layout skills. Estimated Build Time: 40 to 50 hours over three to four weekends.
Materials and Tools
Lumber Requirements
- Pressure-treated 4×6 posts cut to 18 inches for support columns
- Pressure-treated 6×6 timbers for main beam and girder framing
- Pressure-treated 2×6 decking boards at 12 feet in length
- Pressure-treated 2×4 blocking and rim joists
- Treated 2×10 joists spaced at 16 inches on center
- Exterior-grade 5/4×6 composite or cedar for premium decking surface
Hardware and Fasteners
- 17d galvanized common nails for structural connections
- 3-inch structural screws rated for wet service
- Post bases with anchor bolts for ground mounting
- Joist hangers sized for 2×10 and 2×6 members
- 10d deck screws for decking attachment
- Construction adhesive rated for exterior use
Required Tools
- Circular saw with 7-1/4 inch blade
- Impact driver with 3/8 inch hex chuck
- Level at 4 feet for layout verification
- String line and stakes for alignment
- Tape measure at 25 feet
- Speed square for 45 and 90 degree cuts
- Post hole digger or auger
- Shovel and gravel for footings
Technical Layout
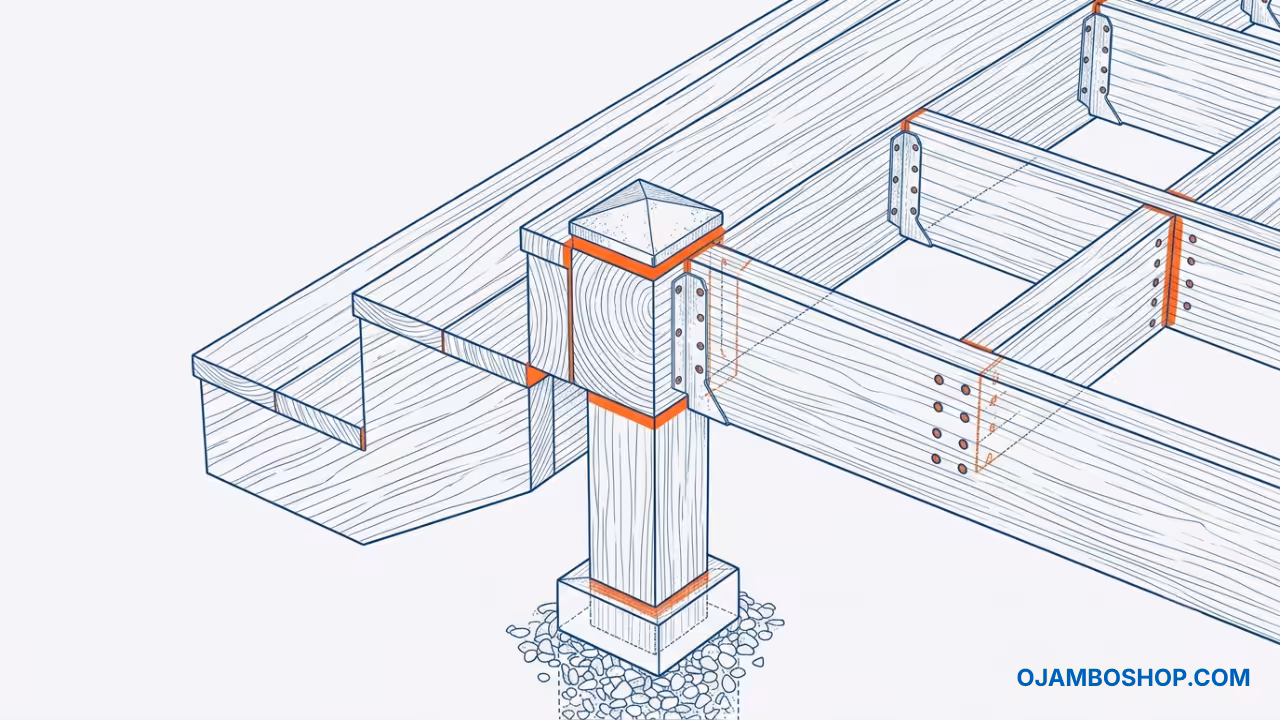
The structural framework relies on a post-and-beam system that distributes load evenly across multiple bearing points. Fourteen support posts anchor into concrete footings or compacted gravel pads at 48 inches on center along the perimeter and intermediate lines. Each post connects to a 6×6 main beam using galvanized post caps that transfer vertical loads directly into the ground. Joists run perpendicular to the beams at 16 inches on center, creating a rigid platform that resists deflection under foot traffic and furniture weight.
The tiered design incorporates three distinct elevation levels connected by integrated stair transitions. The lowest tier sits 6 inches above grade using 6-inch post extensions. The middle tier rises to 12 inches with doubled post heights, and the upper tier reaches 18 inches using the full post length. Rim joists at each level provide lateral stability and a clean edge profile. Blocking between joists at mid-span prevents torsional twisting and creates nailing surfaces for adjacent decking boards. This configuration eliminates the need for complex stair stringers while providing natural zone separation for different activity areas.
Step-by-Step Instructions
Phase 1: Site Preparation and Layout
Clear the build area of vegetation, rocks, and debris to create a level working surface. Use string lines to mark the exact 16 by 20 foot footprint with stakes at each corner. Verify all corners form perfect 90 degree angles using the 3-4-5 triangle method. Compact the soil evenly across the entire area and add a 2 inch layer of crushed gravel for drainage and stability.
Phase 2: Post Installation and Footings
Dig post holes at each marked location to a depth of 12 inches below the frost line for your region. Place 4×6 posts into each hole and set them plumb in all directions using temporary bracing. Fill holes with gravel or concrete according to local code requirements and allow concrete to cure for 24 hours before proceeding. Install galvanized post bases on top of each cured footing to elevate the wood above ground moisture.
Phase 3: Main Beam and Girder Assembly
Lay 6×6 timbers across the post bases at the center line and perimeter locations to create the primary support framework. Secure each beam to the posts using galvanized post caps with 17d nails driven through predrilled holes. Check all beams for level and square alignment before tightening final connections. Add cross-bracing between parallel beams where they span more than 8 feet without intermediate support.
Phase 4: Joist Installation and Layout
Position 2×10 joists perpendicular to the main beams at 16 inches on center spacing along the entire deck footprint. Attach each joist to the beams using appropriately sized joist hangers fastened with 10d nails or structural screws. Install rim joists around the perimeter of each tier level to create a closed rectangular frame. Verify that all joists remain level and flush with the rim joist faces using a straightedge.
Phase 5: Blocking and Mid-Span Support
Install 2×4 blocking between adjacent joists at the midpoint of each span to prevent rotation and lateral movement. Fasten blocking to both joist faces using 16d nails or 3-inch structural screws driven from the top. Add additional blocking near stair transition zones to reinforce the structure where concentrated loads will occur. This blocking also provides attachment surfaces for decking boards at perpendicular intersections.
Phase 6: Decking Board Installation
Lay decking boards parallel to the joists with a 1/4 inch gap between each board for drainage and expansion. Start at one corner and work across the deck, fastening each board with two 10d deck screws per joist intersection. Stagger board end joints by at least 4 feet to maintain visual continuity and structural integrity. Cut boards to fit around post locations and rim joist edges using a circular saw with a straight guide.
Phase 7: Tier Transitions and Stair Integration
Construct integrated stair sections at each tier change using 2×6 stringers cut with uniform rise and run dimensions. Install stair treads matching the decking material and secure them to stringers with structural screws from below. Add riser boards if desired for a finished appearance and enhanced safety. Ensure all stair transitions maintain consistent geometry and provide adequate headroom clearance.
Phase 8: Finishing and Sealant Application
Sand all decking surfaces with 80 grit followed by 120 grit sandpaper to remove mill marks and splinters. Apply a penetrating wood sealant or exterior stain rated for pressure-treated lumber according to manufacturer specifications. Allow the first coat to dry completely for 24 to 48 hours before applying a second protective layer. Install optional railing posts and handrails at tier edges where height differences exceed 30 inches for safety compliance.
Common Mistakes
Ignoring proper post depth leads to frost heave damage in colder climates and compromised structural stability over time. Builders must research local frost line requirements and dig accordingly rather than using shallow surface footings.
Skipping the blocking installation between joists causes deck bounce and squeaking under foot traffic. The mid-span blocking is not optional for a professional-quality build that will last decades.
Using untreated fasteners on pressure-treated lumber results in rapid corrosion and weakened connections within the first few years. Always specify hot-dipped galvanized or stainless steel hardware for exterior structural applications.
Failing to maintain consistent spacing gaps between decking boards traps moisture and accelerates wood rot. Use spacers or nail gauges to ensure uniform 1/4 inch gaps across the entire deck surface.
Maintenance and Safety
Inspect the deck structure annually for signs of wood deterioration, loose fasteners, or post base corrosion. Clean the decking surface with a deck cleaner and brightener solution every spring to remove mildew and prepare for fresh sealant application. Reapply protective sealant every two to three years depending on sun exposure and weather conditions in your region.
Wear appropriate personal protective equipment including safety glasses, hearing protection, and work gloves during all construction phases. Keep a first aid kit accessible on site and ensure all power tools have functioning ground fault circuit interrupters. Never work alone when operating circular saws or driving posts into the ground.
Pro-Tip: Use 3-inch structural screws rated for wet service instead of traditional nails for joist hanger connections. Structural screws provide superior withdrawal resistance and eliminate the popping and squeaking that occurs when nailed connections loosen over time due to wood shrinkage and seasonal movement. This single fastener upgrade significantly extends the service life of the entire deck structure.
Hardware Comparison
| Fastener Type | Diameter | Length | Best Application | Corrosion Rating |
|---|---|---|---|---|
| 17d Common Nail | 0.148 inch | 3 inch | Post cap connections | Hot-dipped galvanized |
| 10d Deck Screw | 0.148 inch | 2 inch | Decking attachment | Coated or stainless |
| 3-inch Structural Screw | 0.200 inch | 3 inch | Joist hanger fastening | Coated for wet service |
| Anchor Bolt | 0.375 inch | 4 inch | Post base mounting | Hot-dipped galvanized |
| Construction Adhesive | N/A | Cartridge | Supplemental bonding | Exterior grade polyurethane |