
Introduction
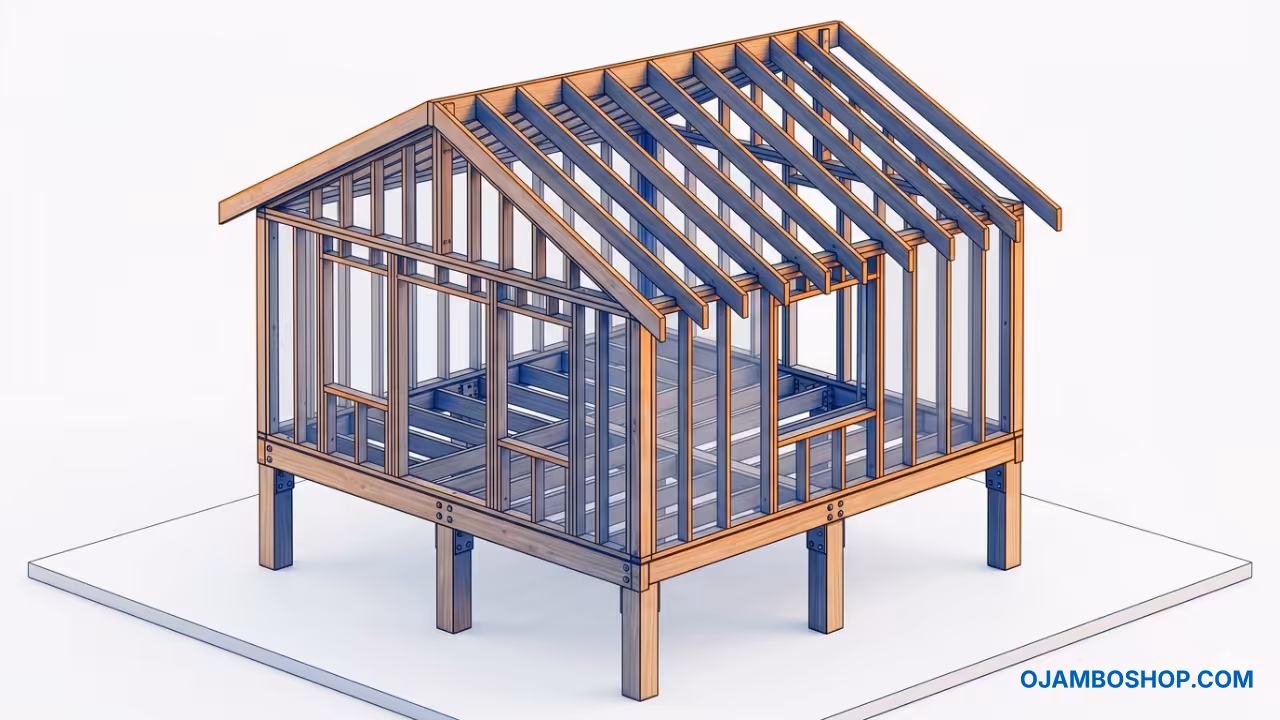
Imagine a tiny retreat that defies flooding, resists coastal winds, and sits gracefully above the tides. The Coastal-Ready Stilt-House Micro Cabin delivers 400 square feet of elevated living space designed for shoreline properties, flood zones, and waterfront lots. This structure combines minimalist small-living design with serious engineering for durability in harsh marine environments.
The cabin lifts the entire living envelope six feet above grade, allowing water, wildlife, and wind to pass underneath. This elevation strategy protects the interior from storm surges while creating a shaded outdoor deck area below. The result is a resilient, low-impact dwelling that adds significant value to coastal real estate.
Quick Specs
Dimensions: 20 feet wide by 20 feet deep with a 6-foot elevation and 14-foot peak roof height. Estimated Cost: $18,000 to $24,000 depending on local lumber prices and hardware. Difficulty Level: Advanced DIY requiring framing experience and basic concrete knowledge. Estimated Build Time: 120 to 160 hours over four to six weekends.
Materials and Tools
Lumber List
- Pressure-treated 6×6 posts (8 pieces at 8 feet long)
- Pressure-treated 4×6 beams (6 pieces at 22 feet long)
- Pressure-treated 2×10 floor joists (12 pieces at 20 feet long)
- Standard 2×4 studs (48 pieces at 8 feet long)
- Standard 2×6 rafters (20 pieces at 14 feet long)
- Standard 2×4 ceiling joists (20 pieces at 20 feet long)
- Exterior-grade 3/4-inch plywood sheets (28 sheets)
- Exterior-grade 1/2-inch CDX plywood sheets (16 sheets)
Hardware List
- 1/2-inch diameter anchor bolts (16 pieces at 12 inches long)
- 1/2-inch diameter lag screws (32 pieces at 6 inches long)
- 16d galvanized common nails (3 boxes)
- 3-inch structural screws (2 boxes)
- Galvanized hurricane ties (40 pieces)
- Galvanized joist hangers (24 pieces)
- 3/8-inch diameter through-bolts with washers (32 pieces)
- Stainless steel hinge sets (4 sets)
- Stainless steel latch hardware (2 sets)
Tools List
- Circular saw with 7-1/4-inch blade
- Chop saw or miter saw
- Ham drill with 1/2-inch masonry bit
- Post hole digger or auger
- Level (4-foot and 2-foot)
- Chalk line
- Speed square
- Tape measure (25 feet)
- Scaffolding or ladder
- Safety glasses and work gloves
Technical Layout
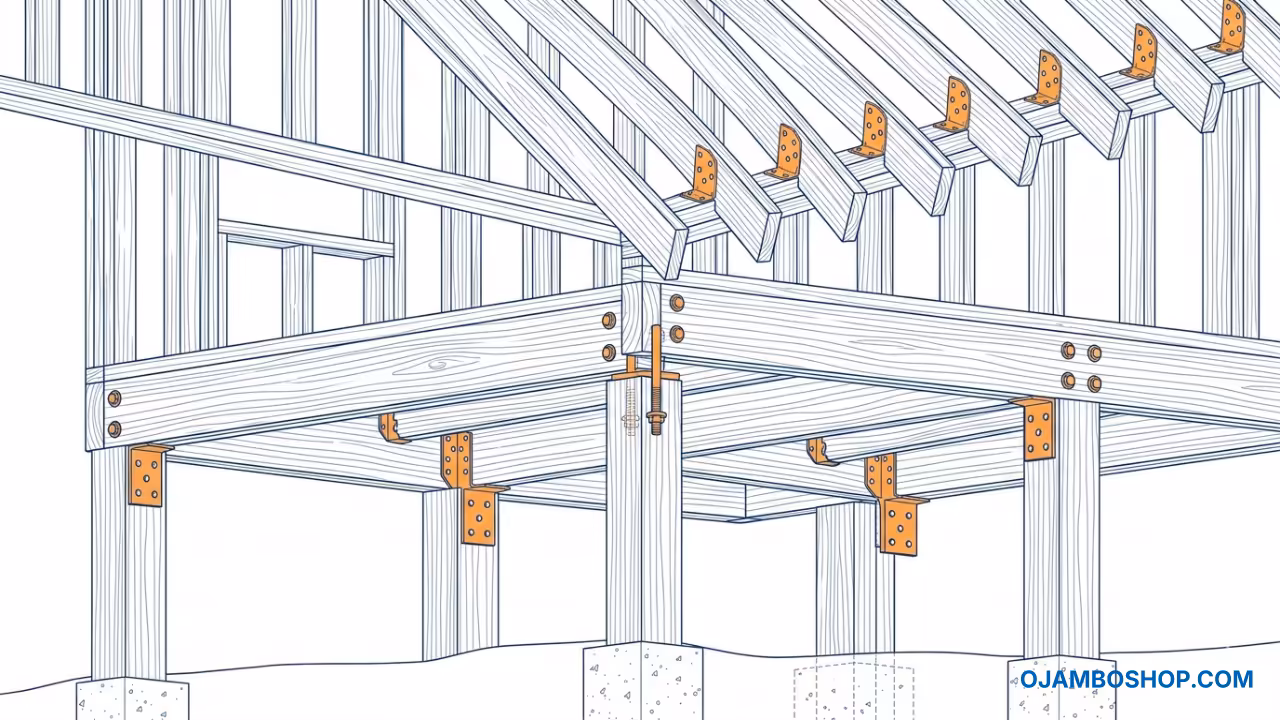
The structural skeleton of the Coastal-Ready Stilt-House Micro Cabin relies on eight vertical 6×6 pressure-treated posts embedded in concrete footings below the frost line. These posts transfer all dead and live loads directly into the ground while leaving the entire floor system suspended six feet above grade. Each post connects to horizontal 4×6 beams using 3/8-inch through-bolts with structural washers, creating a rigid moment frame that resists lateral wind forces.
The floor system spans 20 feet between beams using 2×10 pressure-treated joists spaced 16 inches on center. These joists support 3/4-inch exterior-grade plywood sheathing fastened with 8d galvanized nails at 6-inch spacing along all edges. The wall framing uses standard 2×4 studs at 16-inch spacing, topped with 2×6 double top plates that tie into the roof rafter system.
The roof employs a 6-on-12 pitch using 2×6 rafters that meet at a central 4×4 ridge beam. Each rafter connects to the top plate with a galvanized hurricane tie rated for 180 mph wind uplift. Ceiling joists run perpendicular to the rafters, forming triangular truss-like assemblies that prevent wall spreading under snow or wind loads.
Pro-Tip: Use hot-dipped galvanized or stainless steel fasteners exclusively in this build. Coastal salt air accelerates corrosion on standard zinc-plated hardware by up to 300 percent. Invest in the premium fasteners now to avoid structural softening within five years.
Step-by-Step Instructions
Phase 1: Site Preparation and Footings
Clear the build site of vegetation and debris, then mark eight post locations in a 20-by-20-foot square grid. Dig holes 36 inches deep and 18 inches wide at each location, extending below the local frost line if required by code. Pour 8 inches of crushed stone into the bottom of each hole for drainage, then set sonotube forms 24 inches in diameter.
Phase 2: Concrete Footings and Post Installation
Mix and pour high-strength concrete into each sonotube, embedding a 12-inch anchor bolt with a square washer at the center of each pour. Allow the concrete to cure for a minimum of 72 hours before proceeding. Dry-fit each 6×6 post onto the anchor bolts, check for plumb in both directions, then tighten the nuts with a wrench.
Phase 3: Beam Installation
Position the 4×6 pressure-treated beams horizontally across the tops of the posts, forming a rectangular perimeter with two cross beams in the center. Mark bolt hole locations through the beams into the posts, drill 3/8-inch diameter holes, and install through-bolts with washers on both sides. Torque each bolt until the beam sits flush against the post top.
Phase 4: Floor Joist Layout
Install 2×10 floor joists perpendicular to the long beams, spacing them 16 inches on center. Use galvanized joist hangers nailed to the beams with 10d nails on each side of the hanger bracket. Check the entire floor frame for square by measuring both diagonals and adjusting until they match exactly.
Phase 5: Floor Sheathing
Lay 3/4-inch exterior-grade plywood sheets across the joists, staggering the seams between rows. Fasten each sheet with 8d galvanized nails at 6-inch spacing along all edges and 10-inch spacing in the field. Leave a 1/8-inch gap between sheets to allow for seasonal expansion and contraction.
Phase 6: Wall Framing
Build the four exterior walls on the ground using 2×4 studs at 16-inch spacing, 2×4 bottom plates, and 2×6 double top plates. Cut rough openings for one 36-inch door and four 3-by-4-foot windows according to your floor plan. Lift each wall section into place, brace it temporarily with 2×4 scraps, and bolt the bottom plate to the floor sheathing with 1/2-inch lag screws.
Phase 7: Roof Framing
Install a 4×4 ridge beam centered on the top plates, supported by temporary king posts during construction. Cut 2×6 rafters with a 6-on-12 pitch angle and a plumb cut at the peak. Seat each rafter on the top plate and secure it with a galvanized hurricane tie. Install 2×4 ceiling joists between the rafter tails to complete the triangular bracing system.
Phase 8: Roof Sheathing and Weatherproofing
Nail 1/2-inch CDX plywood sheets to the rafters, starting from the eave and working toward the ridge. Apply a self-adhering ice and water shield membrane over the entire roof deck, overlapping each row by 6 inches. Install your chosen roofing material, such as standing-seam metal or asphalt shingles rated for high-wind zones.
Phase 9: Exterior Wall Sheathing and Siding
Cover all exterior walls with 1/2-inch CDX plywood sheathing, fastening with 8d nails at 6-inch spacing. Apply a house wrap moisture barrier over the sheathing, sealing all seams with compatible tape. Install your chosen exterior siding, such as board-and-batten cedar or fiber-cement panels, using corrosion-resistant screws.
Phase 10: Interior Finishing and Deck Railing
Install interior drywall or plywood paneling, add electrical wiring and plumbing rough-ins, and finish with paint or stain. Build a wrapped deck railing around the perimeter using 4×4 posts and 2×4 top and mid rails spaced to meet local building codes for guardrail height. Add a spiral staircase or straight stair tower for safe access to the elevated floor.
Common Mistakes
Skipping the diagonal bracing between posts and beams leaves the structure vulnerable to racking during high winds or seismic events. Always install X-bracing or shear panels in at least two opposing directions. Using standard galvanized nails instead of hot-dipped or stainless steel fasteners guarantees premature corrosion in salt-laden coastal air. Replace every fastener specification with marine-grade hardware before purchasing materials.
Neglecting to check the floor frame for square before nailing down the sheathing creates crooked walls and doors that will never close properly. Measure both diagonals and adjust the frame until they are identical within 1/8 inch. Failing to install hurricane ties on every rafter connection compromises the roof against uplift forces during storms. Each rafter must have a rated metal connector fastened with the manufacturer-specified nail pattern.
Maintenance and Safety
Inspect all fasteners and connections twice per year, tightening any loose bolts and replacing corroded hardware immediately. Apply a fresh coat of marine-grade spar urethane to all exposed wood surfaces every two years to prevent UV degradation and moisture intrusion. Wear safety glasses, hearing protection, and steel-toed boots during all cutting and drilling operations. Use a harness when working on scaffolding above six feet, and never stand on roof sheathing before the structural framing is fully secured.
Clean gutters and drainage channels quarterly to prevent water pooling on the deck or around the post bases. Trim nearby vegetation to maintain at least a 10-foot clearance around the cabin for fire safety and wind flow. Coastal environments demand proactive maintenance schedules to preserve structural integrity over decades of salt, sun, and storm exposure.