
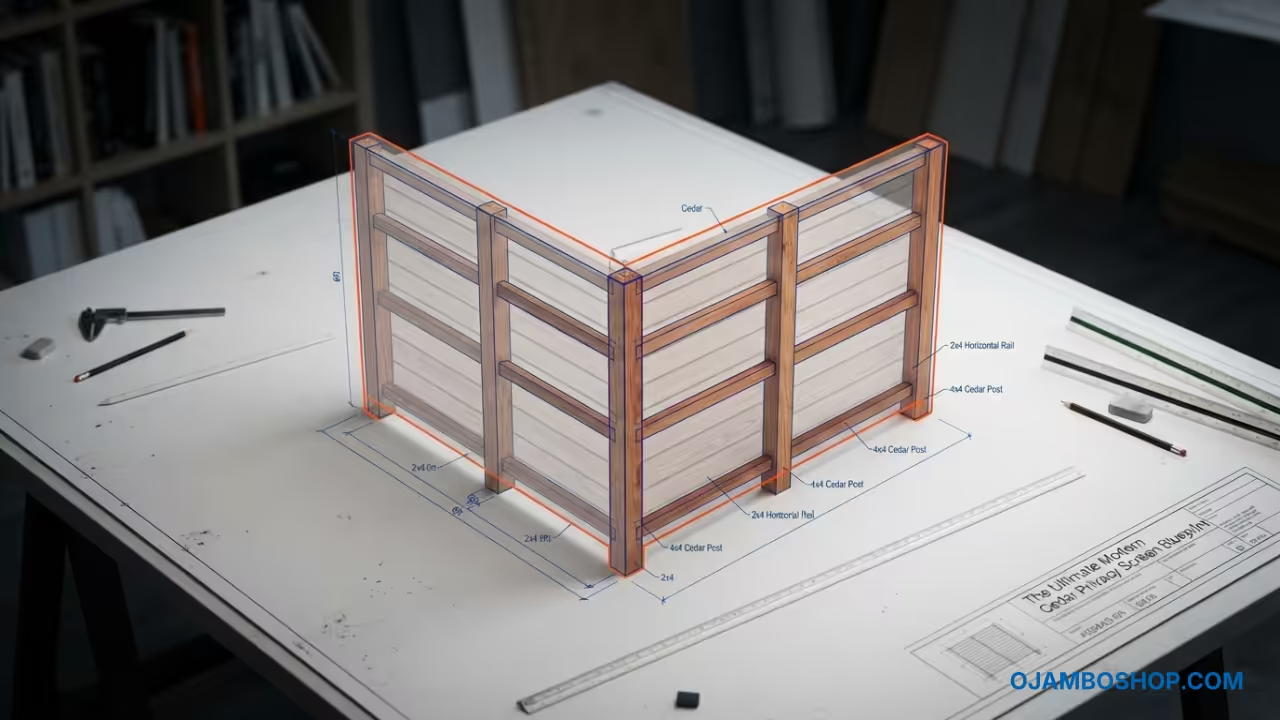
A well-designed privacy screen does more than just block the view of a neighbor. It transforms a fragmented backyard into a series of intentional outdoor rooms that enhance the overall utility of the property.
By installing a modern slatted screen, homeowners can create an intimate sanctuary for lounging or dining while adding a sophisticated architectural element to their landscape. This project balances open airflow with strategic visual occlusion to maintain a breezy yet private atmosphere.
These structures significantly increase property value by creating a sense of luxury and seclusion. Whether you are hiding an unsightly AC unit or defining a patio boundary, the linear geometry of a slatted screen provides a timeless aesthetic.
Disclosure: article includes affiliate links.

Quick Specs
Dimensions: 96 inches wide by 72 inches high.
Estimated Cost: 455 to 1179 USD.
Difficulty level: Intermediate.
Estimated build time: 8 to 12 hours.
Materials and Tools
Lumber Requirements
- Four 4×4 pressure treated posts 8 feet length
- Six 2×4 cedar boards 8 feet length for horizontal rails
- Twenty-four 1×3 cedar slats 8 feet length
- Three 4×4 pressure treated skids 8 feet length for the base
Hardware Requirements
- 3 inch deck screws stainless steel
- 2.5 inch wood screws galvanized
- 1/2 inch galvanized carriage bolts with washers and nuts
- Exterior grade wood glue
Required Tools
- Miter saw or circular saw
- Power drill and driver
- Level 4 foot
- Speed square
- Tape measure
- Kreg jig or pocket hole tool
- Orbital sander with 80 and 120 grit paper
- Safety glasses and hearing protection
| Parameter | Description | Value |
|---|---|---|
| Pressure Treated Pine | Cost | Low |
| Western Red Cedar | Cost | Medium |
| Composite Lumber | Cost | High |
| Pressure Treated Pine | Durability | High Chemical |
| Western Red Cedar | Durability | High Natural |
| Composite Lumber | Durability | Very High |
| Parameter | Description | Value |
Technical Layout
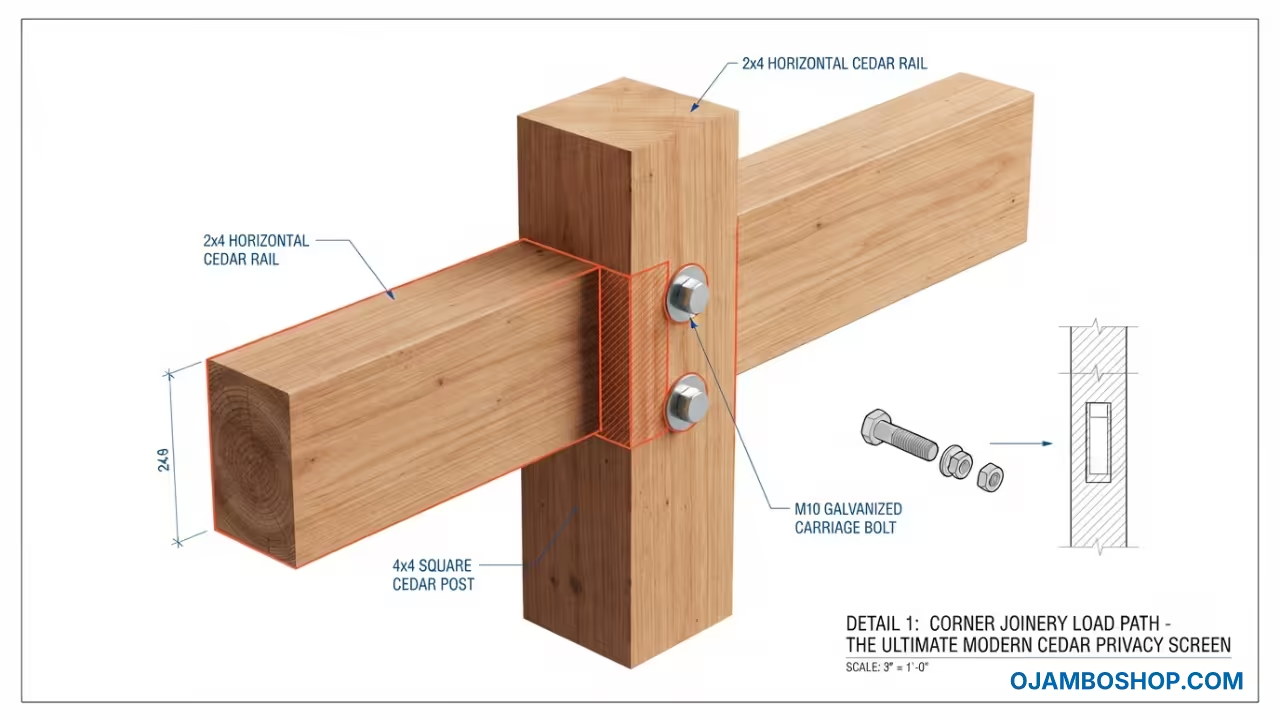
The structural integrity of a six foot privacy screen relies entirely on the relationship between the vertical posts and the horizontal load-bearing rails. In this design, we utilize a post-and-beam configuration where the 4×4 vertical members act as the primary anchors for the entire system.
To prevent the structure from racking or leaning under wind loads, the horizontal 2×4 rails are recessed into the posts or secured with heavy duty carriage bolts. The load-bearing capacity is distributed across these rails, which support the weight of the 1×3 decorative slats.
By maintaining a precise 1.5 inch gap between each slat, we reduce the wind sail effect that often topples lightweight privacy screens during storms. The foundation uses 4×4 skids that distribute the total weight across a wider surface area, preventing the posts from sinking into the soil.
This combination of deep-set verticality and reinforced horizontals ensures the screen remains plumb and square over many seasons of weather exposure.
Step-by-Step Instructions
Phase 1: Site Preparation and Leveling
Begin by marking the footprint of your screen using batter boards and string lines to ensure the layout is perfectly square. Clear all vegetation and debris from the installation area to create a flat surface for the base skids.
Use a long level to identify the highest and lowest points of the terrain. Dig small shallow trenches for the skids if the ground is uneven.
Phase 2: Assembling the Base Foundation
Lay your 4×4 pressure treated skids parallel to each other with a spacing of 6 feet between the outer edges. Connect these skids using short 2×4 cross-members to create a rigid rectangular frame.
Secure all joints using 3 inch deck screws and exterior wood glue. Ensure the base is perfectly level before proceeding to the vertical framing.
Phase 3: Setting the Vertical Posts
Position your 4×4 vertical posts at the corners of your base frame. Use a speed square to ensure every post is at a precise 90 degree angle to the ground.
Drill pilot holes through the posts and into the base skids to prevent the wood from splitting. Drive 1/2 inch carriage bolts through the assembly to lock the vertical members in place.
Phase 4: Installing Horizontal Load Rails
Measure and cut your 2×4 horizontal rails to fit snugly between the vertical posts. Install one rail six inches from the bottom and another six inches from the top of the structure.
Use pocket hole joinery or heavy duty L-brackets to secure these rails to the interior of the posts. This creates the primary skeleton that will hold the privacy slats.
Phase 5: Preparing the Slats
Cut your 1×3 cedar slats to the exact width of your internal frame. Use an orbital sander to smooth the edges of every slat to prevent splinters.
Ensure every cut is a perfect 90 degree angle to maintain a clean linear look. Organize the slats by length to ensure consistency during the installation process.
Phase 6: Spacing and Mounting Slats
Start by installing the bottom slat flush with the lower rail. Use a 1.5 inch spacer block to maintain an exact gap between the first and second slat.
Secure each slat using 2.5 inch galvanized wood screws driven through the slat into the 2×4 rails. Repeat this process moving upward until the frame is completely filled.
Phase 7: Structural Reinforcement
Add a center support rail between the top and bottom rails to prevent the slats from bowing over time. This vertical center post or horizontal mid-rail provides critical stability for screens over 6 feet in width.
Use wood glue at every contact point before driving in the final fasteners. Check the entire structure with a level one last time.
Phase 8: Finishing and Sealing
Fill all screw holes with a high quality exterior wood filler that matches the cedar tone. Sand the entire structure with 120 grit sandpaper to remove any rough patches.
Apply a professional grade UV-resistant clear sealer or a semi-transparent stain. Allow the finish to cure for 24 hours before placing any furniture near the screen.
Common Mistakes
The most frequent error is failing to use a spacer block when installing slats. Without a physical guide, the gaps will inevitably vary, resulting in a crooked appearance that is visually distracting.
Many builders forget to pre-drill their holes in the cedar slats. Cedar is a soft wood that splits easily when screws are driven directly into the grain near the edges.
Ignoring the wind sail effect is a dangerous mistake for tall screens. If the gaps between slats are too small, the screen acts like a giant sail and can be knocked over by high winds.
Using interior-grade screws in an outdoor environment leads to rapid failure. Standard screws will rust and leave black streaks down the cedar within a single season.
Maintenance and Safety
Pro-Tip: To maximize the longevity of your screen, install a rubber moisture barrier or a plastic shim between the 4×4 posts and the concrete or soil. This prevents capillary action from drawing moisture up into the end grain of the wood, which is where rot typically begins.
Wear safety glasses at all times when operating the miter saw or power drill. Use a dust mask when sanding cedar, as the fine dust can be an irritant to the respiratory system.
Keep a fire extinguisher nearby if you are using oil-based stains or sealers. Re-apply a UV-protective sealer every two years to prevent the cedar from turning a weathered silver-grey.
Inspect the carriage bolts annually and tighten them if the wood has shrunk due to seasonal humidity changes. Clean the slats with a mild soap and water solution to remove mildew or pollen buildup.