
Transform Your Backyard Into a Productive Workspace
Transform your unused backyard space into a fully functional workspace with this freestanding office pod. This compact eight by eight structure delivers serious productivity potential without overwhelming your property. Homeowners seeking a dedicated remote work zone will find this design perfectly balanced between affordability and practicality.
The gable roof configuration sheds water efficiently while providing generous interior headroom for standing desks and ergonomic setups. Building this pod yourself saves thousands compared to manufactured alternatives. You control every material choice and construction detail from the ground up.
The straightforward rectangular footprint simplifies framing and reduces waste during the cut list phase. This project fits comfortably within a single weekend for experienced builders or stretches across three weekends for first time framers.
Quick Specs
Overall Dimensions: 8 feet wide by 8 feet deep by 9 feet 6 inches tall at the ridge. Estimated Material Cost: 1200 to 1800 dollars depending on lumber availability and finish choices.
Difficulty Level: Intermediate. Estimated Build Time: 20 to 30 hours spread across two to three weekends. Roof Pitch: 6 on 12 slope for effective water drainage. Foundation Type: Pressure treated skid foundation with concrete pier supports.
Materials and Tools
Lumber Requirements
- Two by Four by Eight foot studs: 28 pieces
- Two by Six by Eight foot top and bottom plates: 10 pieces
- Two by Ten by Eight foot floor joists: 4 pieces
- Four by Four by Six foot pressure treated skids: 2 pieces
- Two by Four by Twelve foot rafters: 6 pieces
- Two by Four by Ten foot ridge board: 1 piece
- One half inch exterior grade plywood sheets for subfloor: 2 sheets
- Five eighth inch OSB sheets for wall sheathing: 6 sheets
- One quarter inch OSB sheets for roof sheathing: 4 sheets
- T11 exterior siding panels 4 by 8 feet: 8 panels
Hardware and Fasteners
- Three inch structural screws for framing: 250 count box
- Two and a half inch deck screws for sheathing: 150 count box
- One half inch by three and a half inch structural bolts with washers: 8 sets
- Galvanized hurricane ties for rafter connections: 12 pieces
- Sixteen gauge galvanized nail strips for sheathing: 4 boxes
- Exterior construction adhesive tubes: 4 tubes
Tools Required
- Circular saw with a 7 and a quarter inch blade
- Speed square and 16 foot tape measure
- Power drill with impact driver attachment
- Level and chalk line for layout work
- Reciprocating saw for trim work
- Safety glasses and hearing protection
Technical Layout
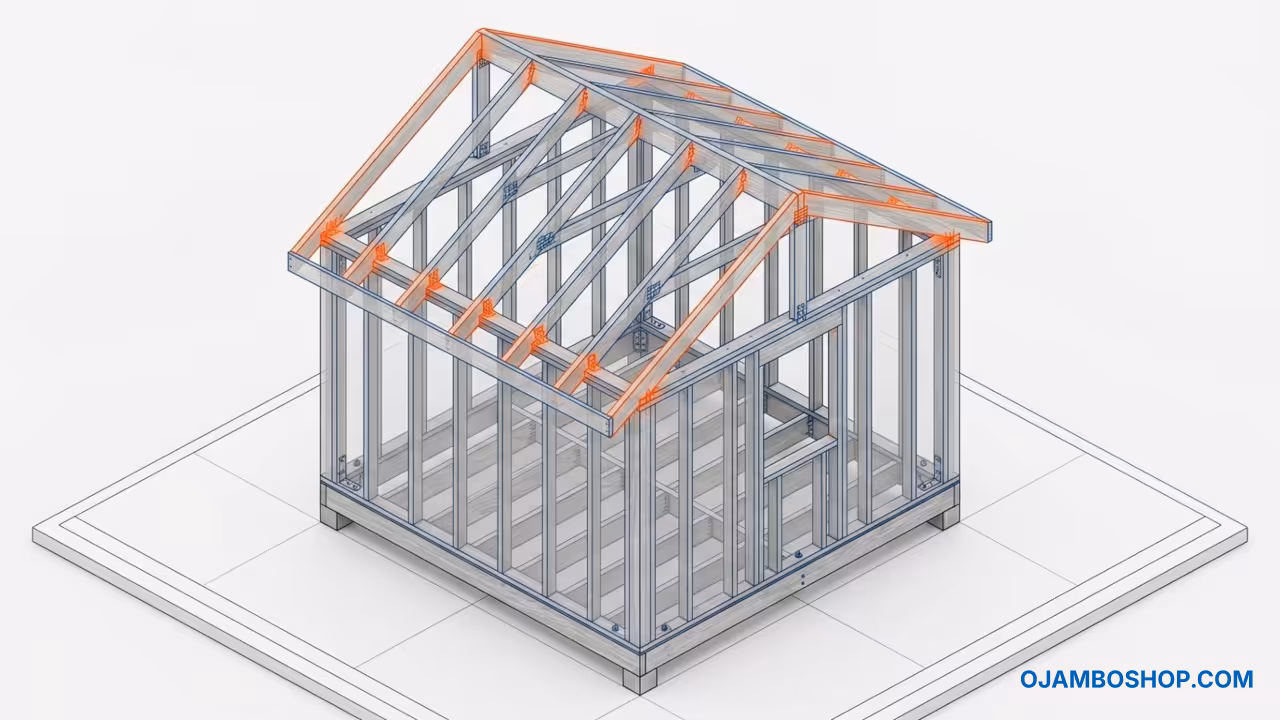
The structural framework relies on a conventional stud wall system with 16 inch on center spacing for optimal load distribution. Each wall assembly begins with a bottom plate that anchors directly to the pressure treated skid foundation using structural bolts. Vertical studs rise from this base plate and connect to a double top plate configuration that ties all four walls together into a rigid box structure. The double top plate runs continuously around the entire perimeter, creating a moment frame that resists lateral forces from wind loading.
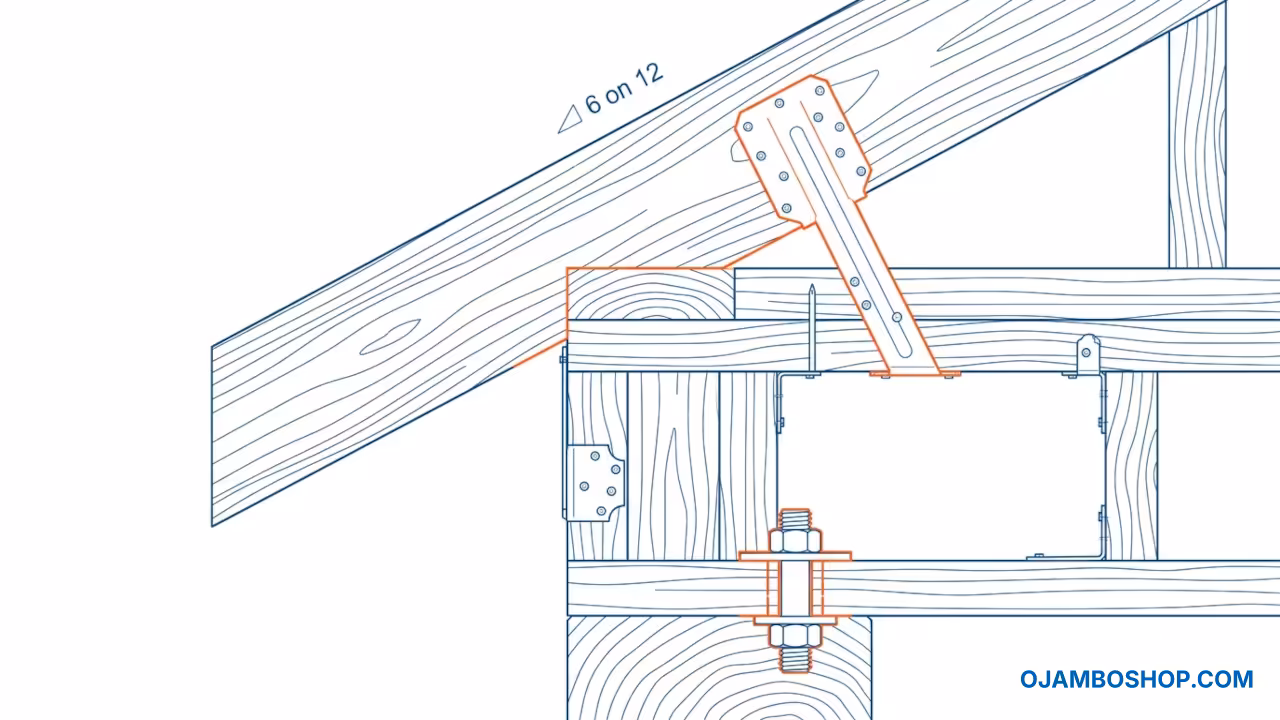
The gable roof system employs rafters cut with a 6 on 12 pitch angle. Each rafter features a birdsmouth notch carved into the bottom edge where it meets the wall plate. This triangular cutout creates a broad bearing surface that transfers roof loads directly into the wall framing below. The rafters converge at a central ridge board that runs the full 8 foot width of the structure. Hurricane ties secure each rafter to the top plate, preventing uplift during severe weather events.
This connection detail proves absolutely critical for long term structural integrity in exposed backyard locations. Pro-Tip: Use hot dipped galvanized structural screws instead of nails for all primary framing connections. The zinc coating provides superior corrosion resistance compared to standard bright finish screws, especially important for exterior structures exposed to moisture and temperature cycling. This small material upgrade extends the service life of your fasteners by decades.
| Fastener Type | Diameter | Length |
|---|---|---|
| Structural Wood Screw | 9 gauge | 3 inches |
| Deck Screw | 10 gauge | 2.5 inches |
| Structural Bolt | 0.5 inches | 3.5 inches |
| Common Nail | 12 gauge | 16 penny |
| Best Application | Corrosion Rating |
|---|---|
| Primary framing connections | Hot dipped galvanized |
| Sheathing attachment | Ceramic coated |
| Skid to plate anchoring | Hot dipped galvanized |
| Sheathing nailing | Galvanized |
Step by Step Instructions
Phase 1: Foundation Preparation
Clear and level an 8 by 8 foot area in your chosen backyard location. Remove all vegetation and grade the soil to create a flat working surface. Lay down a 4 inch layer of crushed gravel and compact it thoroughly with a plate compactor or by hand tamping. This gravel base provides drainage and prevents moisture from wicking up into your wooden foundation members.
Position the two pressure treated 4×4 skids parallel to each other with 6 feet 8 inches of spacing between their centerlines. This spacing allows for the 8 foot wide floor framing while keeping the skids within the structural footprint. Verify that both skids sit perfectly level using a 4 foot level placed across the tops. Adjust the gravel beneath each skid until you achieve a uniform level reading in both directions.
Phase 2: Floor System Assembly
Lay the four 2×10 floor joists perpendicular across the two skids with 16 inch on center spacing. The outer joists should align flush with the outside edges of each skid. Secure each joist to the skids using two 3 inch structural screws driven from the side of each skid into the end grain of the joist. This toenailing technique creates a solid mechanical connection that resists twisting forces.
Install the two half inch plywood subfloor sheets over the joist system. Stagger the seam so it lands on a center joist for proper support. Screw down the plywood using 2.5 inch deck screws spaced 6 inches apart along all edges and 12 inches apart in the field. Apply a continuous bead of construction adhesive along each joist top before laying the plywood to eliminate floor squeaks.
Phase 3: Wall Panel Construction
Lay out your first wall assembly on the subfloor. Place a 2×6 bottom plate and position 2×4 studs at 16 inch on center measurements along its length. You will need seven studs for each 8 foot wall section. Stand each stud plumb and temporarily brace it with scrap blocks. Cut and install a double 2×6 top plate assembly that runs the full wall length.
Secure all stud connections using two 3 inch structural screws at every intersection. Drive one screw from the plate into the stud end grain and one from the stud face into the plate edge. This cross nailing pattern creates a rigid wall panel that maintains its square geometry during lifting. Repeat this process for all four wall sections, marking locations for your door opening and any window rough openings before final assembly.
Phase 4: Wall Erection and Bracing
Lift the first completed wall panel into vertical position and temporarily brace it with 2×4 diagonal supports anchored to the floor. Check for plumb using a level placed against the outside face of the studs. Adjust the bracing until the wall reads perfectly vertical in both directions. Bolt the bottom plate to the skid foundation using 0.5 inch structural bolts with washers at each stud location.
Raise the second wall panel and connect its bottom plate to the first wall using the continuous double top plate system. The top plates should overlap by at least 16 inches at each corner for maximum strength. Secure the plate connections with 3 inch structural screws driven through the overlapping plates into each stud end. Repeat for the remaining two walls until all four walls form a complete rectangular box.
Phase 5: Roof Rafter Installation
Measure and mark the birdsmouth notch dimensions on each 2×4 rafter. The horizontal cut sits 1.5 inches up from the rafter bottom, and the sloped cut follows the 6 on 12 pitch angle. Cut each notch carefully using a circular saw for the horizontal cut and a reciprocating saw for the angled portion. The birdsmouth creates the critical bearing surface that transfers roof loads into the wall structure.
Install the ridge board centered across the top of the wall assembly, supported by temporary 2×4 jack posts during installation. Set each rafter pair into position with birdsmouths resting on opposite wall plates and peaks meeting at the ridge board. Secure each rafter to the top plate with a galvanized hurricane tie fastened with 10 penny nails. Screw the rafter peak to the ridge board using two 3 inch structural screws driven from the inside face.
Phase 6: Sheathing Installation
Begin with wall sheathing by attaching 5/8 inch OSB panels to the exterior face of each wall. Start from the bottom corner and work upward, maintaining 1/8 inch gaps between panels for expansion. Screw the sheathing using 2.5 inch deck screws spaced 6 inches apart on all edges and 12 inches apart in the field. This spacing meets building code requirements for wind resistance in most jurisdictions.
Install roof sheathing using 1/4 inch OSB panels laid perpendicular to the rafters. Maintain the same 1/8 inch spacing between all panels to allow for thermal expansion. Screw down every panel using 2.5 inch screws at 6 inch edge spacing and 12 inch field spacing. The roof sheathing must form a continuous diaphragm that distributes wind loads across the entire rafter system.
Phase 7: Exterior Siding and Trim
Apply T11 exterior siding panels over the wall sheathing starting from the bottom course. These pregrooved panels create an attractive board and batten appearance while providing weather resistance. Screw each panel to the wall studs using 2.5 inch deck screws placed at every stud location. Stagger the horizontal seams between adjacent panels by at least 16 inches for structural continuity.
Install fascia boards along both gable edges and the rake lines using 1×6 boards cut to match the roof pitch. These boards cover the exposed rafter tails and provide a finished appearance to the roof perimeter. Apply exterior grade caulk at all siding seams and around any window or door openings before painting. Use a quality exterior paint system with primer for maximum moisture protection and color retention.
Phase 8: Interior Finishing and Weatherproofing
Install interior drywall or plywood paneling on the inside faces for a finished workspace appearance. Run electrical wiring through the wall cavities before closing up the interior surfaces. Connect your electrical system to a properly grounded outdoor circuit with GFCI protection. Install insulation batts between wall studs and beneath the roof sheathing for thermal comfort during all seasons.
Apply a quality exterior stain or paint system to all exposed wood surfaces. Focus special attention on the foundation skids and bottom plates where moisture exposure remains highest. Install drip edge flashing along all roof edges and consider adding a small overhang to protect the walls from driving rain. Seal all penetrations and joints with exterior grade silicone caulk for complete weatherproofing.
Common Mistakes
Skipping the gravel base preparation leads to uneven settling and water pooling beneath the structure. Always compact your gravel foundation to at least 4 inches of depth before setting the skids. This simple step prevents rot and maintains structural level for decades.
Using nails instead of structural screws for primary framing connections reduces long term holding power. Nails can work loose over time due to wood shrinkage and temperature cycling. Structural screws maintain their grip indefinitely and provide superior withdrawal resistance in critical load bearing applications.
Neglecting hurricane tie installation at rafter connections creates a serious wind uplift vulnerability. These small metal connectors cost pennies per unit but prevent catastrophic roof failure during storms. Never skip this connection detail regardless of your local wind exposure conditions.
Installing roof sheathing without proper expansion gaps causes buckling and telegraphing through the finished roofing material. Wood expands and contracts with seasonal humidity changes. Maintaining 1/8 inch gaps between all panels accommodates this movement without compromising structural integrity.
Maintenance and Safety
Inspect your office pod foundation annually for signs of settling or moisture damage. Replace any pressure treated lumber that shows cracking or decay beyond surface checking. Keep the gravel drainage layer clear of debris to maintain proper water flow away from the structure. Relevel the skids if you notice door binding or floor slope developing over time.
Apply a fresh coat of exterior paint or stain every three to five years depending on sun exposure and weather severity. Focus on touch up repairs immediately when you notice peeling or cracking in the finish. These small maintenance actions prevent moisture intrusion that leads to rot and structural degradation. Clean gutters and fascia boards twice yearly to prevent water backup against the siding.
Always wear safety glasses and hearing protection when operating power tools during construction. Use a stable work platform or sawhorses when cutting long lumber pieces. Keep your work area clear of tripping hazards and maintain sharp tool blades for clean cuts. Never work alone when raising wall panels or handling heavy sheathing sheets. Install GFCI protection on all electrical circuits and consult local building codes before running permanent wiring through the structure.