
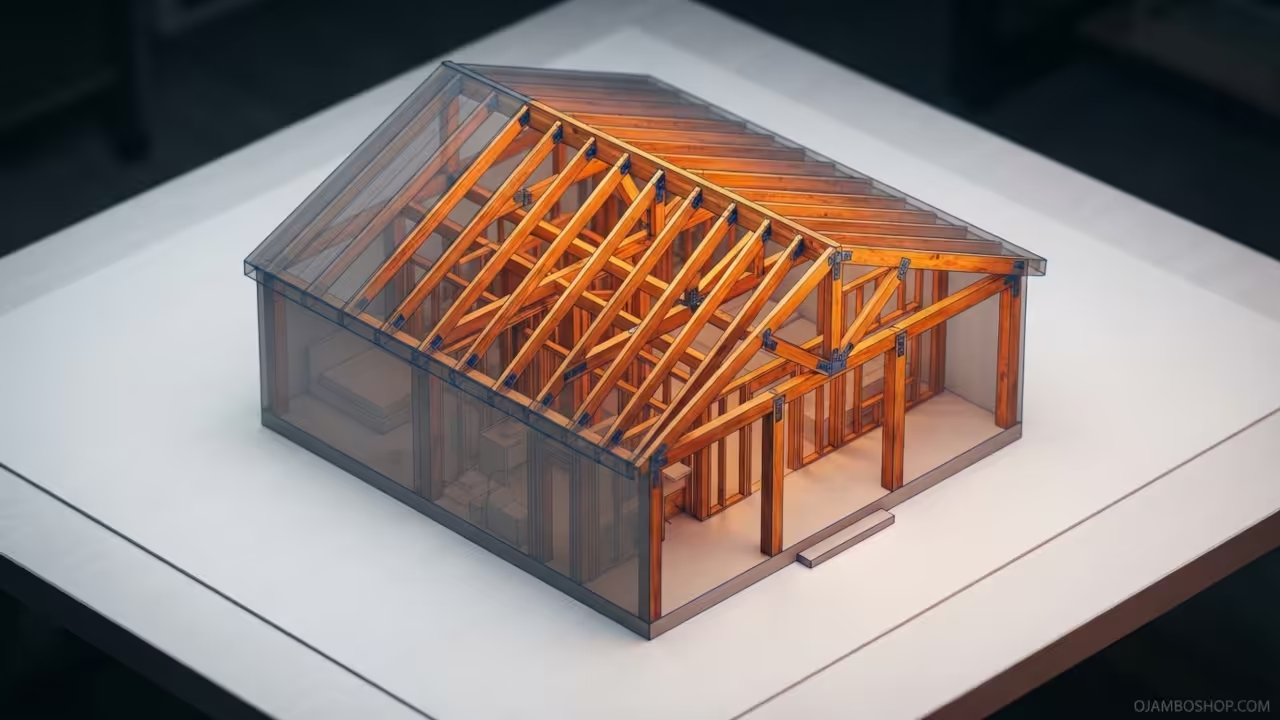
The modern shift toward small living has brought the barndominium into the mainstream spotlight for homeowners. These structures offer a unique blend of industrial strength and residential comfort that traditional homes often lack.
Building a compact eight hundred square foot residence allows you to maximize efficiency while reducing long term maintenance costs. This project provides a durable shelter that resists pests and extreme weather better than standard wood frame houses.
A single story layout ensures accessibility and simplifies the construction process for first time DIY builders. By focusing on a streamlined footprint, you can allocate more budget toward high quality interior finishes and energy efficiency.
Quick Specs
Dimensions: 20 feet by 40 feet.
Estimated Cost: 60,000 to 120,000 USD.
Difficulty Level: Moderate to High.
Estimated Build Time: 6 to 12 Months.
Materials and Tools
The foundation requires high strength concrete and grade sixty rebar for the perimeter footings. You will need a significant amount of crushed stone for the sub base to prevent future settling.
For the primary structure, purchase pressure treated six by six posts for the vertical load bearing members. Use two by ten kiln dried lumber for the roof rafters and gable end framing.
The exterior shell consists of twenty six gauge R panel steel siding and matching roofing panels. Ensure all metal components are coated with a factory baked finish to prevent oxidation and rust.
Fasteners must be high quality self tapping screws with EPDM rubber washers to create watertight seals. Use heavy duty galvanized joist hangers and hurricane ties to secure the roof to the wall frames.
For the interior, standard two by four studs are required for partition walls and closet framing. Select a high R value closed cell spray foam for the walls and ceiling to eliminate thermal bridging.
Required tools include a rotary laser level for precise site grading and foundation pouring. You will need a heavy duty impact driver and a cordless drill with a variety of masonry bits.
A metal shear or chop saw with a carbide blade is essential for cutting the steel panels. Rent a concrete mixer and a plate compactor for the initial ground preparation and slab installation.
Safety equipment must include a full body harness for roof work and an N95 respirator for insulation. Protective eyewear and steel toed boots are mandatory throughout every phase of the construction process.
| Parameter | Description | Value |
|---|---|---|
| Siding | Professional Grade | 26 Gauge Steel |
| Foundation | Professional Grade | Thickened Edge Slab |
| Insulation | Professional Grade | Closed Cell Foam |
| Fasteners | Professional Grade | Galvanized Steel |
| Framing | Professional Grade | Douglas Fir |
| Parameter | Description | Value |
Technical Layout
The structural integrity of this barndominium relies on a post frame construction system known as pole framing. In this layout, the primary weight of the roof is carried by the six by six vertical posts. These posts are anchored deep into the concrete footings to resist uplift and lateral movement during storms.
Horizontal girts are nailed between the posts at sixteen inch intervals to provide a nailing surface for the metal siding. This grid system creates a rigid cage that distributes the load evenly across the entire foundation slab. The roof uses a common rafter system with a ridge beam that prevents the walls from spreading outward.
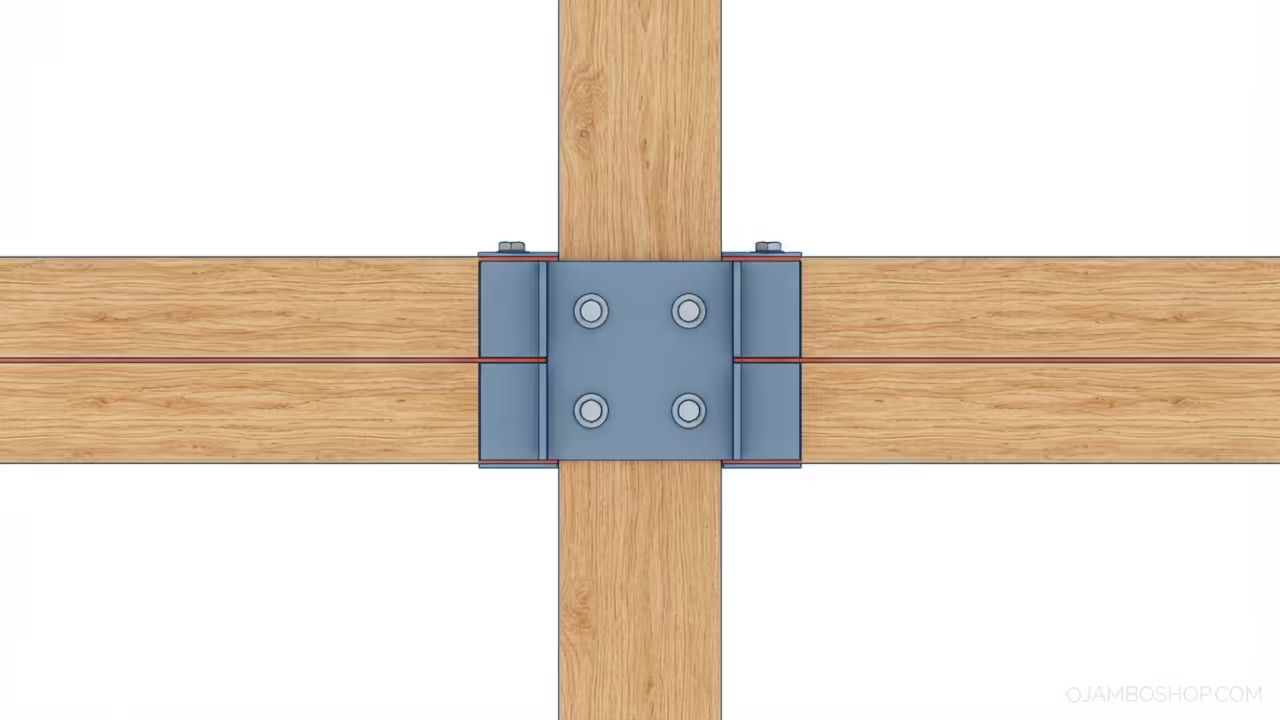
Every intersection between the vertical posts and the horizontal beams is reinforced with steel gusset plates. These plates ensure that the joints do not rotate or shift under the weight of heavy snow loads. The geometry of the twenty by forty footprint minimizes the span of the rafters, reducing the need for internal load bearing walls.
This open framing approach allows for a flexible interior floor plan that can be adapted as needed. The integration of the metal shell provides an immediate weather envelope, allowing interior work to proceed regardless of the season.
Step by Step Instructions
Phase 1 focuses on site preparation and the pouring of the concrete slab. Begin by clearing all organic debris and leveling the ground using a skid steer or handheld tools. Dig the perimeter footings to the depth required by your local frost line to prevent foundation heaving.
Lay down a six inch layer of compacted gravel and install a heavy duty vapor barrier. Place your rebar grid according to the blueprint, ensuring it is suspended in the middle of the pour. Pour the concrete and use a bull float to create a perfectly smooth surface for your flooring.
Phase 2 involves the installation of the primary vertical columns and support beams. Set your six by six posts into the pre cast holes or bolt them to the slab using heavy duty anchors. Use a laser level to ensure every post is perfectly plumb and aligned with the building perimeter.
Connect the top plates using two by ten beams that span the distance between the posts. These beams serve as the primary support for the roof and provide the upper structural tie for the walls. Double check the squareness of the building by measuring the diagonals from corner to corner.
Phase 3 is dedicated to roof framing and the setting of the trusses. Install the ridge beam at the center of the structure, supporting it with temporary vertical jacks. Cut and install the rafters, ensuring the birdsmouth notches fit tightly against the top plates.
Secure every rafter with hurricane ties to prevent the roof from lifting during high wind events. Install the roof purlins perpendicular to the rafters at twenty four inch intervals to support the metal panels. This creates a stable platform for the roofing material and ensures a consistent slope for water runoff.
Phase 4 covers the installation of the exterior metal sheathing and roofing panels. Start with the roof, overlapping the panels by one rib to prevent leaks at the seams. Drive the self tapping screws through the high ribs to ensure maximum water shedding.
Install the metal siding by starting at one corner and working across the length of the building. Align the panels carefully and use a spirit level to maintain a straight vertical line. Apply high quality sealant around all corners and junctions to prevent moisture from entering the wall cavity.
Phase 5 involves the integration of windows and doors into the metal shell. Cut the openings using a metal shear or a plasma cutter, following the exact dimensions of your frames. Install flashing tape around the perimeter of every opening to create a secondary water barrier.
Secure the window and door frames using structural screws and apply a professional grade caulk to the exterior. Ensure all units are properly leveled and shimmed to allow for smooth operation of the sashes and doors. This phase seals the building and allows you to begin the interior climate control.
Phase 6 shifts the focus to the interior framing of partition walls. Lay out the room dimensions on the slab using a chalk line to mark where the two by four plates will go. Build the wall frames on the floor and raise them into position, nailing them securely to the slab.
Install headers over the interior door openings to support the weight of the ceiling joists. Use a plumb bob to ensure the walls are perfectly vertical before securing them to the roof structure. This phase defines the living spaces, including the bedroom, bathroom, and open concept kitchen area.
Phase 7 is the rough in process for electrical wiring and plumbing lines. Run the main water supply lines and drain pipes through the slab or under the floor joists. Install the electrical panel and run Romex wiring to every planned outlet and switch location.
Ensure all wiring is secured with staples and protected by nail plates where it passes through studs. Install the HVAC ductwork or PEX piping for radiant heating while the walls are still open. This is the most critical phase for long term functionality and requires strict adherence to local building codes.
Phase 8 involves the application of insulation and the installation of the vapor barrier. Spray closed cell foam directly onto the interior of the metal shell to create a seamless seal. This material provides both thermal insulation and structural rigidity to the exterior skin.
Pay special attention to the corners and seams where air leaks are most likely to occur. Ensure the foam is applied at a consistent thickness to avoid cold spots and condensation buildup. Once the foam is cured, you have a highly energy efficient envelope that reduces heating and cooling costs.
Phase 9 covers the interior finishes, including drywall and flooring. Hang the drywall sheets horizontally to minimize the number of joints that require taping and sanding. Apply joint compound in three thin coats, sanding between each layer for a smooth finish.
Install the flooring, choosing a durable material like luxury vinyl plank or polished concrete. Paint the walls with a high quality acrylic latex paint in a light color to maximize natural light. This phase transforms the industrial shell into a comfortable and inviting residential living space.
Phase 10 focuses on the final trim and exterior detailing. Install baseboards, window casings, and door trim to hide the gaps between the drywall and the frames. Add the final exterior trim pieces and gutters to manage rainwater runoff away from the foundation.
Conduct a final walkthrough to ensure every screw is tight and every seal is watertight. Install the light fixtures and plumbing hardware to complete the functional aspects of the home. Your compact barndominium is now ready for occupancy and long term enjoyment.
Common Mistakes
One frequent error is the failure to properly manage the thermal bridge between the metal shell and the interior. If you do not use a continuous layer of spray foam, moisture will condense on the steel and cause rot.
Another mistake involves the improper installation of flashing around windows and doors. Using only caulk instead of professional flashing tape often leads to slow leaks that damage the interior framing.
Some builders ignore the importance of site drainage, leading to water pooling around the foundation. Ensure the ground slopes away from the building at a minimum of one inch per foot to protect the slab.
Finally, many DIYers underestimate the wind load requirements for metal buildings in open areas. Failing to use sufficient hurricane ties or anchor bolts can result in structural failure during severe weather events.
Maintenance and Safety
Treat the exterior metal panels with a specialized wax or sealant every five years to maintain the finish. Check all roof screws and rubber washers annually, replacing any that have cracked or shrunk due to UV exposure.
Inspect the perimeter of the foundation for cracks or signs of settling after every major seasonal change. Clean the gutters and downspouts regularly to ensure water is diverted far away from the concrete base.
Always wear a safety harness when working on the roof, as metal panels can become extremely slippery when wet. Use a respirator when applying spray foam or sanding drywall to avoid inhaling hazardous particles.
Ensure all electrical work is inspected by a licensed professional to prevent fire hazards. Keep a fire extinguisher in the kitchen and garage areas for immediate response to emergencies.