
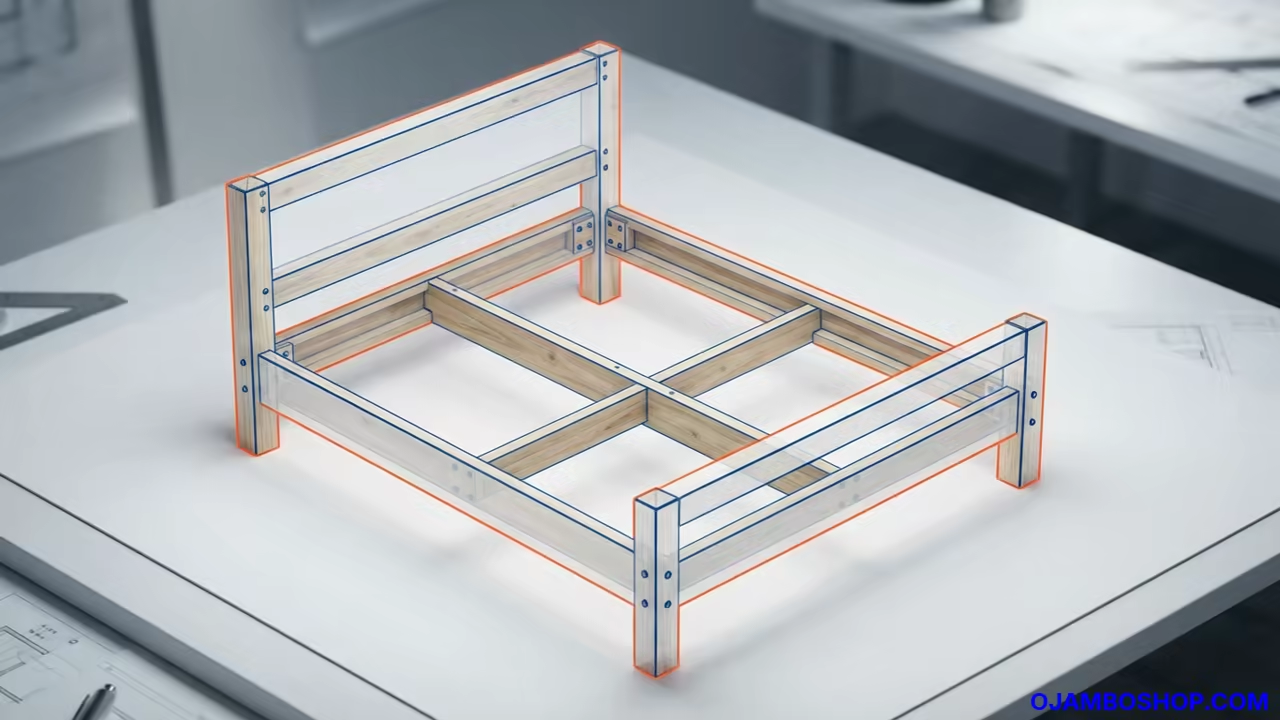
Professional Solid Wood Queen Bed Frame Blueprint
Investing in a handcrafted solid wood bed frame transforms a bedroom into a sanctuary of stability and timeless style. A custom build allows for superior material selection and structural integrity that mass produced furniture simply cannot match.
Building this piece increases the overall value of your home through the addition of high quality artisan furniture. You will create a focal point that stands the test of time while ensuring a supportive sleep surface.
Disclaimer: I may earn a commission from purchases made through these links at no extra cost to you.


Quick Specs
Dimensions: 62 inches width by 82 inches length by 42 inches headboard height.
Estimated Cost: 250 to 450 dollars depending on hardwood selection.
Difficulty Level: Intermediate.
Estimated Build Time: 18 to 24 hours of active labor.
Materials and Tools
The primary lumber for this project consists of premium hardwoods like White Oak or Black Walnut for the best results. You will need four 4×4 posts for the corners and 2×6 boards for the main side rails.
Support slats require 1×4 pine or poplar boards to keep the mattress ventilated and properly aligned. Use 2×4 lumber for the critical center support beam to prevent any mid section sagging over time.
Hardware requirements include heavy duty bed bolts with washers and nuts for the main frame connections. Use 2.5 inch pocket hole screws for the internal bracing and high quality wood glue for all permanent joints.
Essential tools include a compound miter saw for precise cross cuts and a power drill with a full set of bits. A random orbital sander with various grits is mandatory for achieving a professional furniture grade finish.
You will also need a speed square for ensuring 90 degree angles and a tape measure for absolute precision. Large bar clamps are necessary to hold components securely during the gluing and fastening process.
Technical Layout
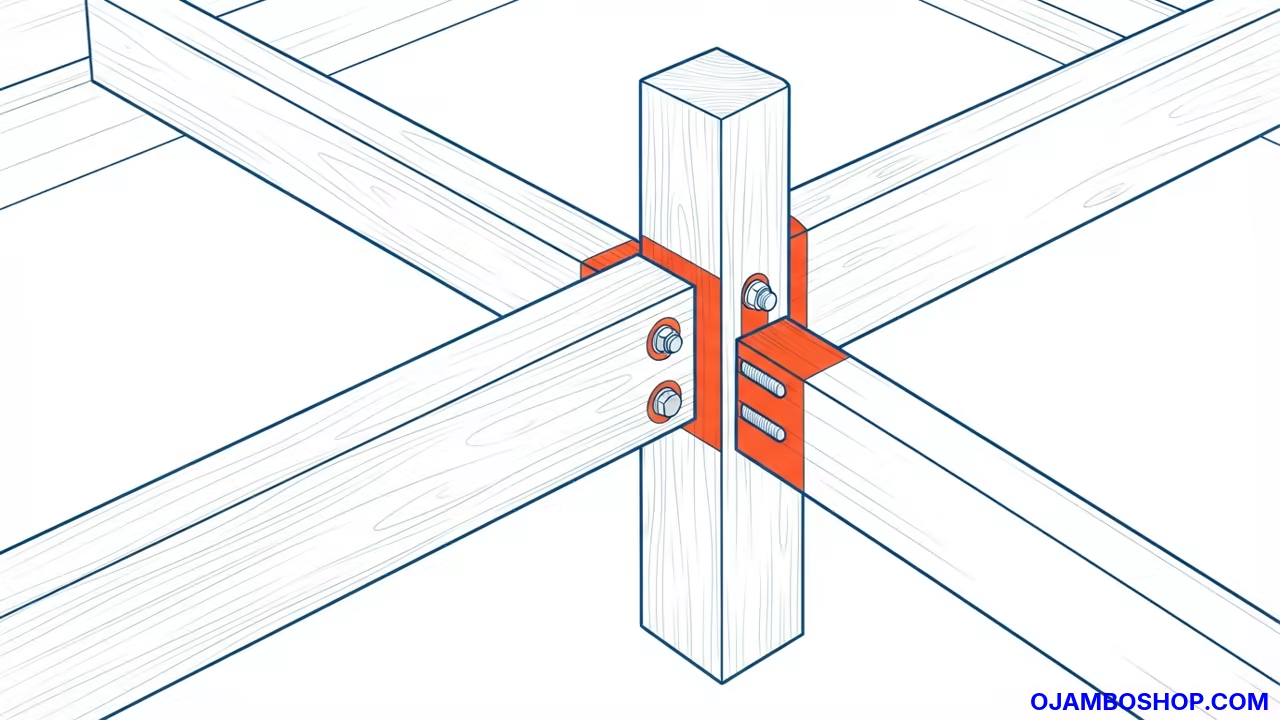
The structural integrity of this queen size frame relies on a distributed load bearing system centered around a heavy duty spine. The central support beam runs the full length of the bed and transfers weight directly to the head and foot posts.
This prevents the side rails from bowing and eliminates the common squeaking found in inferior bed frames. The rail to post connections utilize a bolt through design which allows for seasonal wood movement without compromising the joint.
Pocket hole joinery is employed for the slat supports to maintain a clean exterior aesthetic while providing rigid vertical stability. Every load bearing point is reinforced with a combination of mechanical fasteners and high strength adhesive.
The geometry is designed to cradle a standard sixty by eighty inch mattress with a half inch clearance on all sides. This ensures the mattress fits snugly without rubbing against the finished hardwood surfaces during movement.
Hardware Comparison
| Parameter | Description | Value |
|---|---|---|
| Main Fasteners | Standard Option | Wood Screws |
| Main Fasteners | Professional Option | Bed Bolts |
| Joint Method | Standard Option | Butt Joints |
| Joint Method | Professional Option | Mortise and Tenon |
| Support Beam | Standard Option | 2×4 Pine |
| Support Beam | Professional Option | 2×4 White Oak |
| Finishing Oil | Standard Option | Polyurethane |
| Finishing Oil | Professional Option | Hardwax Oil |
| Slat Spacing | Standard Option | 4 inch gap |
| Slat Spacing | Professional Option | 2 inch gap |
Step by Step Instructions
Phase 1 Milling and Material Preparation
Start by selecting the straightest boards available to avoid any twisting in the final assembly. Cut your 4×4 posts to the required heights for the headboard and the lower footboard.
Ensure every cut is perfectly square by using a speed square and a sharp miter saw blade. Sand all rough edges immediately after cutting to prevent splinters during the assembly process.
Organize your lumber by section to keep the workflow efficient and avoid mixing up different component lengths. Label each piece with a pencil to ensure the correct boards are used for the side rails.
Phase 2 Preparing the Corner Posts
Drill the primary bolt holes through the 4×4 posts at the exact height where the side rails will meet. These holes must be perfectly centered to ensure the bed frame remains square and balanced.
Create a shallow recess for the bolt heads using a Forstner bit to allow the hardware to sit flush. This prevents the bolts from snagging on bedding or causing discomfort to anyone near the frame.
Check the alignment of the holes across all four posts to ensure they match perfectly. Any deviation here will result in a frame that is twisted or difficult to assemble.
Phase 3 Constructing the Side Rails
Cut the 2×6 side rails to the precise length required for a queen size mattress footprint. Use a jointer or a hand plane to ensure the inner edges are perfectly straight and smooth.
Drill the corresponding bolt holes in the rails to match the holes previously drilled in the corner posts. Use a template to ensure the spacing between the holes is identical on both the left and right rails.
Apply a light coating of wax to the interior of the holes to make the future assembly smoother. This simple step prevents the wood from binding or splitting when you tighten the heavy duty bolts.
Phase 4 Assembling the Headboard
Lay the two tallest 4×4 posts on a flat work surface with the headboard rails positioned between them. Use pocket hole screws from the back side to create a hidden and strong connection.
Add a center cross member to the headboard to provide lateral stability and a mounting point for decorative elements. Ensure the cross member is centered exactly between the two main posts.
Check for squareness by measuring the diagonals of the headboard assembly to ensure they are equal. Tighten all fasteners once the geometry is verified and the structure is rock solid.
Phase 5 Building the Footboard
Repeat the assembly process for the footboard using the shorter 4×4 posts and the matching lower rail. The footboard provides the necessary counterbalance to the headboard and completes the rectangular perimeter.
Ensure the footboard rails are aligned perfectly with the headboard rails to maintain a consistent width. Use the same pocket hole technique to keep the fasteners hidden from the front view.
Verify that the footboard is perfectly square to prevent any gaps when the side rails are eventually attached. This phase ensures the bed does not wobble or shift during nightly use.
Phase 6 Joining the Main Frame
Position the side rails between the headboard and footboard posts and slide the bed bolts through the holes. Place a washer and a nut on the exterior of each post and tighten them firmly.
Do not over tighten the bolts until all four corners are connected to allow for slight adjustments. Once the frame is square, torque the bolts down to lock the structure into place.
Check the overall dimensions of the frame to ensure it measures exactly sixty two inches across. This precise fit ensures the queen mattress will sit perfectly within the hardwood borders.
Phase 7 Installing the Slat Support System
Attach the 2×4 center support beam using heavy duty joist hangers or reinforced pocket screws. The beam should run from the headboard to the footboard and be perfectly centered.
Install the 1×4 slats across the width of the frame with exactly two inches of spacing between each board. This spacing allows the mattress to breathe and prevents the buildup of moisture and heat.
Secure the slats using wood screws to prevent them from shifting or sliding during the night. Ensure the screws are countersunk so they do not snag the mattress fabric.
Phase 8 Final Sanding and Surface Prep
Start the sanding process with 80 grit sandpaper to remove any glue squeeze out or machine marks. Progress to 120 grit and finally 220 grit for a buttery smooth surface touch.
Pay close attention to the corners and edges to remove any sharp points that could cause injury. Vacuum the entire frame thoroughly to remove all dust before applying any finish.
Wipe the wood down with a tack cloth to ensure no microscopic particles remain on the surface. This step is critical for achieving a professional look and preventing bumps in the finish.
Phase 9 Applying the Finish
Apply a high quality hardwax oil or polyurethane to protect the wood from spills and wear. Use a lint free cloth or a high density foam brush to apply the finish in thin layers.
Allow the first coat to dry completely before lightly sanding with 320 grit sandpaper between applications. This removes any raised grain and creates a professional level of smoothness.
Apply a final top coat and allow the bed frame to cure for at least seventy two hours. This ensures the finish is hard enough to handle the weight of the mattress and occupants.
Common Mistakes
Many builders forget to install a center support beam which leads to the mattress sagging in the middle. This mistake ruins the sleep quality and can eventually warp the side rails over time.
Over tightening the bed bolts can cause the hardwood posts to split along the grain lines. Use a torque wrench or feel for the resistance to avoid crushing the wood fibers.
Skipping the intermediate sanding steps often results in a finish that feels rough or looks uneven. A professional result requires a disciplined progression through the sandpaper grits.
Using soft pine for the main load bearing posts can lead to instability and joint failure. Always use a hardwood like Oak or Maple for the primary structural components of the frame.
Maintenance and Safety
Check the tightness of the bed bolts every six months to account for natural wood shrinkage. Tightening these fasteners prevents the frame from developing squeaks or becoming unstable over the years.
Apply a fresh coat of furniture wax annually to maintain the luster and protect the wood from moisture. Avoid using harsh chemical cleaners that can strip the finish or discolor the natural wood grain.
Always wear a dust mask and safety glasses when cutting and sanding hardwood to protect your lungs. Use a stable workbench and secure your lumber with clamps to prevent accidental slips during cutting.
Ensure the room is well ventilated when applying oils or polyurethanes to avoid inhaling toxic fumes. Store any flammable rags in a sealed metal container to prevent spontaneous combustion.
Pro Tip for Structural Longevity
To maximize the lifespan of your bed frame use stainless steel hardware and a moisture barrier on the feet. Adding small rubber pads to the bottom of the 4×4 posts prevents moisture from wicking up from the floor.
This is especially important for bedrooms with hardwood or tile floors where condensation can occur. Using stainless steel prevents rust streaks from forming on your beautiful hardwood posts over the decades.