
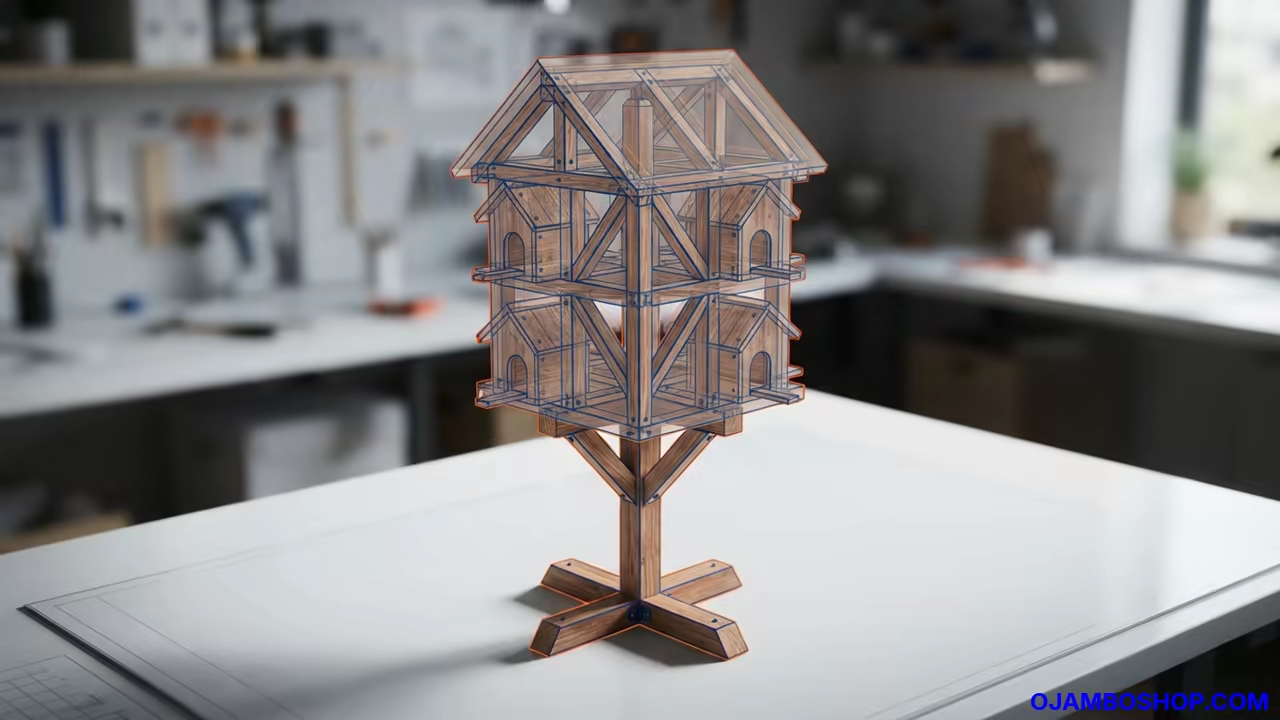
Multi Tier Backyard Birdhouse Sanctuary Station
Bringing a diverse array of avian life into your own backyard transforms a simple outdoor space into a living sanctuary. A multi tier birdhouse station provides the necessary verticality and spacing to attract various species while serving as a stunning architectural centerpiece for any garden.
This project combines functional ornithological design with classic woodworking techniques to create a durable structure. By providing multiple nesting heights and varied hole sizes you effectively cater to a wide spectrum of local birds.
The resulting station not only supports local biodiversity but also increases the overall aesthetic value of your residential property. It offers a rewarding building experience that balances structural engineering with artistic craftsmanship.
Quick Specs
Dimensions 48 inches width by 48 inches depth by 84 inches total height.
Estimated Cost 175 to 250 USD depending on lumber grade.
Difficulty Level Intermediate.
Estimated Build Time 14 to 18 total working hours.
Materials and Tools
For the primary structure you will need three 4×4 cedar posts at 8 feet length and six 2×4 cedar boards at 8 feet length. Use 1×6 cedar planks for the individual birdhouse boxes and a 4×8 sheet of 1/2 inch exterior grade cedar plywood for the base.
Hardware requirements include a large box of 2.5 inch stainless steel exterior screws and a smaller set of 1.25 inch galvanized finishing nails. Purchase a set of 4 inch heavy duty L brackets for the primary arm supports and high quality waterproof wood glue.
Essential tools include a miter saw for precise angle cuts and a circular saw for breaking down larger sheets. You will also need a cordless drill with a full set of driver bits and a variety of Forstner bits for creating the birdhouse entry holes.
Additional equipment should include a speed square a 4 foot spirit level and a tape measure. For finishing keep a random orbital sander with 80 and 120 grit sandpaper and a set of high quality exterior paint brushes.
Disclaimer: I may earn a commission from purchases made through these links at no extra cost to you.


Technical Layout
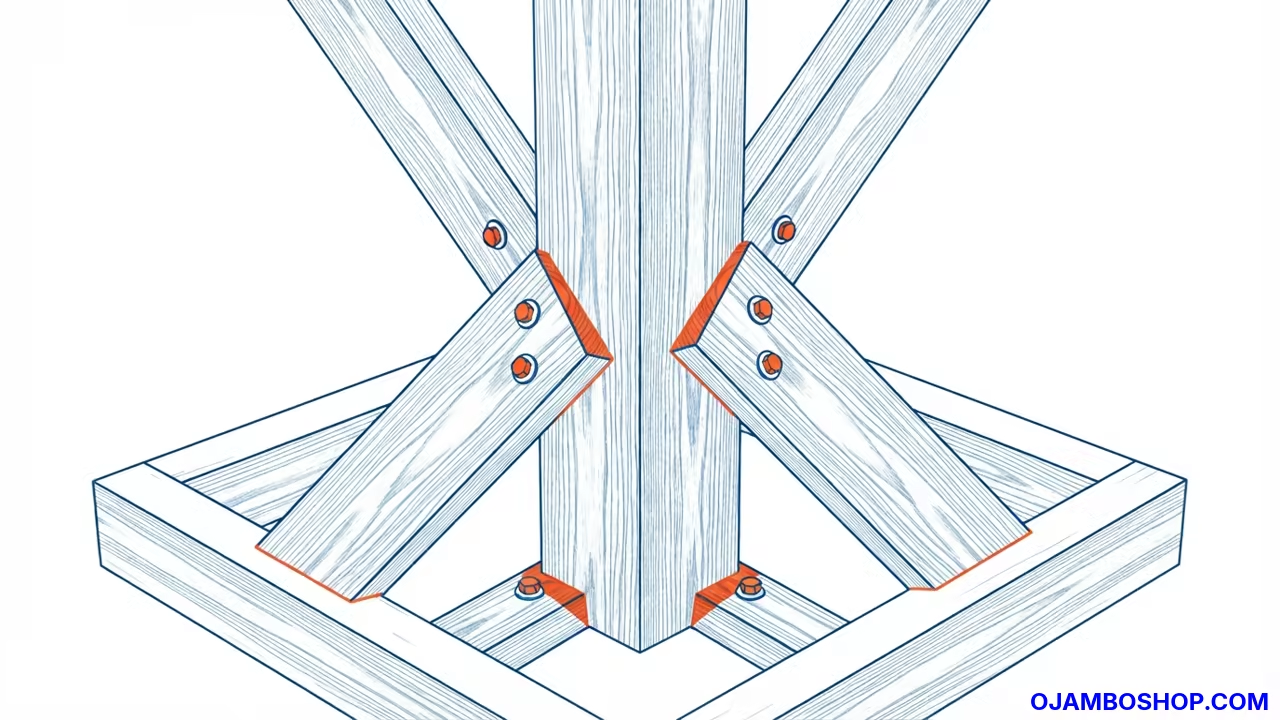
The structural integrity of the station relies on a centralized 4×4 vertical column that acts as the primary load bearing member. This central mast is anchored into a reinforced 48 inch square base frame consisting of 2×4 joists spaced 16 inches on center.
To prevent racking and ensure long term stability the station utilizes a series of 45 degree diagonal braces that transfer the weight of the cantilevered arms back into the main column.
Each cantilevered arm is constructed from 2×4 stock and is secured to the central mast using a combination of heavy duty L brackets and 3 inch structural screws. The birdhouse modules are then mounted to these arms with a specific offset to prevent territorial disputes between different bird species.
This geometric arrangement ensures that the center of gravity remains low and centered over the base. The use of cedar provides natural resistance to decay and insects without the need for toxic chemical treatments.
All joints are reinforced with waterproof adhesive and mechanical fasteners to withstand high wind loads and the weight of multiple nesting pairs.
| Parameter | Description | Value |
|---|---|---|
| Material | Main Structure | Western Red Cedar |
| Material | Ground Contact Base | Pressure Treated Pine |
| Material | Internal Bracing | Douglas Fir |
| Material | Floor Panels | Plywood Exterior |
| Fasteners | All Connections | Stainless Steel Screws |
| Fasteners | Shingle Attachment | Galvanized Nails |
| Parameter | Description | Value |
Step by Step Instructions
Phase 1 begins with site preparation and the installation of the base. Clear a level 4 foot square area of all debris and vegetation to prevent moisture buildup under the structure.
Lay the 4×4 skids parallel to each other and build a 2×4 perimeter frame around them to create a stable platform. Secure the floor plywood to this frame using 1.25 inch screws every 8 inches along the edge.
Phase 2 focuses on the erection of the central support column. Position the 8 foot 4×4 post exactly in the center of the base frame and use a spirit level to ensure it is perfectly plumb.
Drive three 6 inch structural lag bolts through the base frame and into the bottom of the post to lock it in place. This connection is the most critical point of the build and must be absolutely rigid.
Phase 3 involves the fabrication of the arm support brackets. Cut four 2×4 members to 18 inches in length and miter the ends at 45 degrees to create the diagonal braces.
Attach these braces to the central column using the L brackets and structural screws to create a stable platform for the birdhouses. Ensure each arm is perfectly level using your spirit level before final tightening.
Phase 4 is dedicated to the construction of the individual birdhouse modules. Cut your 1×6 cedar planks into front back side and roof pieces according to the species you wish to attract.
Drill the entry holes using Forstner bits ensuring that the diameter matches the specific requirements for bluebirds wrens or chickadees. Assemble the boxes using waterproof wood glue and galvanized finishing nails for a clean look.
Phase 5 requires the installation of the birdhouse modules onto the cantilevered arms. Space the boxes at least 12 inches apart to reduce competition and aggression among the birds.
Secure the boxes using 1.25 inch exterior screws driven through the bottom of the arm into the base of the birdhouse. Ensure the entry holes are facing different directions to provide privacy for the nesting pairs.
Phase 6 involves the construction of the top decorative cap and weather shielding. Cut a 2×2 square frame to fit the top of the 4×4 post and attach a small pyramidal roof structure.
Cover this roof with cedar shingles or a piece of copper flashing to prevent water from seeping into the end grain of the post. This protects the core of the structure from rot and extends the life of the station.
Phase 7 focuses on the surface preparation and sanding. Use the random orbital sander to remove all sharp edges and splinters from the arms and birdhouse exteriors.
Start with 80 grit for heavy removal and finish with 120 grit for a smooth professional feel. Pay close attention to the entry holes to ensure there are no jagged edges that could harm the birds.
Phase 8 concludes with the application of a protective finish. Apply a clear food safe exterior sealer or a non toxic water based stain to the exterior surfaces only.
Never paint or stain the interior of the birdhouses as the fumes can be lethal to hatchlings. Allow the finish to cure for 48 hours before introducing the station to the wild.
Phase 9 is the final positioning and orientation. Move the completed station to a location that receives morning sun but is protected from strong prevailing winds.
Ensure the station is not placed too close to thick brush where predators like cats or raccoons can easily jump onto the arms. Finalize the setup by adding a few bird feeders to the lower arms to attract initial interest.
Common Mistakes
One of the most frequent errors is using pressure treated lumber for the actual nesting boxes. The chemicals used to treat the wood are toxic to developing embryos and can cause significant health issues for the birds.
Always use natural cedar or redwood for the interior chambers.
Another mistake is failing to include drainage holes in the bottom of the birdhouses. Without small 1/4 inch holes in the floor rainwater can collect and drown the nestlings or cause the nest to mold.
Always drill four small holes in the corners of each floor panel.
Many builders also forget to include a way to clean out the boxes after the nesting season. Failing to provide a hinged roof or a removable side panel makes it impossible to remove old nesting material.
This leads to parasite buildup and reduces the success rate of future broods.
Maintenance and Safety
To maintain the structural integrity of the station inspect all fasteners every six months. Tighten any screws that have loosened due to the natural expansion and contraction of the wood.
Check the base for signs of rot and apply a fresh coat of sealant to the ground contact points annually.
Safety during the build requires the use of impact resistant safety glasses and hearing protection when operating power saws. Always wear a dust mask when sanding cedar as the fine particles can be an irritant to the respiratory system.
Work on a flat stable surface to prevent the structure from tipping during the assembly phase.
Weatherproofing is best achieved by maintaining a good overhang on the birdhouse roofs. Ensure the roof extends at least 2 inches beyond the front wall to keep rain out of the entry hole.
Adding a drip edge to the main station roof will also prevent water from running down the central column.
Pro Tip for Longevity Use stainless steel screws instead of galvanized ones for all critical joints. While more expensive stainless steel will not react with the natural tannins in the cedar wood preventing those ugly black streaks from forming over time and ensuring the fasteners never rust through.