
Outdoor Bar-Height Deck Railing Table: The Ultimate DIY Woodworking Project
Transform your outdoor living space with a custom-built bar-height deck railing table that seamlessly integrates with your existing deck structure. This project combines functional design with structural integrity, creating a perfect spot for entertaining guests or enjoying a quiet evening drink while taking in the view.
The bar-height configuration allows for comfortable standing or seating on high stools, making it an ideal addition to any outdoor entertainment area. This woodworking project is designed for intermediate builders who have experience with basic framing and joinery techniques.
Quick Specs
Dimensions: 48 inches wide by 24 inches deep by 42 inches tall from deck surface to tabletop. Estimated Cost: $150 to $250 depending on lumber grade and finish choice.
Difficulty Level: Intermediate. Estimated Build Time: 6 to 8 hours including finishing.
Materials and Tools
Lumber Requirements
- Pressure-treated 4×4 posts for vertical supports
- Kiln-dried cedar or redwood 1×6 boards for tabletop
- Exterior-grade plywood for structural backing
- 2×4 framing lumber for internal bracing
Hardware List
- 3-inch exterior-grade deck screws
- 2-inch structural screws for railing attachment
- Stainless steel hinge pins for adjustable supports
- Weather-resistant wood glue
- Galvanized carriage bolts with washers
Required Tools
- Circular saw with carbide-tipped blade
- Cordless drill with impact driver
- Speed square and tape measure
- Level and plumb bob
- Orbital sander with 80, 120, and 220 grit paper
Technical Layout

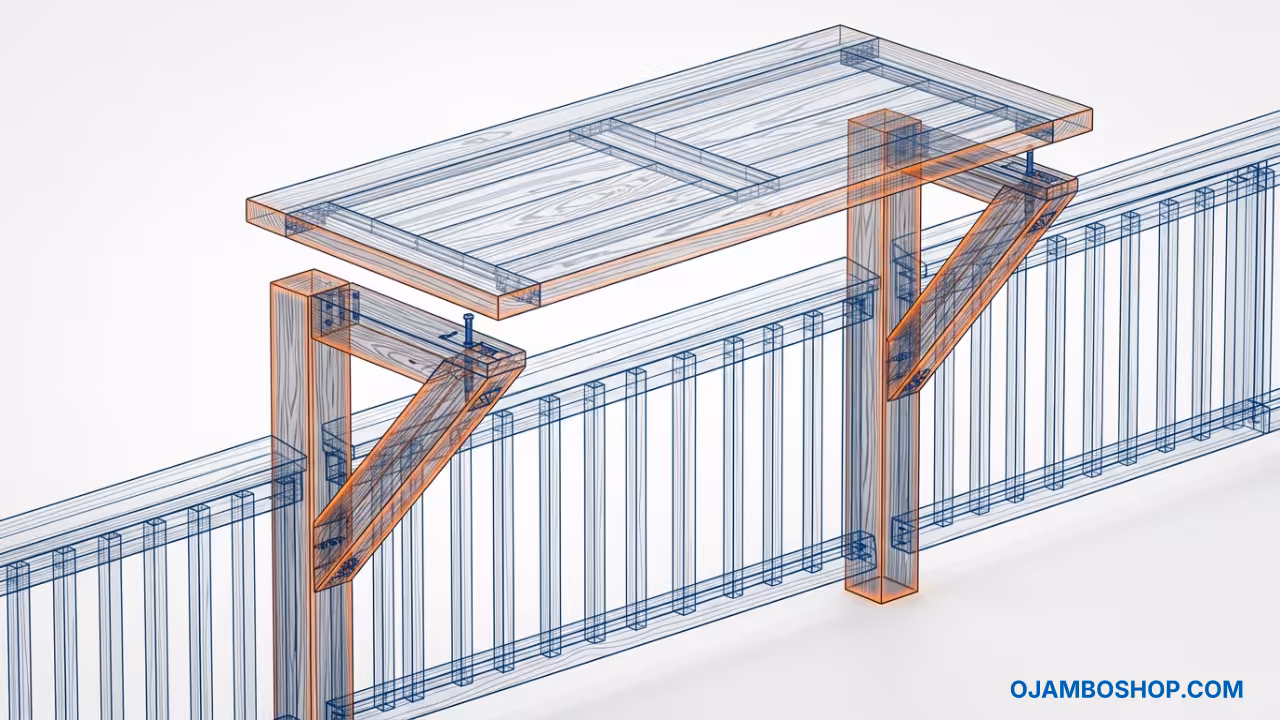
The structural framework of this bar-height railing table relies on a triangulated support system that distributes weight evenly across the deck railing structure. Two vertical 4×4 posts serve as the primary load-bearing members, connecting to the deck surface through the existing railing post holes or via surface-mounted brackets.
These posts extend upward to support a horizontal ledger board that runs the full width of the table. The tabletop assembly uses a 3/4-inch exterior-grade plywood subframe that attaches to the ledger board through concealed bracket connections.
This creates the floating appearance while maintaining structural rigidity. The 1×6 cedar boards form the visible surface, spaced with 1/4-inch gaps for drainage and expansion. Cross-bracing between the vertical posts prevents lateral movement and ensures the table remains stable under load.
A critical design element is the adjustable support arm that connects the tabletop frame to the deck railing at a 45-degree angle. This angle provides optimal load distribution and allows for minor height adjustments during installation. The connection points use stainless steel hardware to prevent corrosion and maintain structural integrity over years of outdoor exposure.
Step-by-Step Instructions
Phase 1: Measure and Mark Attachment Points
Begin by measuring the exact spacing between your deck railing posts. Mark the center points on both the top and bottom rails where the table supports will attach. Use a level to ensure your marks are perfectly aligned horizontally. Transfer these measurements to your 4×4 vertical support posts.
Phase 2: Cut and Prepare Vertical Supports
Cut two 4×4 posts to a height of 40 inches using a circular saw with a straight-edge guide. Sand all cut surfaces smooth and apply a coat of exterior wood preservative to the end grain. Pre-drill attachment holes at the marked locations, spacing them 12 inches apart vertically.
Phase 3: Install Base Brackets
Mount stainless steel L-brackets to the deck railing at your marked attachment points. Use structural screws that penetrate at least 1.5 inches into the railing posts for secure holding power. Verify that both brackets are level and square before tightening all fasteners completely.
Phase 4: Attach Vertical Posts
Slide the prepared 4×4 posts into the mounted brackets and secure them with carriage bolts through the pre-drilled holes. Use a level to ensure both posts are perfectly vertical. Install cross-bracing between the posts at mid-height using 2×4 lumber cut at 45-degree angles.
Phase 5: Build the Tabletop Frame
Construct a rectangular frame using 2×4 lumber measuring 44 inches by 20 inches on the inside dimensions. Join the corners with pocket screws and exterior wood glue for maximum strength. Attach a 3/4-inch plywood sheet to the frame using deck screws spaced 6 inches apart.
Phase 6: Install Cedar Tabletop Boards
Lay out the 1×6 cedar boards across the plywood subframe, leaving 1/4-inch gaps between each board. Secure each board with deck screws driven through the subframe from below. Stagger the board ends to fall on the frame members for proper support.
Phase 7: Create the Floating Connection
Fabricate adjustable support arms from 2×4 lumber cut at 45-degree angles. Attach these arms to the underside of the tabletop frame and the deck railing using stainless steel hinges. This allows for fine height adjustments and accommodates any slight irregularities in the railing alignment.
Phase 8: Sand and Apply Finish
Sand the entire tabletop surface with 80-grit paper, followed by 120 and 220 grit for a smooth finish. Apply two coats of marine-grade spar urethane, allowing 24 hours of drying time between coats. Seal all cut ends and fastener heads with exterior-grade wood filler.
Common Mistakes
Many builders fail to account for the expansion and contraction of wood in outdoor conditions. Always leave adequate spacing between tabletop boards and use fasteners that allow for some movement. Using interior-grade plywood or screws will result in premature failure and potential safety hazards.
Another frequent error is inadequate attachment to the deck railing. The table must connect to structural members, not just surface rails. Always verify that your attachment points reach into solid wood or metal posts capable of supporting the dynamic loads generated during use.
Pro-Tip: Install a moisture barrier membrane between the tabletop subframe and the cedar boards. This simple step prevents water accumulation and extends the life of your table by several years. Use exterior-grade construction adhesive to create a continuous seal around all fastener penetrations.
Maintenance and Safety
Inspect all fasteners and connections every six months, tightening any loose hardware immediately. Clean the tabletop with mild soap and water, avoiding pressure washers that can damage the finish. Reapply protective coating annually to maintain weather resistance.
Always wear appropriate safety gear including eye protection and hearing protection when cutting lumber. Ensure your work area is stable and that all tools are in good working condition. Never exceed the weight capacity of your deck railing system, and consider professional installation if you are unsure about structural adequacy.
Apply a fresh coat of spar urethane every two years to protect against UV damage and moisture penetration. Check for signs of wood rot or insect damage during routine inspections, addressing any issues before they compromise structural integrity.