
The concept of modular living has transformed from a niche architectural trend into a practical solution for modern homeowners. These 12 by 12 modular pods offer a scalable approach to expanding your living space without the overwhelming cost of a traditional home addition.
By utilizing a grow as you go strategy, you can build a single functional unit today and seamlessly attach additional pods as your budget or family needs evolve. This flexibility makes it an ideal choice for backyard offices, guest suites, or a gradual transition into a full tiny home.
The beauty of the 12 by 12 footprint lies in its geometric simplicity and structural efficiency. It provides enough room for a comfortable living area while remaining small enough to avoid complex engineering requirements in many jurisdictions.
Quick Specs
- Dimensions: 12 feet by 12 feet per pod
- Estimated Cost: 4500 to 7500 USD depending on finish materials
- Difficulty Level: Intermediate
- Estimated Build Time: 120 to 160 man hours
Materials and Tools
Lumber Requirements
- Pressure treated 4×4 skids for ground contact
- 2×6 pressure treated floor joists
- 2×4 kiln dried studs for wall framing
- 2×6 rafters for the roof system
- 3 4 inch tongue and groove subfloor plywood
- 1 2 inch CDX exterior sheathing
- OSB roof decking
Hardware and Fasteners
- 3 inch and 3 5 inch galvanized deck screws
- 16d common nails for framing
- Joist hangers and hurricane ties
- Exterior grade construction adhesive
- High quality house wrap and flashing tape
- Asphalt shingles or corrugated metal roofing panels
Required Tools
- Miter saw and circular saw
- Impact driver and cordless drill
- 4 foot bubble level and laser level
- Framing square and speed square
- Pneumatic framing nailer
- Heavy duty stapler for house wrap
- Chalk line and measuring tape
Material Comparison
| Component | Standard Grade | Premium Grade | Recommended Choice |
|---|---|---|---|
| Floor Joists | Standard Pine | Pressure Treated | Pressure Treated |
| Wall Studs | Standard SPF | Clear Grade Pine | Standard SPF |
| Sheathing | OSB | CDX Plywood | CDX Plywood |
| Roofing | Asphalt Shingle | Standing Seam Metal | Standing Seam Metal |
| Fasteners | Zinc Plated | Hot Dipped Galvanized | Hot Dipped Galvanized |
Technical Layout
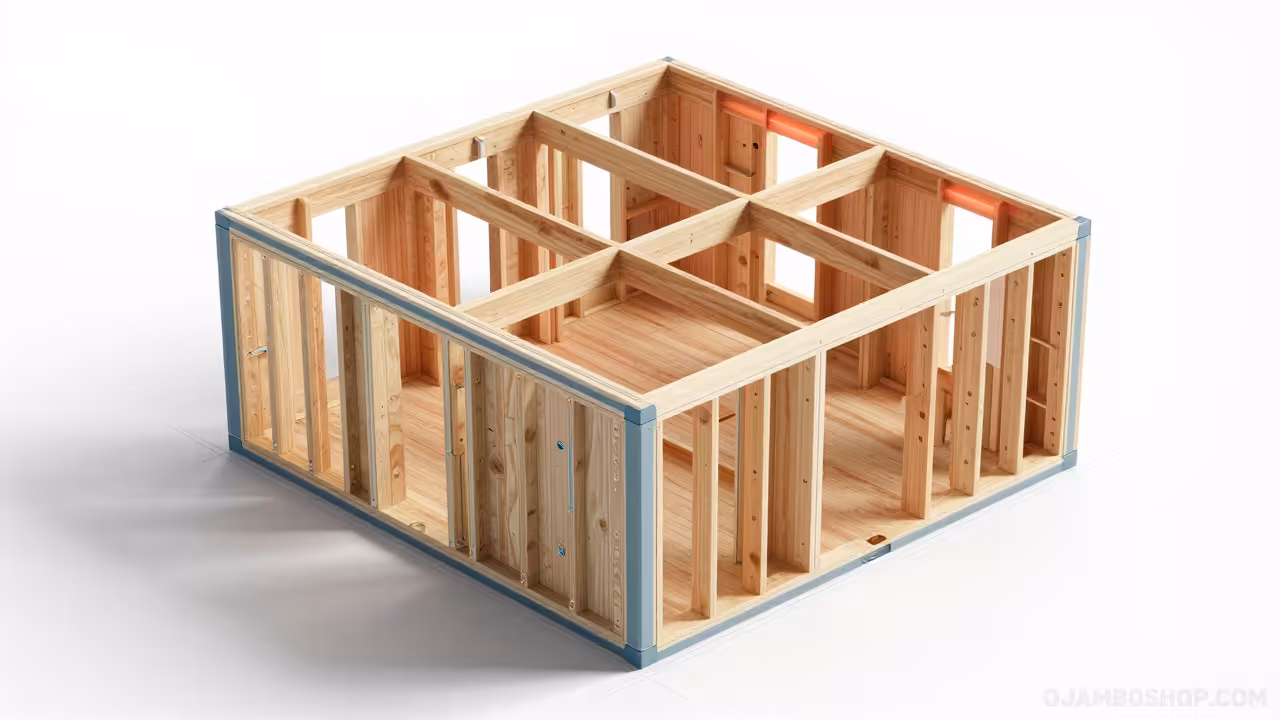
The structural integrity of the modular pod relies on a rigid floor diaphragm and a strategically engineered load path. Because these units are designed to be joined, the perimeter walls must be capable of supporting not only the roof load but also the lateral pressures of an adjacent pod.
The 12 by 12 span is achieved using 2×6 joists spaced 16 inches on center, which prevents floor deflection under standard residential loads. The roof is designed as a single slope shed style, which simplifies the process of aligning multiple pods.
By maintaining a consistent pitch across all units, the drainage system remains unified, preventing water pooling at the connection seams. The framing utilizes a double top plate system, providing a secure anchor point for the rafters and ensuring that the walls remain plumb during the expansion process.
The modular interface is created by leaving one wall as a non load bearing partition that can be removed or converted into a doorway when the second pod is attached. This ensures a seamless transition between living spaces.
Step by Step Instructions
Phase 1 Site Preparation and Foundation
Begin by clearing a 14 by 14 foot area to allow for a small perimeter buffer around the pod. Lay down a four inch layer of compacted crushed stone to provide a stable, well draining base that prevents the wood from sitting in standing water.
Place four pressure treated 4×4 skids parallel to each other, spaced exactly 4 feet apart. Use a laser level to ensure the skids are perfectly horizontal, shimming with concrete pavers if the ground slope exceeds two inches.
Phase 2 Floor Frame Assembly
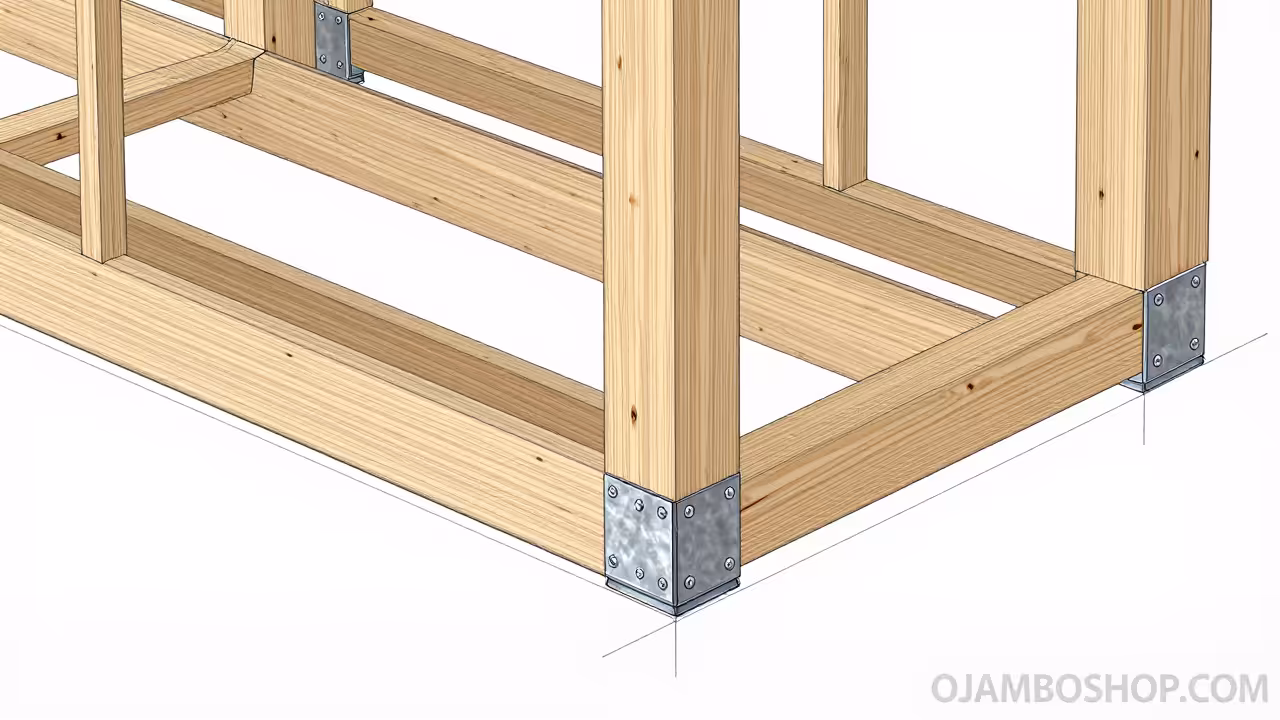
Construct the outer perimeter of the floor using 2×6 pressure treated lumber, ensuring the frame is exactly 12 feet by 12 feet. Install the interior joists 16 inches on center using joist hangers for maximum shear strength.
Check the diagonals of the frame with a tape measure to ensure the base is perfectly square before fastening. Apply a generous bead of construction adhesive to the top of each joist before laying the 3 4 inch subfloor plywood.
Phase 3 Wall Framing
Build the four walls on the flat floor before raising them into position. Use 2×4 studs spaced 16 inches on center with a single bottom plate and a double top plate.
Frame the rough openings for windows and doors using double headers to distribute the weight of the roof. Raise the walls one by one, bracing them with temporary 2x4s to keep them plumb while you nail them into the floor joists.
Phase 4 Roof Rafter Installation
Cut the 2×6 rafters with a birdsmouth notch to seat them securely on the top plates of the walls. Install the rafters every 24 inches on center, starting from the outer edges and working inward.
Use hurricane ties at every connection point to ensure the roof remains attached during high wind events. Install a ridge beam or a high wall plate depending on your chosen slope to lock the rafters in place.
Phase 5 Exterior Sheathing
Apply 1 2 inch CDX plywood to the exterior walls, ensuring the sheets are staggered to increase structural rigidity. Use a framing nailer to secure the sheathing every 6 inches along the edges and every 12 inches in the field.
Install the roof decking using OSB or plywood, ensuring a 1 8 inch gap between sheets to allow for natural thermal expansion. This creates a solid skin that protects the interior framing from wind and rain.
Phase 6 Weatherproofing and House Wrap
Wrap the entire exterior in a high quality breathable house wrap, overlapping the seams by at least six inches. Use flashing tape around all window and door openings to prevent moisture from penetrating the wall cavity.
This layer is critical for preventing rot and improving the energy efficiency of the pod. Ensure the wrap is tucked under the roof drip edge to create a continuous water shedding surface.
Phase 7 Roofing Installation
Install a synthetic underlayment over the roof decking to provide a secondary moisture barrier. Lay down the asphalt shingles or screw down the metal roofing panels, starting from the lowest point of the slope and working upward.
Install a drip edge around the entire perimeter to direct water away from the fascia boards. Finish the roof with ridge caps or a gable trim to seal the peak.
Phase 8 Doors and Windows
Set the window and door units into their rough openings, using shims to ensure they are perfectly level and square. Apply a professional grade sealant around the exterior trim to prevent air leaks and water intrusion.
Install the interior casing and exterior trim to provide a polished look. Ensure that the door swings outward to maximize the limited interior square footage of the pod.
Phase 9 Interior Finishing
Install a vapor barrier over the studs before hanging drywall or installing tongue and groove cedar planks. Run electrical wiring through the wall cavities, ensuring all boxes are properly grounded and meet local building codes.
Install the ceiling joists or a simple beadboard ceiling to hide the underside of the roof rafters. Apply a light colored paint to the walls to make the 12 by 12 space feel larger and more open.
Phase 10 Modular Connection Points
Identify the designated expansion wall and install reinforced framing members that will eventually mate with the next pod. Use heavy duty bolts instead of nails for these specific connection points to allow for easier adjustment during the expansion phase.
Install a temporary exterior wall panel that can be easily unscrewed when the time comes to grow. This ensures the pod remains weather tight until the second unit is added.
Common Mistakes
- Failure to Square the Foundation: Many builders overlook the importance of a perfectly square base, which leads to walls that do not meet correctly and roof rafters that require constant trimming.
- Ignoring the Moisture Barrier: Skipping the house wrap or improperly flashing the windows often leads to hidden rot within the wall cavities.
- Over Tightening Fasteners: Driving screws too deep into the lumber can crush the wood fibers, significantly reducing the holding power of the fastener.
- Incorrect Rafter Spacing: Placing rafters too far apart can lead to roof sagging, especially in areas with heavy snow loads.
Maintenance and Safety
Apply a high quality UV resistant stain or sealant to all exterior wood surfaces every two to three years to prevent graying and cracking. Inspect the roof flashing and sealant around windows annually, especially after winter freeze thaw cycles.
Clear all gutters and debris from the base of the pod to ensure water flows away from the foundation. This prevents moisture from seeping into the base skids.
Always wear a dust mask and safety goggles when cutting pressure treated lumber, as the chemicals used in the treatment process are hazardous when inhaled. Use a sturdy ladder and a spotting partner when working on the roof to prevent falls.
Ensure all electrical work is inspected by a licensed professional to avoid fire hazards in a small living environment. Safety should always be the primary concern during the build process.
Pro Tip for Structural Longevity: To significantly extend the life of your modular pods, use stainless steel or hot dipped galvanized fasteners exclusively. Standard zinc plated screws will react with the chemicals in pressure treated lumber, leading to premature corrosion and joint failure within five to ten years.