
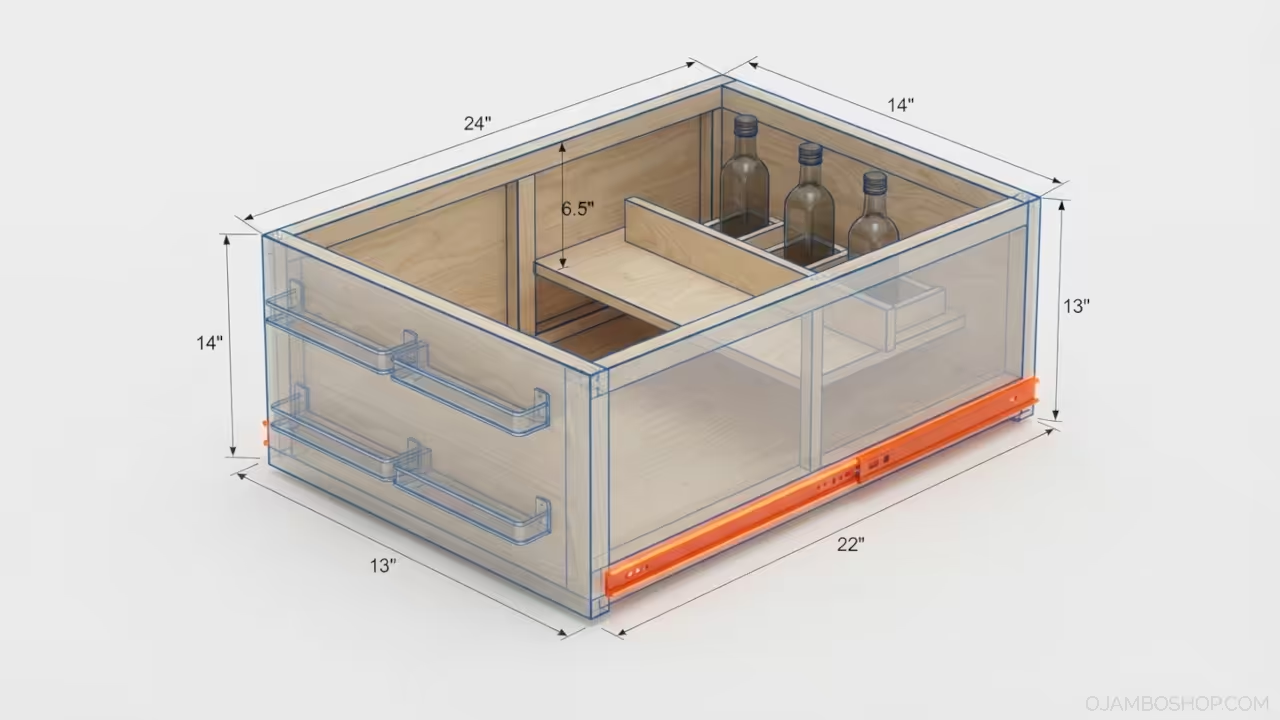
A compact sliding spice and oil pull-out transforms wasted cabinet space into an organized and accessible storage system. This under-cabinet solution keeps frequently used seasonings and cooking oils within easy reach while maintaining a clean kitchen aesthetic. Homeowners who spend considerable time cooking will appreciate the immediate visibility and ergonomic access this system provides. The project requires basic woodworking skills and can be completed in a single weekend with standard tools.
Quick Specs
Overall Width: 24 inches. Overall Height: 7 inches. Overall Depth: 14 inches.
Estimated Cost: 45 to 65 dollars. Difficulty Level: Intermediate. Estimated Build Time: 6 to 8 hours.
Materials and Tools
Lumber Requirements
- One sheet of 3/4 inch Baltic Birch plywood or hardwood veneer plywood cut to size
- Two pieces of 3/4 inch by 1-1/2 inch hardwood strip for edge banding
- One piece of 1/2 inch by 12 inch hardwood for shelf supports
Hardware Requirements
- Two sets of 24-inch full-extension soft-close drawer slides rated for 50 pounds
- Four sets of adjustable spice jar holders with 2-inch base diameter
- Two sets of oil bottle dividers with 3-inch spacing
- Eight pieces of 1-1/4 inch wood screws for slide mounting
- Six pieces of 1-inch wood screws for shelf support attachment
- Four pieces of cabinet knobs or pulls matching existing hardware
Tool Requirements
- Circular saw or table saw for crosscuts and rip cuts
- Power drill with screwdriver bits for assembly
- Clamp set including bar clamps and quick-grip clamps
- Measuring tape and combination square for layout verification
- Edge banding iron or clamping method for edge finishing
- Wood glue and sandpaper ranging from 120 to 220 grit
Technical Layout
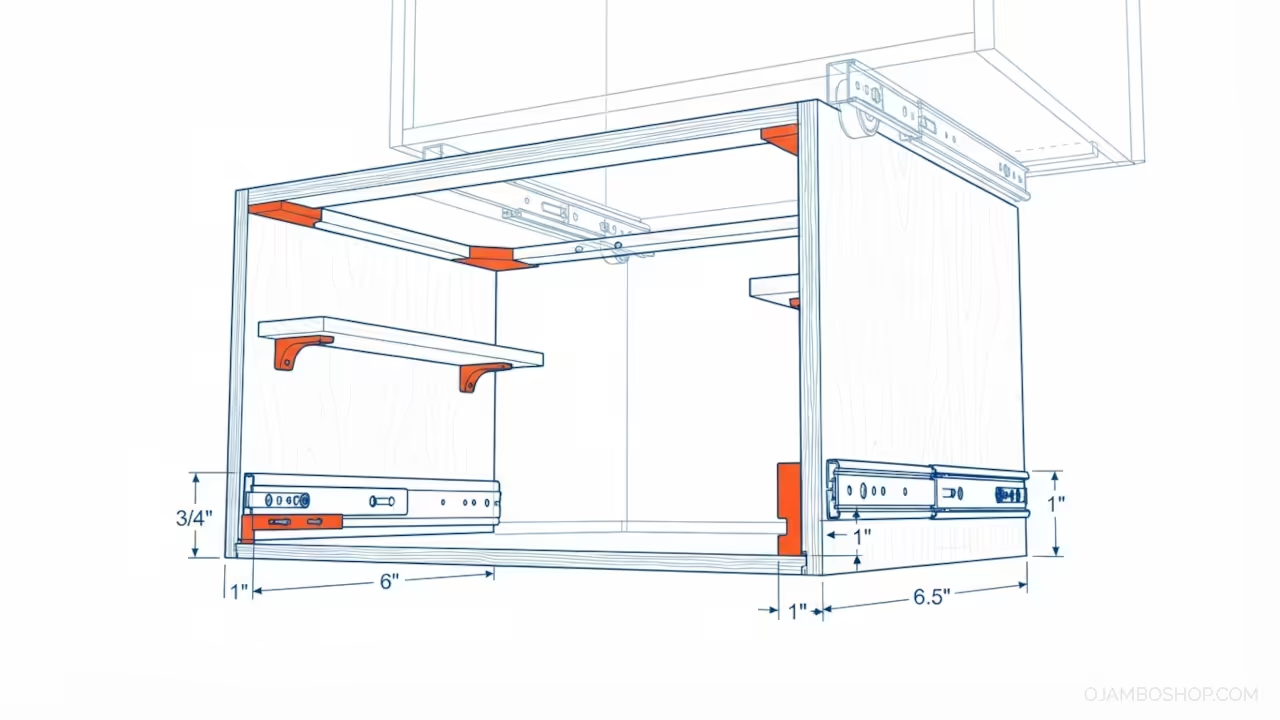
The structural foundation of this under-cabinet pull-out relies on a box-frame design that distributes weight evenly across the drawer slide mounting surface. The front panel measures 24 inches wide by 7 inches tall and serves as the primary load-bearing member connecting to the drawer slides. Two side panels each measure 13 inches deep by 7 inches tall and provide lateral stability while housing the spice jar mounting brackets. The bottom panel spans 22 inches wide by 13 inches deep and features a dado joint connection to both side panels for maximum rigidity. A center support shelf positioned at 6.5 inches from the front creates two distinct storage zones with independent weight distribution.
The drawer slides mount to the underside of the existing cabinet using 1-1/4 inch screws through pre-drilled pilot holes to prevent wood splitting. Each slide set includes a cabinet-mounted rail and a drawer-mounted rail that interlock with ball-bearing rollers for smooth extension. The mounting surface must be perfectly level and square to ensure the pull-out slides without binding or sagging under load. A tolerance of no more than 1/16 inch deviation across the mounting plane guarantees reliable operation over years of daily use.
Pro-Tip: Apply a thin layer of polyurethane edge sealer to all exposed plywood edges before assembly. This moisture barrier prevents the layered veneer from absorbing humidity and swelling, which can cause binding in the drawer slides over time. This single step extends the functional lifespan of the pull-out by preventing dimensional changes in the plywood substrate.
Step-by-Step Instructions
Phase 1: Cabinet Measurement and Preparation
Begin by measuring the interior width, height, and depth of the target under-cabinet space. Verify that the cavity measures at least 24 inches wide, 8 inches tall, and 14 inches deep to accommodate the pull-out with proper clearance. Remove any existing shelving or hardware that would interfere with the slide mounting surface. Clean the cabinet interior thoroughly to ensure proper adhesion of mounting screws and eliminate debris that could affect slide operation.
Phase 2: Plywood Cutting and Edge Banding
Cut the front panel to 24 inches by 7 inches using a circular saw guided by a straight edge or a table saw for precision. Cut both side panels to 13 inches by 7 inches ensuring perpendicular corners with a combination square verification. Cut the bottom panel to 22 inches by 13 inches and the center shelf to 10 inches by 13 inches. Apply edge banding to all visible plywood edges using an edge banding iron or contact adhesive with clamping pressure for 30 minutes.
Phase 3: Dado Joint Formation
Cut a 3/4 inch deep by 3/4 inch wide dado groove along the full length of both side panels at a height of 3/4 inch from the bottom edge. Position the side panels on the bottom panel so the dado grooves receive the panel edges flush with the outer face. Apply wood glue to the dado surfaces and clamp the assembly with bar clamps positioned at 45-degree angles to prevent panel shift during drying.
Phase 4: Center Shelf Installation
Mark the center shelf position at 6.5 inches from the front edge on both side panels. Install two 1/2 inch by 12 inch hardwood shelf supports using 1-inch wood screws driven from the interior face of each side panel. Apply wood glue to the shelf support contact surfaces before screwing to create a rigid mechanical bond. Verify that the center shelf sits perfectly level using a small bubble level across the support members.
Phase 5: Drawer Slide Mounting
Attach the drawer-mounted rail sections to the exterior faces of both side panels using 1-1/4 inch wood screws through the pre-drilled mounting holes. Position each slide set so the rail sits flush with the bottom edge of the side panel and extends 1 inch from the front edge. Verify parallel alignment between both slide sets using a measuring tape across multiple points along the rail length. Install the cabinet-mounted rail sections to the underside of the existing cabinet using the manufacturer template for precise spacing.
Phase 6: Spice Jar Holder Installation
Mount four adjustable spice jar holders to the front panel interior face at 6-inch horizontal spacing using 1-inch wood screws. Position each holder at a height of 4 inches from the bottom edge to allow clear visibility through the front panel opening. Install two oil bottle dividers to the center shelf surface using adhesive backing or small screws depending on the divider design. Verify that all holders align vertically with the intended jar positions for uniform appearance.
Phase 7: Hardware Attachment and Front Panel Finishing
Attach the cabinet knob or pull to the center of the front panel exterior face using the provided mounting screws and backing nuts. Sand all exposed surfaces starting with 120 grit and progressing to 220 grit for a smooth finish. Apply two coats of water-based polyurethane with 24 hours drying time between coats for durability and moisture resistance. Allow the final coat to cure for 48 hours before loading the pull-out with weight.
Phase 8: Final Assembly and Load Testing
Slide the drawer-mounted rails into the cabinet-mounted rails ensuring smooth engagement of the ball-bearing mechanism. Load the pull-out gradually with spice jars and oil bottles to verify balanced weight distribution across both slide sets. Test the soft-close mechanism by opening and closing the pull-out multiple times to confirm proper damping function. Adjust any binding points by checking slide alignment and cabinet mounting screw tightness.
Common Mistakes
Builders frequently mount the drawer slides without verifying that the cabinet mounting surface is perfectly level. Even a 1/8 inch deviation causes the pull-out to slide unevenly and creates premature wear on the ball-bearing rollers. Always use a precision level across the entire mounting surface before driving any screws.
Another frequent error involves cutting the side panels without accounting for the drawer slide thickness. The slides add approximately 3/4 inch to the overall exterior width, and failing to subtract this dimension results in a pull-out that will not fit into the cabinet cavity. Measure the slide thickness and subtract it from the available cabinet width before cutting any lumber.
Many builders skip the edge banding step on plywood panels, leaving the exposed layered veneer vulnerable to moisture absorption. Kitchen environments generate significant humidity during cooking, and unprotected plywood edges will swell over time. This swelling creates friction against the drawer slides and eventually causes the pull-out to bind or stick permanently.
Maintenance and Safety
Inspect the drawer slides every six months for accumulated debris or dried lubricant that impedes smooth operation. Clean the slide rails with a dry cloth and apply a light coating of silicone-based lubricant to the ball-bearing tracks annually. Avoid petroleum-based lubricants as they attract dust and create a sticky residue that accelerates wear on the moving components.
Wear safety glasses during all cutting and drilling operations to protect against flying wood chips and metal fragments. Use a dust mask when sanding plywood to prevent inhalation of fine particulate matter that can cause respiratory irritation. Keep a first-aid kit accessible in the workshop area and ensure adequate ventilation when applying polyurethane finishes.
Re-tighten all mounting screws annually as the repeated opening and closing cycles can gradually loosen the fasteners. Check the spice jar holders for any signs of adhesive failure or screw backing out from the repeated weight of glass jars. Replace any worn or damaged hardware immediately to prevent the pull-out from becoming a safety hazard in the kitchen environment.
| Component | Description | Value |
|---|---|---|
| Drawer Slides | Standard Grade: Steel ball-bearing 50 lb | Premium Grade: Stainless steel soft-close 75 lb | 8 to 12 dollars per set |
| Spice Holders | Standard Grade: Plastic adjustable | Premium Grade: Bamboo fixed-height | 4 to 6 dollars per set |
| Edge Banding | Standard Grade: PVC self-adhesive | Premium Grade: Real wood iron-on | 3 to 5 dollars per project |
| Shelf Supports | Standard Grade: Particle board | Premium Grade: Hardwood maple | 2 to 4 dollars per set |
| Component | Description | Value |