
Introduction
Building a dedicated shelter for your ducks is a significant investment in the health and longevity of your flock. A well-designed duck house provides essential protection from nocturnal predators and harsh weather conditions throughout the changing seasons. By integrating a floating ramp, you solve the common issue of fluctuating water levels in backyard ponds or shorelines.
This project is designed for the modern homesteader who values both functionality and aesthetic appeal. A sturdy, elevated structure prevents the accumulation of moisture and bacteria, which are common issues in ground-level coops. This guide provides the comprehensive technical details needed to construct a professional-grade duck sanctuary that enhances your property value.
Designing for waterfowl requires a specific understanding of their behavior and physical needs. Unlike chickens, ducks produce significant amounts of moisture and require more floor space for comfortable movement. This blueprint prioritizes ventilation and easy cleaning to ensure your birds thrive in a hygienic and dry environment.
Quick Specs
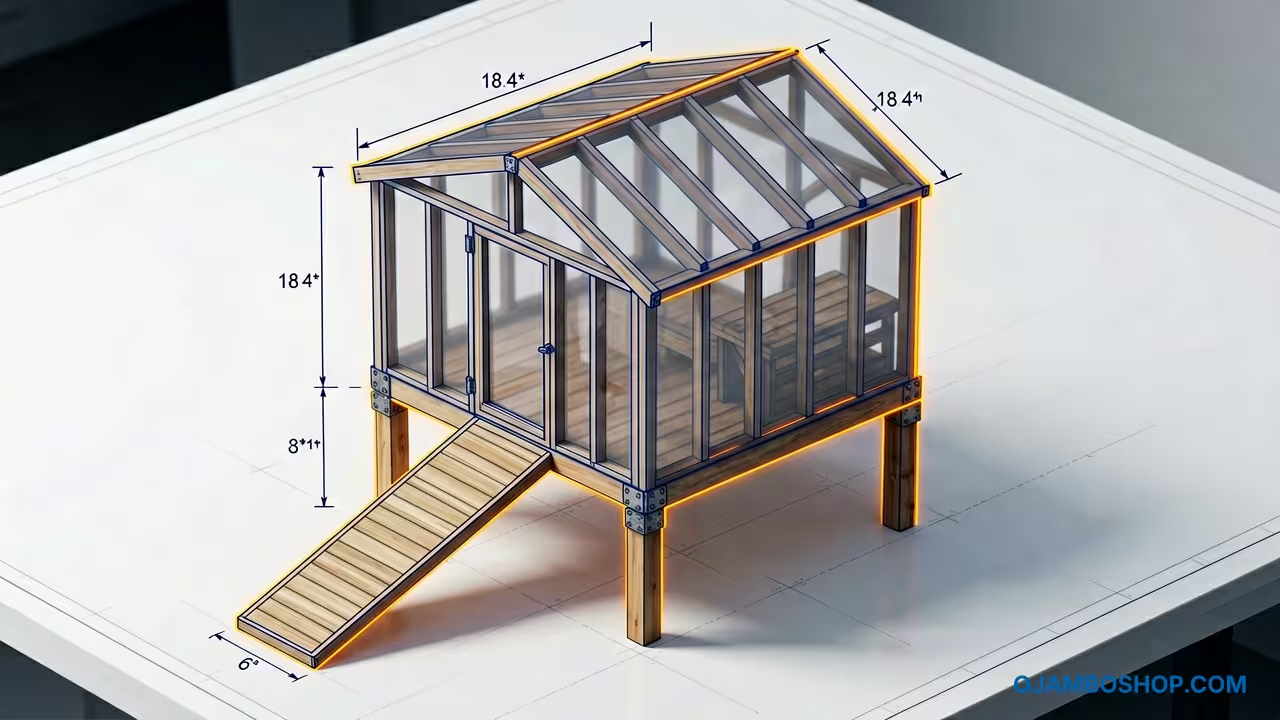
The overall footprint of this structure is 4 feet by 4 feet for the main house, standing 5 feet tall at the roof peak. This sizing provides ample space for 4 to 6 ducks while remaining manageable for a single weekend build. The floating ramp extends 6 feet to accommodate various slope angles.
The estimated cost for this project ranges between 250 and 400 dollars depending on the local price of pressure-treated lumber. This budget includes all high-quality fasteners and roofing materials required for a long-lasting build. You should expect a moderate difficulty level, requiring basic proficiency with a miter saw and a power drill.
Total construction time is estimated at 12 to 16 hours of active labor. This timeframe is typically split across two days to allow for wood treatments or stains to dry properly. Most DIY enthusiasts find they can complete the framing on day one and finish the roofing and ramp on day two.
Materials and Tools
For the framing and foundation, you will need eight 2×4 pressure-treated boards at 8 feet in length. The exterior walls require four sheets of 1/2-inch exterior-grade plywood or T1-11 siding for a more finished look. For the roof, two sheets of 1/2-inch plywood and one bundle of asphalt shingles or corrugated metal panels will suffice.
The floating ramp system requires two large closed-cell foam blocks or sealed PVC pipes to provide necessary buoyancy. You will also need 3-inch exterior wood screws, 1.5-inch roofing nails, and heavy-duty galvanized hinges for the door and nesting box. A gallon of animal-safe wood sealer is highly recommended for the interior and exterior surfaces.
Required tools include a circular saw or miter saw for precise lumber cuts and a cordless drill with various bits. A level, speed square, and measuring tape are essential for maintaining structural squareness during the framing phase. You should also have a staple gun for attaching hardware cloth to the ventilation windows and ramp surface.
| Material Item | Purpose | Recommended Type |
|---|---|---|
| Framing Lumber | Main Skeleton | Pressure-Treated 2×4 |
| Wall Sheathing | Siding | 1/2-inch CDX Plywood |
| Fasteners | Structural Joints | 3-inch Deck Screws |
| Hinges | Access Doors | 6-inch Zinc Strap Hinges |
| Floatation | Ramp Buoyancy | High-Density EPS Foam |
| Roofing | Weather Shield | Corrugated Bitumen |
| Mesh | Predator Guard | 1/2-inch Hardware Cloth |
Technical Layout
The structural integrity of the duck house relies on a reinforced post-and-beam foundation that keeps the floor at least 18 inches off the ground. By elevating the structure, you create a natural barrier against burrowing predators and ensure that the floor remains dry even during heavy rain. The floor joists are spaced 16 inches on center to prevent the plywood floor from sagging under the weight of wet bedding and birds.
The roof features a 4/12 pitch, which is steep enough to shed water and snow efficiently while remaining easy to shingle. Rafters are notched with birdsmouth cuts to sit securely on the top plates, distributing the roof load evenly down through the wall studs. This load-bearing design ensures the house can withstand high winds and heavy snow loads without structural shifting over time.
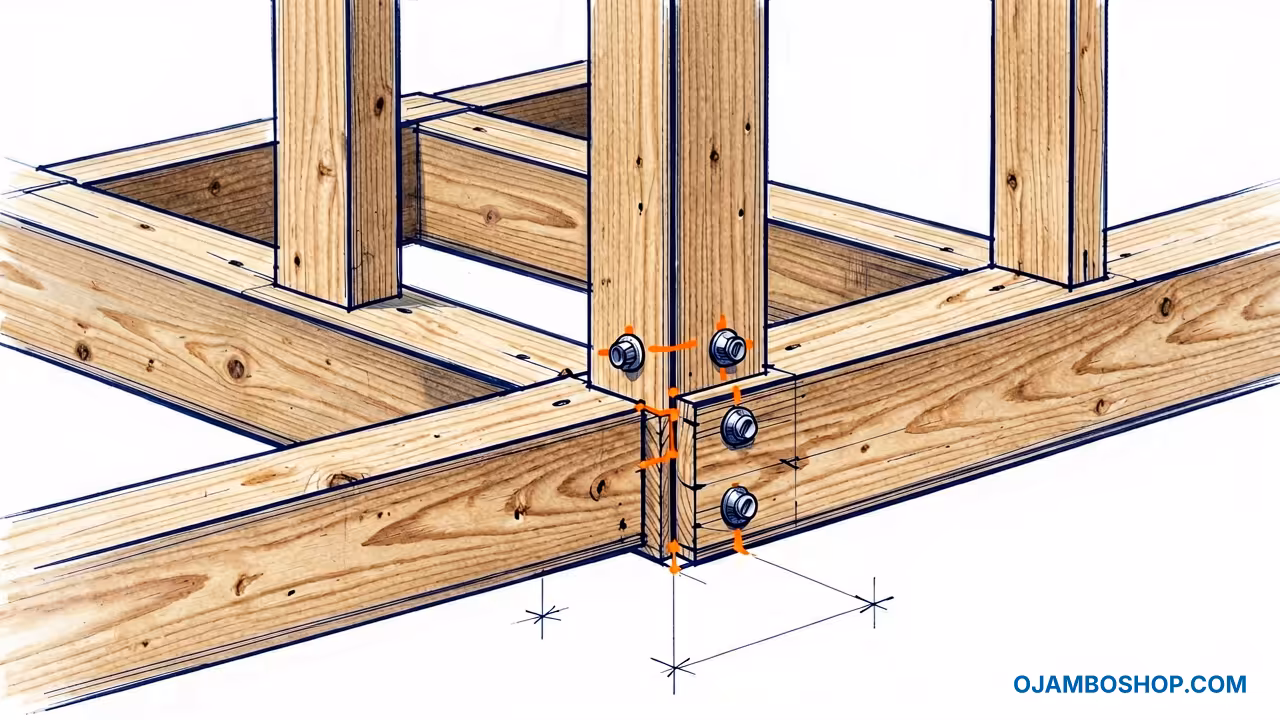
Pro-Tip: When assembling the floor frame, use 3.5-inch stainless steel structural screws instead of standard zinc screws. Ducks create a high-moisture environment, and the ammonia in their waste can quickly corrode standard fasteners. Stainless steel or high-quality ceramic-coated deck screws will prevent the floor from detaching from the joists over years of heavy use.
Step-by-Step Instructions
Phase 1: Foundation and Floor Framing
Start by cutting four 4×4 pressure-treated posts to a length of 24 inches to serve as the corner supports. Dig post holes 6 inches deep and fill them with leveled pavers or gravel to provide a stable base. Construct a 4-foot by 4-foot square frame using 2×4 joists, ensuring the frame is perfectly square by measuring the diagonals. Install one center joist to provide additional support for the flooring sheet.
Secure the 4×4 posts to the inside corners of the frame using two structural lag bolts per post. Once the frame is level and secured, attach a 4-foot by 4-foot sheet of 3/4-inch pressure-treated plywood to the top. This heavy-duty flooring is necessary because ducks carry a significant amount of water into the house on their feathers. Ensure the plywood edges are flush with the frame to prevent moisture from seeping into the end grain of the joists.
Phase 2: Wall Framing
Cut your wall studs to 36 inches in length, which allows for a comfortable interior height. Frame the front and back walls first, placing studs 16 inches on center to match standard construction practices. The front wall should include a rough opening for the duck entrance and a larger door for cleaning access. Leave space in the side walls for two 12-inch by 12-inch ventilation windows near the top plates.
Assemble the wall sections on a flat surface before lifting them onto the floor platform. Use a spirit level to ensure every wall is plumb before driving 3-inch screws through the bottom plates and into the floor joists. Tie the walls together at the corners by overlapping the top plates or using corner studs. This creates a rigid box structure that serves as the foundation for the roof rafters.
Phase 3: Roof Rafters and Sheathing
Determine the ridge height based on a 4/12 pitch, which requires a center ridge board approximately 12 inches above the top plates. Cut your rafters with a 18.4-degree angle at the peak and include a 6-inch overhang to protect the siding from runoff. Install the ridge board first, then attach the rafters in pairs to ensure the pressure is equalized on both sides of the building.
Once the rafters are secured, nail 1/2-inch plywood sheathing over the roof frame. Start from the bottom edge and work your way up to the ridge, ensuring a 1/8-inch gap between sheets for natural expansion. Cover the plywood with roofing felt or synthetic underlayment to provide a secondary moisture barrier. Finally, install your shingles or metal panels, finishing the peak with a matching ridge cap to prevent leaks.
Phase 4: Siding and Ventilation
Measure and cut your plywood siding or T1-11 panels to fit each wall section, including the gable ends. Attach the siding using 2-inch galvanized nails, ensuring that the vertical grooves are perfectly plumb. Cut out the openings for the doors and windows that you framed in Phase 2. Be sure to treat the cut edges of the plywood with sealer immediately to prevent de-lamination.
Install 1/2-inch galvanized hardware cloth over the window openings from the inside. This mesh is critical for keeping out raccoons and weasels while allowing for constant airflow. Secure the mesh with heavy-duty staples or wood lath strips screwed into the studs. Proper ventilation is the most important factor in preventing respiratory issues in ducks, so do not skip this step or use flimsy window screening.
Phase 5: Door Construction and Hardware
Build the main cleaning door and the smaller duck pop-hole door using the scrap plywood from the siding phase. Reinforce the back of each door with a “Z” frame made of 1×4 lumber to prevent warping over time. Install heavy-duty zinc-plated strap hinges and a locking sliding bolt latch on each door. It is essential to use a locking mechanism that requires two distinct movements, as raccoons are capable of opening simple latches.
For the duck entrance, consider a ramp that can be folded up and locked at night for extra security. Use weather stripping around the edges of the large cleaning door to prevent drafts during the winter months. Proper door alignment ensures that the house remains predator-proof and easy to maintain. Check the swing of the doors to ensure they do not hit the ground or the floating ramp.
Phase 6: The Floating Ramp Assembly
The floating ramp is the signature feature of this build, allowing ducks easy access regardless of water levels. Construct a 6-foot long by 18-inch wide frame using 2×2 pressure-treated lumber. Attach 1×4 slats across the width of the ramp, spaced 1 inch apart, to provide traction for the ducks’ webbed feet. These slats act as a ladder, preventing the birds from slipping on the wet surface.
Underneath the far end of the ramp, secure two blocks of closed-cell foam or capped PVC pipes using stainless steel strapping. This buoyancy allows the end of the ramp to rise and fall with the water level. Attach the other end of the ramp to the duck house threshold using heavy-duty stainless steel hinges. This mechanical connection allows for a full range of vertical motion while keeping the ramp securely anchored to the structure.
Phase 7: Interior Finishing
Clear out all sawdust and wood scraps from the interior of the house to prepare for bedding. Apply a thick layer of animal-safe, low-VOC wood sealer to the floor and the bottom 6 inches of the interior walls. This creates a “tub” effect that makes it much easier to hose out the house during deep cleans. Avoid using high-gloss paints, as these can be slippery for ducks and may contain harmful chemicals.
Add a 4-inch layer of pine shavings or straw to the floor to provide cushion and absorbency. Unlike chickens, ducks do not require roosting bars, as they prefer to sleep on the flat ground in a huddle. Ensure that the nesting area is located in a quiet, dark corner of the house away from the main entrance. This encourages the ducks to lay their eggs in a predictable and protected location.
Phase 8: Exterior Weatherproofing
Apply two coats of high-quality exterior paint or solid-color stain to the siding and trim. Choose a light color to reflect heat in the summer or a dark color to absorb warmth in the winter, depending on your local climate. Pay special attention to the end grains of the wood, as these areas are most susceptible to rot. Install decorative trim around the windows and doors to provide a professional, finished look.
Inspect all seams and joints for potential water entry points and apply exterior-grade caulk where necessary. Check that the roof drip edge is properly diverting water away from the siding. Finally, place the house in its permanent location and test the movement of the floating ramp. Your backyard duck house is now ready to provide a safe and comfortable home for your waterfowl.
Common Mistakes
One of the most frequent errors is failing to provide enough ventilation near the roofline. DIY builders often worry about their ducks getting cold and seal the house too tightly, which leads to toxic ammonia buildup. Always ensure there is a cross-breeze high above the ducks’ heads to exhaust moist air without creating a direct draft on the birds.
Another mistake is using chicken wire instead of hardware cloth for the windows and doors. Raccoons and other large predators can easily tear through thin chicken wire or reach through the gaps. Only 1/2-inch galvanized hardware cloth provides the necessary strength to keep your flock safe from determined nocturnal hunters.
Builders often underestimate the weight of wet ducks and saturated bedding when framing the floor. Using 2×2 lumber for the floor frame or thin 1/4-inch plywood will result in sagging and eventual structural failure. Always stick to 2×4 framing and at least 5/8-inch or 3/4-inch plywood for the flooring to ensure the house lasts for many years.
Maintenance and Safety
To maintain the longevity of your duck house, perform a deep clean every two to four weeks. Remove all old bedding and hose down the interior surfaces with a mixture of water and white vinegar. Inspect the wood for any signs of rot or soft spots, especially around the door thresholds and the ramp hinges. Reapply wood sealer to the floor every year to maintain its water-resistant properties.
Safety is paramount when working with pressure-treated lumber, as the dust can be irritating to the lungs and skin. Always wear a dust mask and safety glasses when cutting wood, and work in a well-ventilated outdoor area. Keep your power tool cords away from water sources and ensure your workspace is clear of debris to prevent trips and falls.
Check the floating ramp regularly to ensure the buoyancy material has not become waterlogged or detached. Over time, algae may grow on the submerged portion of the ramp, making it slippery for the ducks. Scrub the ramp slats with a stiff brush periodically to maintain a high-traction surface. By following these maintenance steps, you ensure a safe environment for your ducks and a durable structure for your backyard.