
The Ultimate Living Room Upgrade: Narrow Tapered Sofa Console
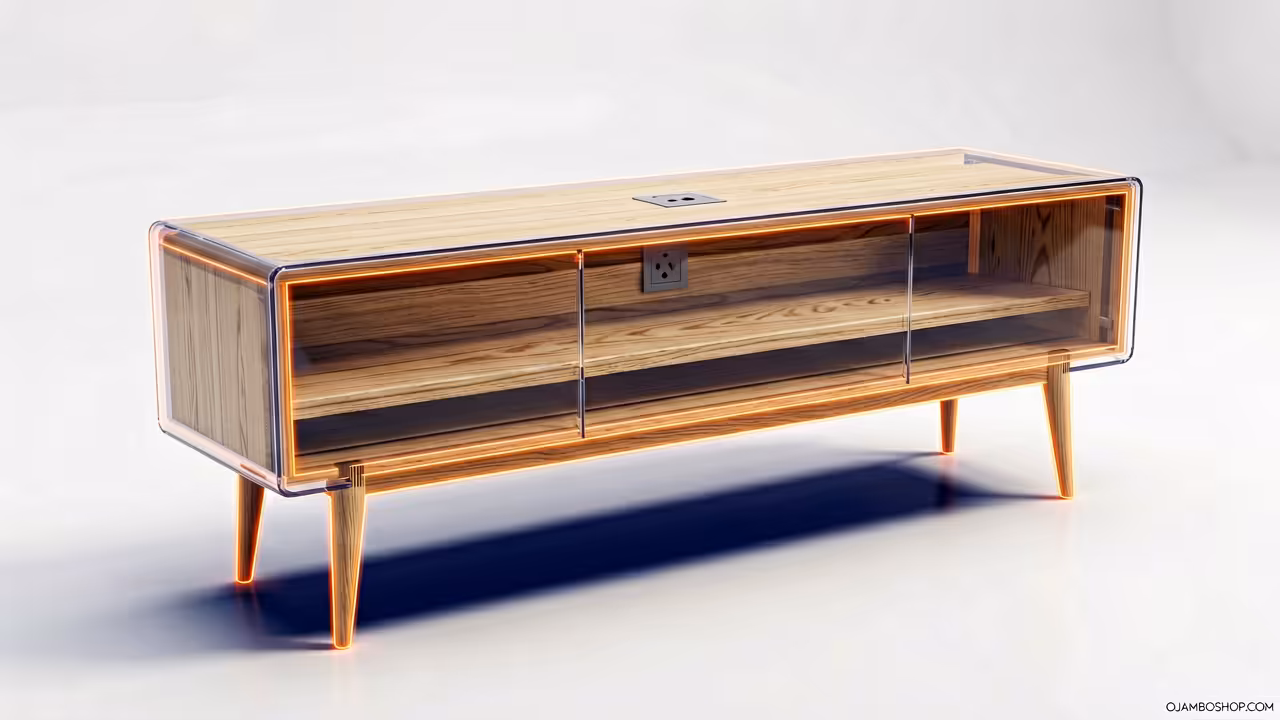
Modern living rooms often suffer from a common spatial dilemma where functionality clashes with aesthetics. The narrow tapered sofa console with integrated outlets serves as the definitive solution for homeowners seeking to reclaim dead space behind a couch while adding essential utility. This piece acts as a bridge between furniture and infrastructure, providing a dedicated surface for lighting, decor, and the ever-present need for device charging.
By choosing a tapered design, you introduce a sophisticated architectural silhouette that prevents the piece from looking bulky in tight quarters. The taper draws the eye upward, creating an illusion of height and lightness that standard blocky consoles simply cannot achieve. This project is not just about building a table; it is about enhancing the flow of your home while ensuring your power needs are met without unsightly extension cords.
Whether you are living in a compact urban apartment or a sprawling suburban home, this console offers a bespoke touch that store-bought furniture lacks. It transforms that awkward six-inch gap between your sofa and the wall into a functional command center. Building this yourself allows for exact color matching with existing decor and the satisfaction of structural integrity that far surpasses mass-produced particle board alternatives.
Quick Specs
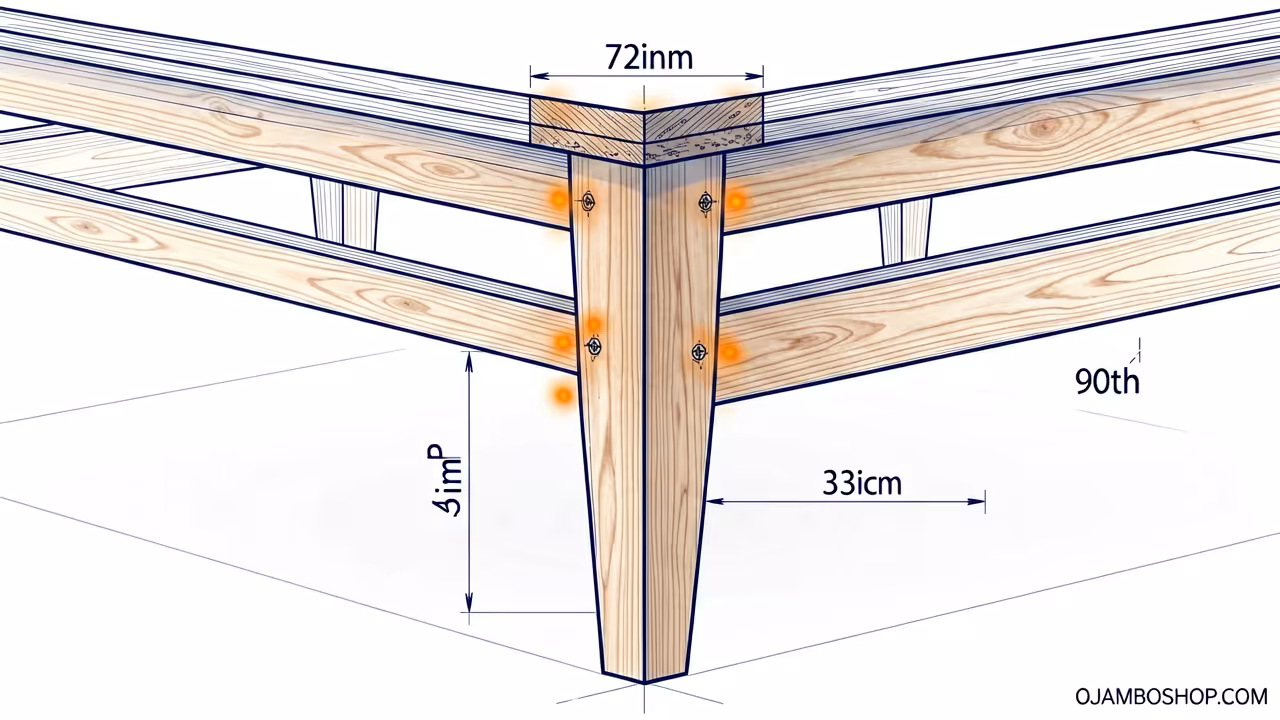
Dimensions: 72″ L x 6″ W x 34″ H (Tapered legs from 1.5″ to 1″)
Estimated Cost: $85 – $120 (Depending on wood species)
Difficulty Level: Intermediate
Estimated Build Time: 6 to 8 Hours (Excluding finishing dry time)
Materials and Tools
Lumber List:
Two 8-foot 1×6 S4S boards (Select Pine, Oak, or Walnut)
Four 36-inch 2×2 clear grain boards for tapered legs
One 1×4 board for internal structural aprons and bracing
Scrap plywood for jig construction if using a table saw
Hardware and Supplies:
One recessed power strip with USB-A and USB-C ports
One box of 1-1/4 inch pocket hole screws
Four heavy-duty 3-inch furniture bolts (if removable legs are desired)
High-strength wood glue (Titebond II or III)
Assorted sandpaper grits (80, 120, 180, and 220)
Wood filler matching your chosen timber species
Clear polyurethane or furniture wax for the final seal
Required Tools:
Miter saw for precise cross-cuts and leg trimming
Table saw with a tapering jig for the four-sided leg tapers
Drill/Driver set with various bits
Pocket hole jig for hidden joinery
Random orbital sander for a professional finish
Tape measure, speed square, and marking pencil
Clamps (at least four 24-inch bar clamps)
Technical Layout and Structural Geometry
The structural integrity of a narrow console relies heavily on the tension between the long top surface and the vertical support system. Because the footprint is only six inches wide, the center of gravity is relatively high, making lateral stability a primary concern for the builder. We utilize a recessed apron system that sits 0.75 inches back from the edge of the tabletop to provide a shadow line while reinforcing the long-grain span.
The tapered legs are the focal point of the geometry, transitioning from a full 1.5-inch square at the top to a refined 1-inch square at the floor. This 0.5-inch reduction over a 33-inch span creates a subtle pitch that must be mirrored across all four legs to ensure the piece sits perfectly level. We incorporate cross-braces at the 12-inch mark from the floor on the narrow ends to prevent racking, which is the tendency of the table to wobble side-to-side.
By integrating the electrical outlet directly into the center of the top plank, we must account for the loss of material strength in that specific zone. To compensate, the underside of the outlet cutout is reinforced with two small cleats that distribute the weight of the power unit across the surrounding wood grain. This ensures that plugging and unplugging devices over time does not cause the tabletop to sag or crack under the repetitive mechanical pressure.
Step-by-Step Construction Guide
Phase 1: Material Preparation and Milling
Begin by selecting your lumber for grain consistency, ensuring that the top 1×6 board is perfectly straight without any bowing or twisting. Use your miter saw to cut the tabletop to exactly 72 inches, followed by cutting the apron pieces to 68 inches for the long sides and 3.5 inches for the short ends. Pre-sanding the interior faces of the boards now will save significant time later when the piece is fully assembled and harder to reach.
Phase 2: Cutting the Tapered Legs
The tapering process requires a dedicated jig on the table saw to ensure all four legs are identical in their geometry. Set the jig to remove 0.25 inches from two adjacent sides of the 2×2 stock, starting the cut 4 inches down from the top of the leg. This leaves a square “block” at the top of the leg where the aprons will eventually attach, providing maximum surface area for glue and screws.
Phase 3: Drilling Pocket Holes
Using your pocket hole jig, drill two holes into each end of the long and short apron pieces on the hidden interior face. You should also drill pocket holes along the top edge of the aprons every 8 to 10 inches to facilitate the attachment of the tabletop later. Ensure your drill depth is set correctly for 3/4-inch material to avoid the screw tips “blowing out” through the finished exterior of the wood.
Phase 4: Assembling the Leg Frames
Start by attaching the short aprons to the square tops of the legs using wood glue and 1-1/4 inch pocket screws. It is helpful to use a spacer block to ensure the apron is inset exactly 0.25 inches from the outer face of the leg for a professional look. Repeat this process for both sets of legs until you have two identical “U” shaped leg assemblies that represent the ends of the console.
Phase 5: Connecting the Long Aprons
Lay the two leg assemblies on their sides and connect them using the long 68-inch apron pieces with glue and pocket screws. This is the stage where the console will begin to feel spindly, so work on a flat surface to keep the frame perfectly square. Check the diagonal measurements from corner to corner; if they are equal, your frame is square and ready for the next structural step.
Phase 6: Cutting the Electrical Outlet Port
Measure the dimensions of your recessed power strip and mark the center point of your 72-inch tabletop board. Use a drill to create pilot holes in the corners of your markings, then use a jigsaw or a router with a straight bit to cut the rectangular opening. Clean up the edges of the hole with a file or sandpaper to ensure the outlet unit fits snugly without any visible gaps on the top surface.
Phase 7: Attaching the Tabletop
Flip the tabletop upside down on a soft surface and center the assembled leg frame on top of it, ensuring even overhangs on all sides. Drive the pocket screws through the pre-drilled holes in the aprons and into the underside of the tabletop, being careful not to over-tighten and strip the wood. The glue is the primary bonding agent here, while the screws act as permanent clamps that hold the joint under tension during the drying process.
Phase 8: Sanding and Surface Prep
Fill all visible pocket holes with wood plugs or high-quality wood filler, allowing it to dry completely before sanding flush with the surrounding timber. Move through your sandpaper grits methodically, starting with 120-grit to remove tool marks and ending with 220-grit for a glass-smooth finish. Wipe the entire piece down with a tack cloth or a damp microfiber rag to remove every speck of sawdust before applying your chosen finish.
Phase 9: Finishing and Sealant
Apply a thin coat of stain if desired, or go straight to a clear protective finish to highlight the natural beauty of the wood grain. For a sofa console, a wipe-on poly is often the easiest choice as it builds thin, durable layers without the risk of drips or bubbles. Allow the first coat to dry for four hours, lightly scuff it with 320-grit sandpaper, and apply a second coat for maximum protection against spills.
Phase 10: Electrical Installation
Once the finish is fully cured and no longer tacky to the touch, drop the recessed power strip into the pre-cut hole in the tabletop. Secure the unit from underneath using the provided mounting hardware or small wood screws, ensuring the cord is routed cleanly down one of the legs. You can use adhesive-backed cable clips to hide the power cord along the back of a leg for a completely seamless look.
Hardware and Material Comparison
| Material Component | Standard Option | Premium Upgrade | Benefit of Upgrade |
|---|---|---|---|
| Wood Species | Select Pine | Black Walnut | Higher dent resistance and rich color |
| Joinery Method | Butt Joints | Pocket Holes | Superior hidden strength and alignment |
| Finish Type | Oil-based Stain | Hardwax Oil | Easier to repair and non-toxic |
| Power Unit | Basic Power Strip | Fast-Charge USB-C | Future-proofs charging capabilities |
Common Mistakes to Avoid
The most frequent error in this build is failing to account for the thickness of the sofa’s base when determining the height of the console. If your sofa has a significant overhang or reclines, you may need to adjust the depth of the console to prevent it from being pushed against the wall. Always measure the height of your sofa cushions and aim for the console to sit about one inch below the top of the backrest.
Another mistake is skipping the tapering jig and attempting to cut the legs freehand on a miter saw or with a circular saw. This almost always results in inconsistent angles which will cause the table to rock and appear amateurish when placed on a hardwood floor. Precision in the leg geometry is what separates a DIY project from a professional-grade furniture piece that can be sold for a premium.
Finally, builders often forget to use wood glue in their pocket hole joints, relying solely on the mechanical strength of the screws themselves. While screws provide initial holding power, the wood glue creates a chemical bond that is stronger than the wood fibers, preventing the joints from squeaking. In a narrow piece like this, every bit of structural rigidity is necessary to prevent the console from feeling flimsy or unstable.
Maintenance and Safety
Pro-Tip: When working with narrow, top-heavy furniture, always consider the moisture content of your wood to prevent warping over time. If you are building with construction-grade lumber, let it acclimate to your indoor environment for at least two weeks before cutting to ensure the dimensions remain stable. For added longevity, apply a thin bead of silicone around the rim of the integrated outlet to prevent any accidental liquid spills from seeping into the electrical housing.
Safety should always be your top priority when operating high-speed machinery like table saws and miter saws during this build. Wear wrap-around safety glasses to protect against flying splinters, and use a push stick whenever your hands come within six inches of a moving blade. Ensure your workspace is well-ventilated when applying chemical stains or polyurethanes, and never leave oily rags bunched up, as they can spontaneously combust during the drying process.
Regular maintenance for your sofa console involves nothing more than a light dusting and an occasional application of furniture polish to keep the wood hydrated. If the power strip ever becomes loose, simply tighten the mounting screws from the underside to maintain a flush fit against the tabletop. This piece is designed to last for decades, providing a timeless aesthetic and modern utility to your home’s most social living space.