

The kitchen serves as the central nervous system of the modern home, where utility and aesthetics must coexist in perfect harmony. A custom multifunctional kitchen island is more than just extra counter space; it is a significant value-add for any residential property investment.
By integrating specialized features like a pull-out trash station and a vertical spice rack, you eliminate visual clutter and improve workflow efficiency. This project focuses on professional-grade joinery and ergonomic design to ensure your build stands the test of daily culinary rigors.
Quick Specs
The overall dimensions for this build are 48 inches long by 24 inches wide by 36 inches high, including the butcher block overhang. You should expect an estimated material cost between 400 and 600 dollars depending on your choice of hardwood and hardware quality.
This project is rated at an Intermediate difficulty level due to the precise drawer slide installations and cabinet door alignment required for a professional finish. A dedicated builder can expect to complete the construction over a standard two-day weekend, excluding the time required for finishing and curing.
Materials and Tools
Lumber and Sheet Goods:
One 4 foot by 8 foot sheet of 3/4 inch birch plywood for the main cabinet carcass and internal shelving.
One 4 foot by 8 foot sheet of 1/2 inch birch plywood for the drawer boxes and the spice rack inserts.
Four 8 foot lengths of 1×3 select pine or maple for the face frames and the door stiles and rails.
One 25 inch by 50 inch pre-finished butcher block countertop to provide a durable and food-safe preparation surface.
Hardware and Fasteners:
Two pairs of 22 inch heavy-duty full-extension drawer slides for the trash pull-out and the main utensil drawer.
One pair of 18 inch over-travel slides specifically for the vertical spice rack to ensure full access to every jar.
One box of 1-1/4 inch pocket hole screws and one box of 2 inch trim head screws for structural assembly.
Two soft-close cabinet hinges and a variety of brushed nickel pulls to match your existing kitchen hardware aesthetic.
Required Tools:
Table saw or track saw for breaking down large plywood sheets into precise, repeatable cabinet components.
Miter saw for cross-cutting face frame material and decorative trim pieces to the exact required lengths.
Pocket hole jig for creating strong, hidden joints in the carcass and face frame assembly without visible fasteners.
Power drill and impact driver set for driving screws and pre-drilling holes to prevent splitting in the hardwood.
Random orbital sander with various grits from 80 to 220 to prepare the wood surface for final finishing.
| Hardware Type | Load Capacity | Best Use Case | Durability Rating |
|---|---|---|---|
| Ball-Bearing Slides | 100 lbs | Trash Pull-Out / Heavy Drawers | High |
| Under-mount Slides | 75 lbs | High-End Aesthetic Drawers | Very High |
| European Hinges | 25 lbs | Cabinet Doors / Tool Storage | Moderate |
| Pocket Screws | N/A | Frame and Carcass Assembly | High |
Technical Layout
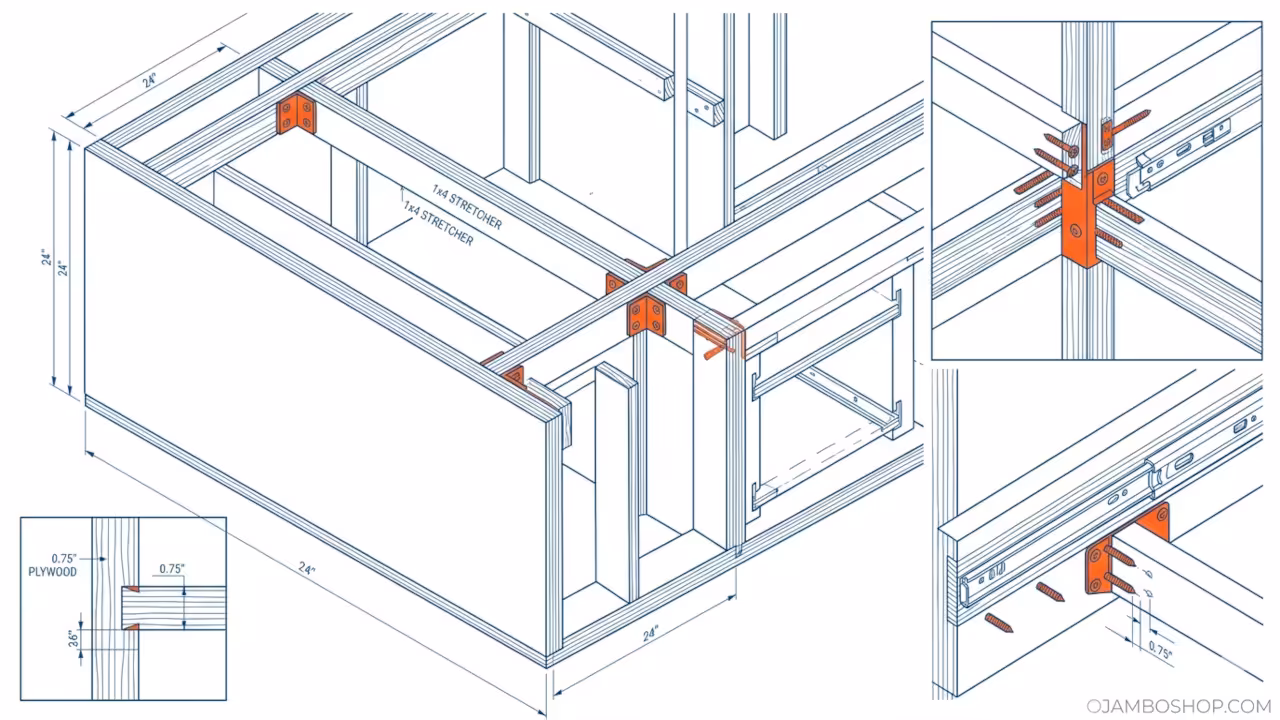
The structural integrity of this kitchen island relies on a reinforced “box-within-a-box” framing philosophy to handle the lateral forces of heavy pull-out components. Unlike a stationary wall cabinet, an island must be rigid on all four sides because it is not anchored to a wall stud for stability.
We utilize 3/4 inch plywood for the side panels, which are joined to a solid 3/4 inch bottom plate using pocket hole joinery and waterproof wood glue. To support the heavy butcher block top, we incorporate 1×4 pine stretchers across the top of the frame, providing multiple points for mechanical fastening.
The trash pull-out section requires a reinforced floor to support the weight of two full bins without sagging over time. This is achieved by installing a double-layered plywood base or adding a central support rib beneath the drawer slide mounting plane.
Step-by-Step Instructions
Phase 1: Carcass Construction
Begin by cutting your 3/4 inch plywood into the two side panels, the bottom plate, and the central vertical divider. Use your pocket hole jig to drill holes along the edges of the bottom plate and the top stretchers for hidden assembly. Apply a thin bead of wood glue to every joint before driving your 1-1/4 inch screws to ensure a permanent bond. Check the assembly for squareness by measuring the diagonals; both measurements must be identical to ensure the drawers will track properly.
Phase 2: Face Frame Assembly
Cut your 1×3 select hardwood to length for the stiles and rails that will form the front face of the island. Join these pieces using pocket holes on the rear side of the frame so that no fasteners are visible from the front. Sand the face frame smooth with 120-grit sandpaper before attaching it to the plywood carcass with glue and finish nails. Ensure the face frame is perfectly flush with the outer edges of the plywood panels to create a professional, seamless appearance.
Phase 3: The Trash Pull-Out Mechanism
Measure the internal width of the large compartment and subtract the thickness of your drawer slides, which is typically one inch total. Build a sturdy, low-profile drawer box using 1/2 inch plywood that will hold your plastic trash and recycling bins securely. Mount the heavy-duty drawer slides approximately 2 inches from the bottom of the cabinet to provide clearance for the bin movement. Test the slide action multiple times to ensure there is no binding or resistance before proceeding to the next construction phase.
Phase 4: Vertical Spice Rack Build
The spice rack is a narrow, tall drawer assembly that slides out from the side or front of the island structure. Build a three-tier shelf unit using 1/2 inch plywood, ensuring the heights of the shelves accommodate standard and oversized spice containers. Attach your over-travel slides to the side of this unit and the corresponding internal divider within the cabinet carcass. This specialized rack adds immense utility by utilizing narrow gaps in the floor plan that would otherwise be wasted dead space.
Phase 5: Drawer Box Construction
Construct the top utensil drawer using traditional butt joints or pocket holes, depending on your preferred level of woodworking complexity. The drawer bottom should be made from 1/4 inch plywood slotted into a groove or stapled securely to the bottom of the box. Ensure the drawer box is exactly 1/2 inch narrower than the opening to accommodate the standard ball-bearing drawer slide hardware. Sand the interior of the drawer box thoroughly to prevent splinters from catching on kitchen linens or wooden cooking utensils.
Phase 6: Door and Drawer Fronts
Cut your door and drawer fronts from the remaining 1×3 hardwood and 1/4 inch plywood panels for a classic shaker-style look. Align the drawer fronts with the pull-out mechanisms, using shims to maintain an even 1/8 inch reveal around all four sides. Secure the fronts from the inside of the drawer boxes using 1-1/4 inch screws once you have achieved perfect alignment. Install the soft-close hinges on the main cabinet door, adjusting the screws until the door hangs perfectly level and closes silently.
Phase 7: Countertop Installation
Place your butcher block countertop onto the cabinet base, centering it to allow for an even overhang on the front and sides. Drill oversized pilot holes through the top stretchers of the cabinet to allow the wood countertop to expand and contract naturally. Use specialized tabletop fasteners or lag bolts with washers to secure the top without over-tightening, which could cause the wood to crack. Sand the edges of the butcher block with progressively finer sandpaper until the surface is exceptionally smooth to the touch.
Phase 8: Sanding and Preparation
Remove all hardware, including slides and hinges, to prepare the island for the final finishing process and surface protection. Fill any visible nail holes or minor gaps in the joinery with a high-quality wood filler that matches your chosen wood species. Sand the entire unit with 150-grit followed by 220-grit sandpaper to remove any remaining mill marks or glue residue from the surface. Vacuum the project and wipe it down with a tack cloth to ensure the wood is completely free of dust.
Phase 9: Finishing and Sealing
Apply a high-quality cabinet-grade paint or a durable wood stain to the base, following the manufacturer instructions for drying times. For the butcher block top, apply at least three coats of food-grade mineral oil or a specialized butcher block conditioner. Allow the finish to cure in a dust-free environment for at least 24 hours before reattaching the hardware and moving the island. Proper curing is essential for a finish that can withstand the moisture and heat typical of a busy kitchen environment.
Phase 10: Final Assembly
Reinstall the drawer slides, hinges, and decorative pulls, ensuring that every screw is tight and every component is properly aligned. Place your trash bins into the pull-out section and organize your spices within the vertical rack to test the full functionality. Perform a final wipe-down with a damp cloth to remove any fingerprints or installation debris before placing the island in its permanent location. Your multifunctional kitchen island is now ready to serve as the centerpiece of your home for many years to come.
Common Mistakes
One of the most frequent errors is failing to account for the thickness of the drawer slides when building the internal drawer boxes. Even a discrepancy of 1/16th of an inch can cause the slides to bind or prevent the drawer from closing flush against the frame.
Another common pitfall is using standard wood screws for the butcher block installation without allowing for seasonal wood movement. If the top is pinned too tightly to the base, the natural expansion of the wood will eventually lead to structural cracking.
Many builders also neglect to level the island during the installation phase, which can lead to drawers drifting open on their own. Always use adjustable furniture feet or shims beneath the base to ensure the unit is perfectly level on your kitchen floor.
Maintenance and Safety
Pro-Tip: For maximum structural integrity, always use a polyurethane-based wood glue on any joint that may be exposed to high humidity or liquid spills. Additionally, apply a clear silicone bead along the bottom edge of the island base to create a moisture barrier against wet mopping.
When operating heavy machinery like table saws or miter saws, always wear impact-resistant safety glasses and hearing protection to prevent long-term injury. Ensure your workspace is well-ventilated when applying stains or paints, as the fumes can become hazardous in enclosed residential garage environments.
Regularly re-oil your butcher block every three to six months to maintain its water resistance and prevent the wood from drying out or warping. Check the tightness of your drawer slide screws annually, as the vibration of constant use can occasionally loosen the mechanical fasteners over time.