
Introduction
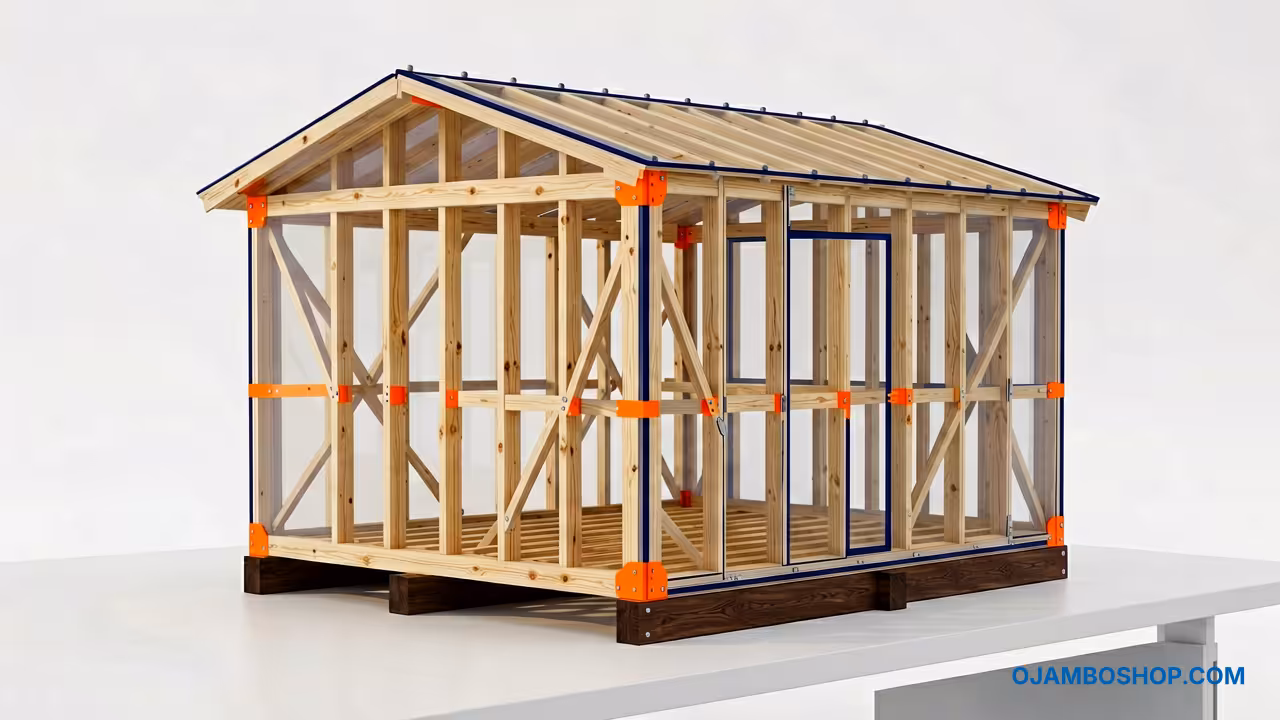
The 6×12 modern I-frame wood shed represents a perfect intersection of contemporary aesthetics and rugged utility for the modern homeowner. This structure offers a sleek profile that complements minimalist landscaping while providing a generous seventy-two square feet of secure storage space.
By opting for an I-frame design, you are prioritizing structural rigidity and efficient material usage throughout the entire building process. This project not only solves your organization’s needs but also significantly increases the overall market value of your residential property.
Investing your time in a high-quality build ensures that your garden tools, bicycles, and outdoor equipment remain protected from the elements for decades. The following guide provides the technical roadmap necessary to execute this build with the precision of a master carpenter.
Quick Specs
Dimensions: 6 Feet Width x 12 Feet Length x 9 Feet Height
Estimated Cost: 1,200 to 1,800 USD depending on local lumber market prices
Difficulty Level: Intermediate to Advanced DIY
Estimated Build Time: Three to Four full weekends for a solo builder
Materials and Tools
The foundation of a lasting structure starts with selecting premium pressure-treated lumber for all components that interact with ground moisture. You will require 2×6 pressure-treated joists, 4×4 runners for the base, and 2×4 kiln-dried studs for the interior wall framing.
For the exterior, 4×8 sheets of T1-11 or LP SmartSide siding provide the best balance of durability and ease of installation. The roofing system utilizes 7/16-inch OSB sheathing topped with synthetic underlayment and architectural asphalt shingles or corrugated metal panels for a modern look.
Your hardware list must include 3-inch and 3.5-inch framing nails, 2-inch galvanized siding nails, and heavy-duty 6-inch strap hinges for the double doors. Do not overlook the importance of high-quality wood glue and exterior-grade silicone caulk to seal every joint against water intrusion.
Essential tools for this project include a circular saw, a miter saw for precise cross-cuts, and a pneumatic framing nailer to speed up assembly. You will also need a 4-foot level, a speed square for checking rafter angles, a power drill with various driver bits, and a chalk line.
Technical Layout
The I-frame geometry utilized in this 6×12 shed focuses on a centralized load-bearing spine that distributes weight evenly across the 4×4 pressure-treated skids. In a traditional shed, the walls carry the majority of the roof load, but the I-frame adaptation reinforces the floor-to-wall connection to prevent racking over time. The floor joists are spaced at 12 inches on center rather than the standard 16 inches to account for the heavy concentrated loads often found in long, narrow 12-foot storage spaces. This tighter spacing prevents the 3/4-inch plywood subfloor from sagging under the weight of lawn tractors or heavy shelving units.
The roof rafters are cut at a 4/12 pitch, providing a modern low-profile silhouette while ensuring adequate water runoff in temperate climates. Each rafter is secured with hurricane ties to the top plate, creating a continuous load path from the peak of the roof down to the foundation. This specific framing technique is vital for structures with a 12-foot span, as it resists the uplift forces generated during high wind events. By integrating the headers directly into the top plate assembly, we maximize the vertical door clearance without sacrificing the structural integrity of the front-facing wall.

Step-by-Step Instructions
Phase 1: Foundation and Site Preparation
Begin by clearing a 8×14 foot area of all vegetation and leveling the ground with crushed stone or gravel for drainage. Lay out your three 4×4 pressure-treated runners parallel to each other, ensuring they are perfectly level and spaced 3 feet apart. Check for square by measuring the diagonals; they must be exactly equal before you proceed to the floor framing.
Phase 2: Floor Joist Assembly
Cut your 2×6 pressure-treated joists to the 6-foot width and secure them to the rim joists using galvanized joist hangers. Space these joists at 12 inches on center to create a rigid platform that can support heavy machinery without flexing. Once the frame is complete, install the 3/4-inch tongue-and-groove plywood subfloor using construction adhesive and 2.5-inch deck screws for a squeak-free finish.
Phase 3: Wall Frame Construction
Build the two 12-foot longitudinal walls first on the flat floor shop surface before raising them into a vertical position. Use 2×4 studs spaced 16 inches on center, ensuring you include a double top plate for added strength and roof support. Construct the 6-foot end walls, including the rough opening for the double doors on the front-facing gable or side wall depending on your preference.
Phase 4: Raising the Walls
Lift the long walls into place and temporarily brace them with scrap lumber to ensure they remain plumb and true during the process. Secure the bottom plates through the subfloor and into the joists using 3.5-inch nails or structural screws every 12 inches. Connect the corners by nailing through the end studs of the shorter walls into the corner posts of the long walls for a seamless transition.
Phase 5: Rafter Cutting and Installation
Mark and cut your first rafter pattern using a speed square to set the 4/12 pitch and the birdsmouth cut for the top plate seat. Test the fit of the first pair of rafters before using them as a template to cut the remaining eleven pairs needed for the roof. Install a 2×6 ridge board and attach the rafters in pairs, securing each one with metal hurricane ties to prevent movement during seasonal temperature shifts.
Phase 6: Exterior Siding Application
Install the 4×8 siding panels starting from one corner, ensuring the first panel is perfectly plumb to prevent a cumulative error across the 12-foot span. Leave a 1/8-inch gap between panels to allow for natural expansion and contraction of the wood fibers throughout the year. Use galvanized siding nails every 6 inches along the edges and every 12 inches in the field to prevent the panels from warping or pulling away.
Phase 7: Roofing and Underlayment
Nail the 7/16-inch OSB sheathing to the rafters, leaving a small gap at the ridge for ventilation if you plan to install a ridge vent. Cover the entire roof surface with synthetic underlayment, overlapping the seams by at least 4 inches to create a secondary water barrier. Install drip edge flashing along all eaves and rakes before laying down your shingles or metal panels to protect the fascia boards from rot.
Phase 8: Door Fabrication and Hanging
Build the double doors using a 2×4 internal frame reinforced with a diagonal “Z” brace to prevent the doors from sagging over time. Skin the exterior of the doors with the same siding material used on the walls for a cohesive and professional appearance. Hang the doors using three heavy-duty strap hinges per side, ensuring there is a 1/4-inch clearance around the entire perimeter for smooth operation.
Phase 9: Trim and Detail Work
Apply 1×4 cedar or composite trim to the corners, door casing, and roofline to hide the raw edges of the siding and roofing materials. Use a high-quality exterior caulk to seal the gaps where the trim meets the siding and around the door frame to prevent moisture infiltration. This stage is critical for the “Modern” look, as clean, sharp lines define the aesthetic of the I-frame design.
Phase 10: Finishing and Preservation
Sand any rough edges on the trim and doors before applying a high-quality exterior stain or paint to protect the wood from UV damage. If using paint, apply one coat of oil-based primer followed by two coats of premium exterior latex paint for maximum longevity. Check the functionality of the door hardware and install a heavy-duty slide bolt or locking latch to secure your belongings.
Common Mistakes
One frequent error is failing to properly level the foundation runners, which leads to walls that are out of plumb and doors that will not close. If the base is off by even half an inch, that discrepancy will multiply as you move upward into the roof framing.
Another common mistake is neglecting the use of a “Z” brace on the shed doors, causing them to sag and drag on the floor within months. The diagonal brace must run from the bottom hinge side to the top latch side to effectively transfer the weight of the door.
Many builders also forget to leave expansion gaps between the siding panels, which results in the wood buckling during humid summer months. A simple 1/8-inch gap, covered by trim or filled with flexible caulk, is essential for the structural integrity of the exterior skin.
Maintenance and Safety
| Material Type | Recommended Use | Expected Lifespan | Pros/Cons |
|---|---|---|---|
| Pressure Treated | Foundation/Joists | 30+ Years | Rot resistant / Heavy |
| Cedar Trim | Corners/Fascia | 15-20 Years | Naturally durable / Expensive |
| LP SmartSide | Exterior Walls | 50 Year Warranty | Engineered strength / Needs paint |
| Galvanized Nails | Framing/Siding | 40+ Years | Rust proof / Harder to pull |
Pro-Tip: To significantly extend the life of your 6×12 shed, install a continuous ridge vent and soffit vents to allow for passive airflow. Trapped moisture is the primary cause of premature structural failure in backyard buildings; proper ventilation keeps the framing dry and prevents mold growth on the interior sheathing.
Always wear safety glasses when using power saws and hearing protection when operating pneumatic nail guns for extended periods. When lifting the 12-foot wall sections, ensure you have at least one assistant to prevent injury or damage to the subfloor.
Treat the exterior of your shed every three to five years with a UV-rated sealant or a fresh coat of paint to maintain the moisture barrier. Periodically check the roof for any damaged shingles or debris buildup in the drip edges to ensure water continues to divert away from the wooden foundation.
By following these technical specifications and maintaining a rigorous build quality, your modern I-frame shed will serve as a durable landmark on your property. This project rewards the patient builder with a professional-grade structure that rivals any prefabricated unit on the market today.