
The Ultimate Live Edge River Coffee Table Guide For Beginners
The live edge river coffee table represents the pinnacle of modern rustic furniture design. It seamlessly blends the organic, raw beauty of natural timber with the sleek, industrial aesthetic of colored epoxy resin. This project offers more than just a surface for your morning coffee; it creates a functional piece of art that serves as a focal point in any living space.
Investing your time into this build increases the perceived value of your interior design significantly. A high-quality river table often retails for thousands of dollars in high-end boutiques, yet the raw materials remain accessible to the dedicated DIY builder. By following this protocol, you will master the delicate balance of structural stability and artistic fluid dynamics.
Quick Specs
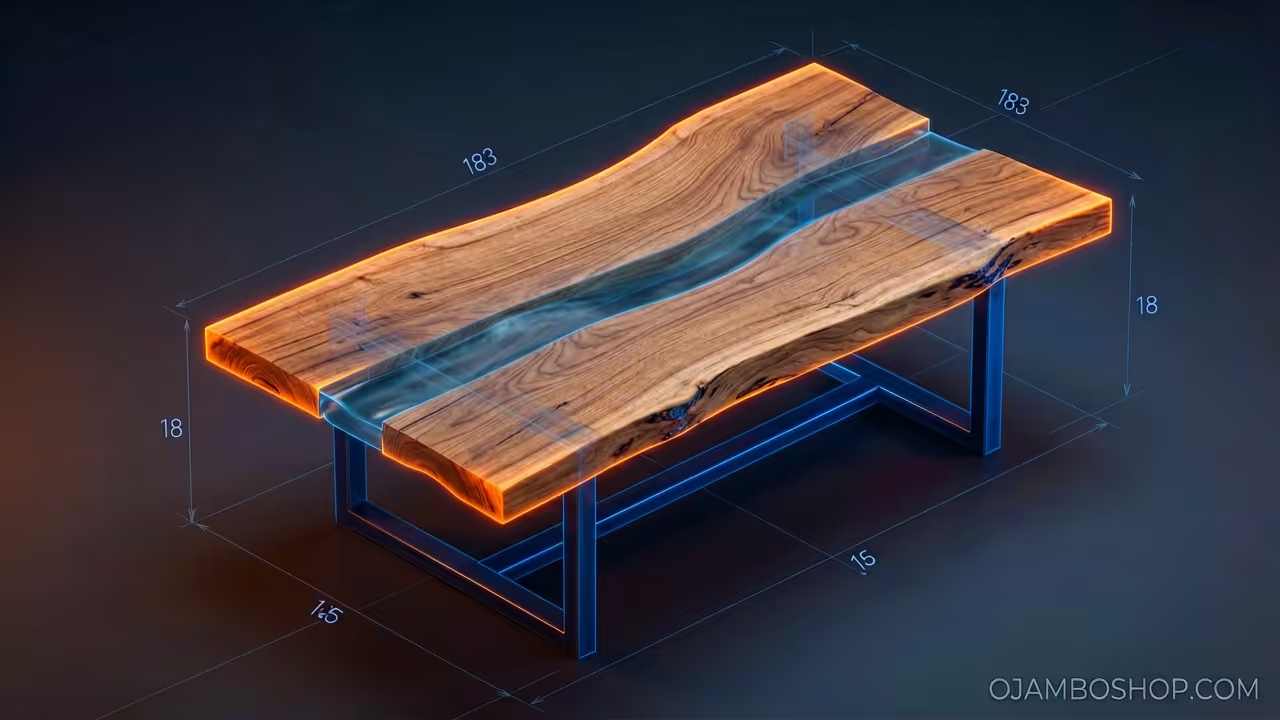
Dimensions: 48 inches long by 24 inches wide by 18 inches high. Estimated Cost: 450 to 800 dollars depending on wood species and resin volume. Difficulty Level: Intermediate to Advanced. Estimated Build Time: 7 to 10 days including resin cure cycles.
Materials and Tools
Lumber: Two matching live edge slabs of Black Walnut or White Oak, 2 inches thick. Hardware: Heavy-duty steel U-frame legs or custom wooden trestle base. Resin: 3 to 5 gallons of deep-pour epoxy resin and liquid pigment. Form Materials: Melamine board, Tuck tape, and 100 percent silicone caulk.
Sanding: Grits ranging from 80 up to 3000 for high-gloss finishes. Polishing: Rubbing compound and a high-speed orbital buffer. Safety Gear: Respirator with organic vapor cartridges, nitrile gloves, and eye protection. Measuring: Digital calipers, a 48 inch level, and a moisture meter.
Cutting: Track saw or circular saw with a straight edge guide. Mixing: High-torque drill with a spiral mixing paddle and graduated mixing buckets. Leveling: Shim kits and a dedicated, perfectly level workbench.
Material Comparison Table
| Material Type | Pros | Cons | Best Use Case |
|---|---|---|---|
| Black Walnut | High stability and dark contrast | Expensive and heavy | Luxury high-end furniture |
| Cedar | Rot resistant and lightweight | Very soft and dents easily | Outdoor or rustic builds |
| Deep Pour Epoxy | Low heat and high clarity | Slow 72 hour cure time | River gaps over 1 inch |
| Table Top Epoxy | Fast cure and high scratch resistance | Yellows easily and thin pours | Final protective seal coat |
Technical Layout
The structural integrity of a river table relies entirely on the mechanical bond between the wood fibers and the epoxy core. Unlike traditional solid wood tops, the resin acts as a rigid bridge that must resist the natural expansion and contraction of the timber slabs. We utilize a book-matched orientation where the natural outside edges of the tree are turned inward to face each other.
This creates the river channel while the straight-cut factory edges form the outer perimeter of the tabletop. Maintaining a moisture content of below 10 percent is critical for preventing the wood from pulling away from the resin over time. If the wood is too wet, the epoxy will not penetrate the pores, leading to catastrophic delamination as the wood eventually dries in your home.
The load-bearing capacity is reinforced by the thickness of the slabs, which should never be less than 1.5 inches for a 48-inch span. This thickness provides enough surface area for the epoxy to grab onto the wood grain, creating a unified slab that functions as a single structural unit.
Step-by-Step Instructions: Phase 1 to 4
Phase 1: Wood Selection and Preparation
Begin by selecting two slabs with interesting “live” contours that complement each other when mirrored. Use a draw knife or a stiff wire brush to remove every trace of bark and loose cambium layer from the inner edges. Any bark left on the wood will eventually rot or cause the epoxy bond to fail completely.
Phase 2: Building the Pour Form
Construct a leak-proof box using melamine board, ensuring the internal dimensions are at least 1 inch larger than your intended table size. Cover the entire inner surface of the melamine with Tuck tape, as epoxy will not stick to the polypropylene backing. Seal all exterior and interior joints with a thick bead of silicone caulk and allow it to dry for 24 hours.
Phase 3: Sealing the Live Edges
Before the main pour, paint a thin layer of fast-set epoxy onto the cleaned live edges of your wood slabs. This seal coat prevents air bubbles from escaping the wood grain and entering the deep pour later. Allow this seal coat to become tacky or fully dry before placing the slabs into the prepared melamine form.
Phase 4: The Deep Pour Process
Secure the slabs to the form using heavy weights or clamps to prevent them from floating once the liquid resin is added. Mix your deep-pour epoxy in a clean bucket, following the manufacturer ratio exactly by volume or weight. Add your chosen pigment slowly and pour the mixture into the river channel, using a heat gun to pop surface bubbles.
Step-by-Step Instructions: Phase 5 to 8
Phase 5: Curing and Demolding
Place a dust cover over the form and maintain a constant room temperature between 70 and 75 degrees Fahrenheit. Do not touch the resin for at least 72 hours, as the curing process is a sensitive chemical reaction. Once fully hardened, remove the side walls of the form and carefully pry the slab off the melamine base.
Phase 6: Flattening the Slab
Use a router sled or a wide-belt sander to bring the wood and resin surfaces to a perfectly flush plane. This step is the most labor-intensive part of the build and requires patience to avoid gouging the material. Take light passes of about 1/16th of an inch at a time until the entire surface is uniform and level.
Phase 7: Precision Sanding
Work through your sandpaper grits methodically, starting at 80 and progressing up to 320 for the wood sections. For the resin river, continue sanding with wet-dry paper up to 3000 grit to achieve a translucent or transparent look. Always wipe the surface with a microfiber cloth between grits to remove any abrasive particles that could cause deep scratches.
Phase 8: Finishing and Leg Mounting
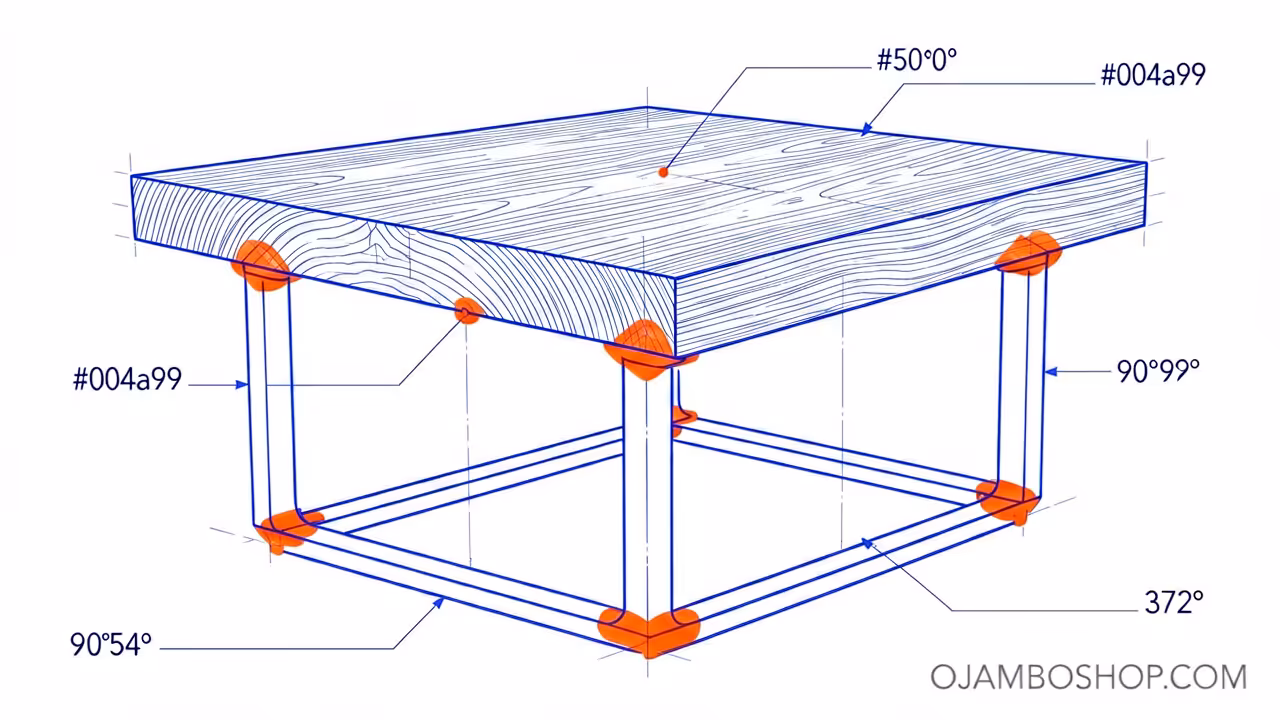
Apply a hard-wax oil or a polyurethane finish to the wood to bring out the natural grain and protect against moisture. Flip the table over and pre-drill holes for your steel legs, using threaded inserts for a professional and removable connection. Ensure the legs are perfectly square to the table ends to provide maximum lateral stability.
Common Mistakes to Avoid
The most frequent error in river table construction is improper mixing of the two-part epoxy resin components. If the resin is not stirred thoroughly, including the bottom and sides of the bucket, it will leave “soft spots” that never fully cure. These sticky areas are nearly impossible to fix without excavating the uncured resin and re-pouring the section entirely.
Another critical mistake is failing to level the workbench before the pour begins. Epoxy is a self-leveling liquid, meaning it will pool at the lowest point of your form if the table is even slightly tilted. This results in a lopsided river that is thin on one end and dangerously thick on the other, complicating the flattening process.
Ignoring the thermal mass of the epoxy can also lead to a disaster known as “exothermic runaway.” If you pour resin too deep in a single pass, the chemical reaction generates excessive heat that can crack the wood or cause the resin to smoke and turn yellow. Always check the maximum pour depth rating on your specific epoxy brand before filling the river channel.
Maintenance and Safety
Pro-Tip: For maximum longevity, use C-channel steel stiffeners recessed into the underside of the tabletop. These structural braces allow the wood to move with seasonal humidity changes while preventing the slab from cupping or bowing over time. Always use oversized holes in the steel to permit the fasteners to slide as the timber expands.
Safety should remain your top priority during the sanding and mixing phases of this project. Hardwood dust is a known carcinogen, and uncured epoxy resins can cause severe skin sensitization or respiratory distress. Always wear a high-quality respirator and maintain active ventilation in your workshop to ensure a safe building environment.
To maintain your finished table, avoid placing hot mugs directly on the resin surface without a coaster. While modern epoxies are heat resistant, they can soften or “blush” when exposed to extreme temperatures. Clean the surface with a damp microfiber cloth and mild soap, avoiding harsh chemical cleaners that can strip the protective oil finish from the wood.