
Build a Backyard Stargazing Platform with Bench Seating
Transform your backyard into a private observatory with this elevated wooden platform designed for celestial viewing and quiet relaxation. This structure combines practical deck construction with thoughtful ergonomic seating to create a dedicated outdoor space that enhances your property value while providing years of enjoyment. The design prioritizes stability, weather resistance, and comfort for extended evening use under the night sky.
Quick Specs
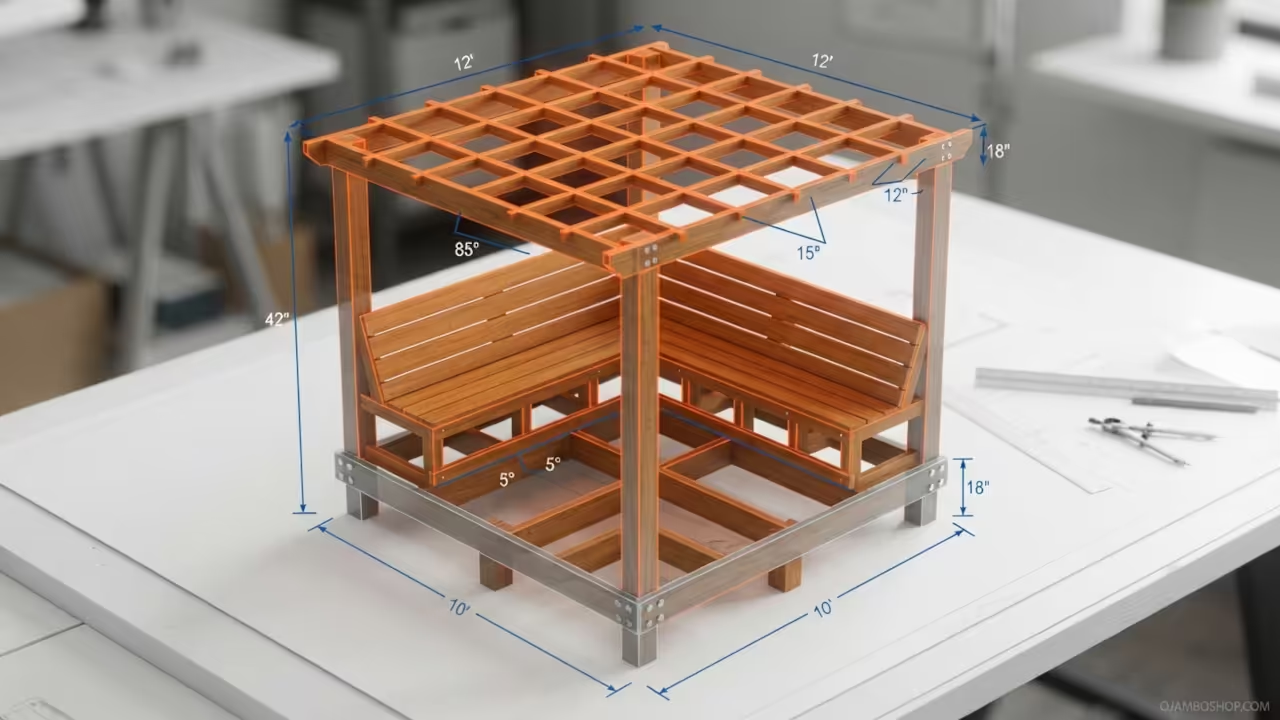
Platform Dimensions: 10 feet wide by 8 feet deep. Platform Height: 18 inches above grade. Overhead Frame: 12 feet wide by 10 feet deep at 42 inches above platform surface. Estimated Cost: 650 to 950 dollars depending on lumber availability. Difficulty Level: Intermediate. Estimated Build Time: 2 full weekends or 16 to 20 hours.
Materials and Tools
Lumber Requirements
- Pressure-treated 6×6 posts: 4 pieces at 7 feet 6 inches length for corner supports
- Pressure-treated 4×4 skids: 2 pieces at 10 feet length for ground bearing beams
- Pressure-treated 2×6 decking boards: 24 pieces at 10 feet length for platform surface
- Pressure-treated 2×4 framing lumber: 8 pieces at 8 feet length for rim joists and cross beams
- Dressed 2×4 lumber: 12 pieces at 6 feet length for bench framing and backrest supports
- Dressed 2×6 lumber: 8 pieces at 6 feet length for bench seat surfaces
- Exterior-grade 3/4-inch plywood: 2 sheets at 4 feet by 8 feet for bench seat substrate
- Pressure-treated 2×8 lumber: 4 pieces at 12 feet length for overhead pergola beams
- Pressure-treated 2×6 lumber: 6 pieces at 10 feet length for overhead cross slats
Hardware Requirements
- 3-inch exterior deck screws: 250 count box
- 2.5-inch exterior deck screws: 100 count box
- 1/4-inch by 3-inch lag bolts with washers: 16 pieces
- 1/2-inch by 4-inch galvanized carriage bolts with nuts and washers: 8 pieces
- 3-inch concrete anchor bolts: 4 pieces
- 1/4-inch by 2-inch structural screws: 50 pieces
- Galvanized joist hangers 16-gauge: 8 pieces
- Stainless steel hinge pair 4-inch: 2 pairs for removable bench backrests
Tools Required
- Circular saw or miter saw with carbide-tipped blade
- Power drill with clutch and driver bits
- Level 4-foot and 2-foot torpedo level
- Tape measure 25-foot
- Speed square and combination square
- Chalk line and chalk
- Post hole digger or auger 8-inch diameter
- Shovel and hand tamper
- Rubber mallet
- Safety glasses and hearing protection
- Work gloves
Technical Layout
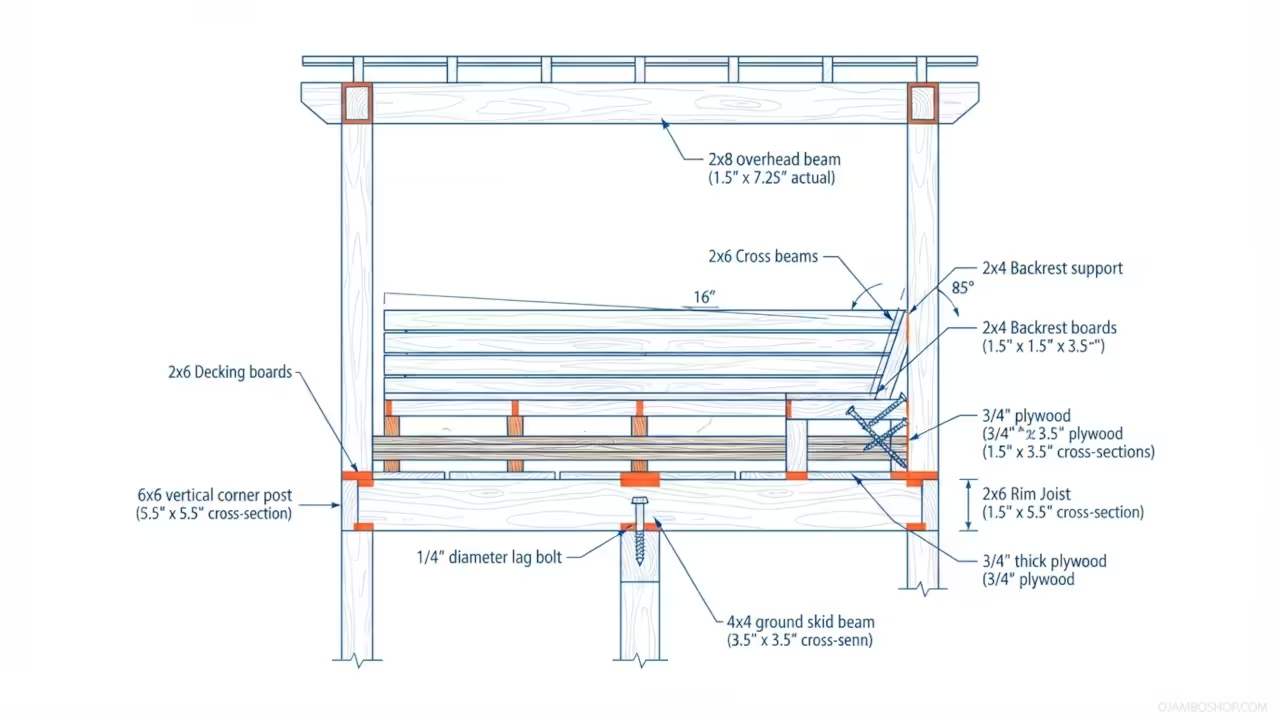
The structural foundation relies on four pressure-treated 6×6 corner posts embedded 24 inches below grade into compacted gravel footings. Each post connects to a 4×4 ground skid via 1/4-inch lag bolts, creating a rigid base frame that distributes the entire platform load across the soil surface. The 18-inch platform elevation uses 2×6 rim joists bolted to the top of each post, with cross beams spaced at 16 inches on center running perpendicular to the decking direction. This configuration provides adequate support for live loads up to 50 pounds per square foot, which accommodates multiple adults and equipment simultaneously.
The bench seating integrates directly into the platform structure along two adjacent sides, forming an L-shaped configuration. Each bench consists of a 2×4 frame anchored to the rim joists, topped with 3/4-inch exterior plywood substrate and finished with 2×6 seat boards. The backrest rises 18 inches above the seat using vertical 2×4 supports angled at 85 degrees from horizontal for optimal lumbar comfort. The overhead pergola frame sits 42 inches above the platform surface, providing shade structure without obstructing the night sky view.
Pro-Tip: Use hot-dip galvanized or stainless steel fasteners for all below-grade and exterior connections. Standard zinc-plated screws will corrode within two to three seasons when exposed to soil moisture and rain splash. The additional cost of corrosion-resistant hardware prevents structural degradation and eliminates the need for premature repairs.
Step-by-Step Instructions
Phase 1: Site Preparation and Layout
Clear the build area of vegetation, rocks, and debris within a 12-foot by 10-foot rectangle. Use a tape measure and stakes to mark the four corner post locations at 10 feet by 8 feet spacing. Drive a string line between opposite corners and measure both diagonals. Adjust the corner stakes until both diagonal measurements are exactly equal, ensuring a perfectly square layout. Mark the center of each corner stake for post hole positioning.
Phase 2: Post Installation and Footings
Dig four post holes to a depth of 24 inches and a diameter of 8 inches using a post hole auger. Place 4 inches of crushed gravel into the bottom of each hole and compact it firmly with a hand tamper. Set each 6×6 post into its hole, using a level to verify plumb on both faces. Fill the remaining hole volume with gravel and compact in 2-inch layers until the post sits 18 inches above finished grade. Repeat this process for all four posts, checking plumb after each filling stage.
Phase 3: Ground Skid Assembly
Position the two 4×4 skid beams parallel to the 8-foot dimension, running beneath the platform between opposite post pairs. Fasten each skid to the adjacent posts using two 1/4-inch by 3-inch lag bolts with washers per connection point. Place the lag bolts 6 inches from each end of the skid to distribute clamping force evenly. Verify that both skids sit at the same elevation using a 4-foot level placed across their tops.
Phase 4: Platform Frame Construction
Install the 2×6 rim joists on top of each corner post, running perpendicular to the skids. Secure each rim joist with two galvanized joist hangers bolted to the post face. Add cross beams at 16-inch on-center spacing across the 8-foot span, resting them on the rim joists and fastening with 3-inch exterior deck screws driven at a downward angle. Install the 5-degree drainage slope by shimming the rear cross beams with 3/4-inch plywood strips, creating a gradual pitch away from the bench seating area.
Phase 5: Decking Installation
Lay the 2×6 decking boards across the cross beams, running parallel to the 10-foot dimension. Leave a 1/8-inch gap between each board for water drainage and wood expansion. Fasten each board with two 3-inch exterior deck screws per cross beam intersection. Stagger the board ends so they fall on different cross beams, preventing weak alignment points. Sand all board edges with 80-grit sandpaper to remove splinters and create a smooth walking surface.
Phase 6: Bench Seating Frame
Construct the L-shaped bench frame along two adjacent platform edges using 2×4 lumber. Cut the frame pieces to create a 48-inch wide seat running along each side, meeting at a 90-degree corner joint. Anchor the bench frame to the platform rim joists using 3-inch structural screws driven through the frame into the joist faces. Add vertical 2×4 backrest supports at 12-inch spacing, angling them 85 degrees from horizontal and fastening to both the seat frame and platform surface.
Phase 7: Bench Seat and Backrest Finish
Cut the 3/4-inch exterior plywood to fit the bench seat dimensions, leaving a 1/2-inch overhang on the front edge. Screw the plywood substrate to the bench frame using 1.25-inch screws at 6-inch spacing. Install the 2×6 seat boards across the plywood, fastening with 2.5-inch deck screws and maintaining 1/8-inch gaps. Attach the backrest boards horizontally across the vertical supports, using stainless steel hinges on the top section to allow folding flat when not in use.
Phase 8: Overhead Pergola Frame
Install the 2×8 overhead beams across the platform, spanning between the 6×6 posts at a height of 42 inches above the deck surface. Secure each beam to the posts using 1/2-inch by 4-inch galvanized carriage bolts with nuts and washers on both sides. Add the 2×6 cross slats perpendicular to the main beams at 12-inch on-center spacing. Fasten each slat with two 3-inch deck screws per beam intersection. This open-grid design provides structural shade while maintaining unobstructed sky visibility.
Phase 9: Final Inspection and Safety Check
Walk the entire platform surface and apply downward pressure on all areas to verify structural rigidity. Check that all fasteners are fully driven and no screw heads protrude above the wood surface. Test the bench backrest hinges for smooth operation and secure locking. Verify the 5-degree drainage slope by pouring water on the deck surface and confirming runoff direction. Install any desired lighting fixtures using low-voltage LED strips mounted beneath the bench overhang.
Common Mistakes
Skipping the diagonal square check during layout results in a raked platform that feels unstable and causes deck boards to align improperly. Builders who rush this step often discover misalignment only after completing the frame, requiring demolition and restart.
Using standard zinc-plated fasteners in below-grade applications leads to rapid corrosion within the first rainy season. The soil moisture creates an electrolytic environment that dissolves thin zinc coatings, leaving rusted screws that snap under load.
Installing decking boards without expansion gaps causes cupping and buckling when humidity changes cause wood to swell. Boards pressed tightly together have nowhere to expand, creating raised ridges that become tripping hazards and trap standing water.
Neglecting to sand deck board edges leaves sharp splinter points that cause injury during barefoot use. The end grain of pressure-treated lumber is particularly prone to splitting and creating jagged fiber protrusions that embed easily in skin.
Maintenance and Safety
Apply a water-repellent wood sealant to all exposed surfaces annually during dry spring weather. Focus particular attention on end grain areas where moisture absorption occurs most rapidly. Reapply sealant to the bench seating surfaces every six months due to frequent contact and UV exposure.
Inspect all fasteners bi-annually for signs of corrosion, loosening, or wood splitting around screw heads. Replace any compromised fasteners immediately to maintain structural integrity. Check the post-to-ground connections for soil settlement that could create platform instability.
Clean the deck surface quarterly using a stiff bristle broom and mild detergent solution. Remove leaves, debris, and organic matter that retain moisture against the wood and accelerate decay. Power washing is acceptable at settings below 1500 PSI, but avoid directing the stream at fastener heads or board edges.
Wear safety glasses when operating any power cutting tools and hearing protection during extended saw use. Keep a fire extinguisher accessible when using gas-powered equipment near wooden structures. Never exceed the 50 pounds per square foot live load rating, which translates to approximately 4000 pounds total capacity for the full platform area.