
Introduction
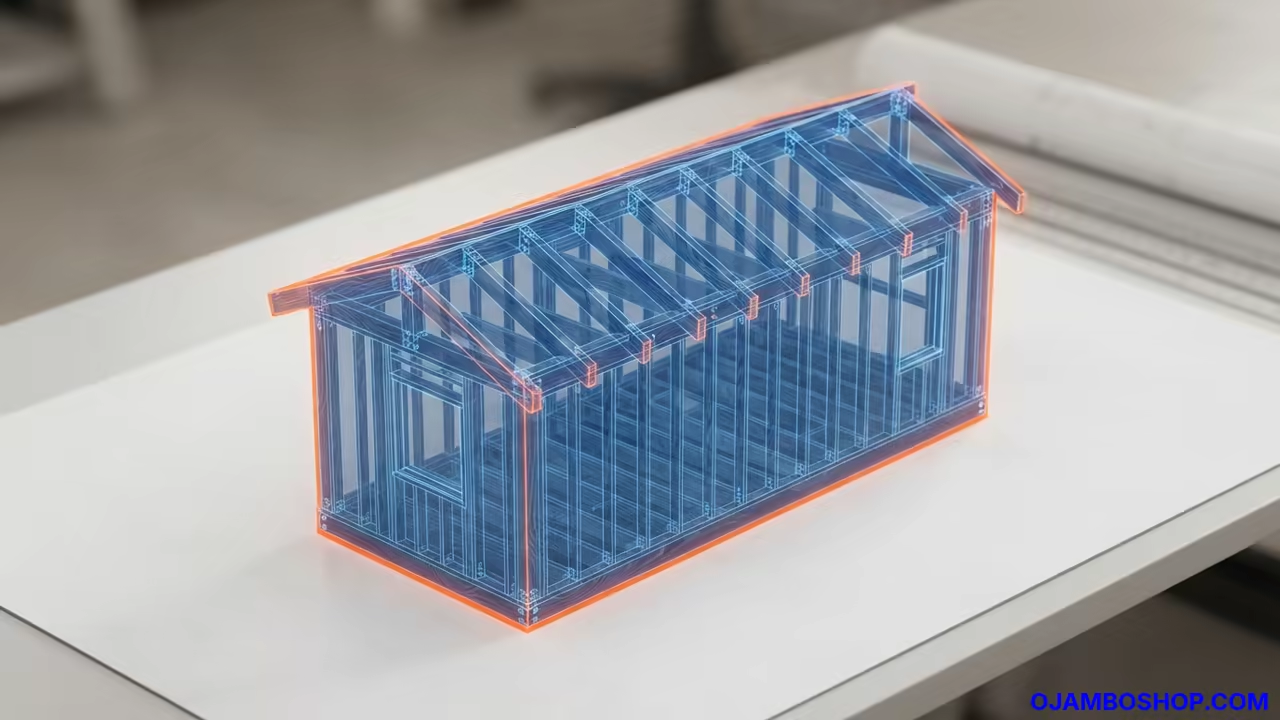
Adding a micro cottage to your property creates an immediate increase in utility and market value. These structures serve as guest houses, rental units, or quiet home offices.
The appeal of the two hundred fifty square foot layout lies in its balance of space. It provides enough room for basic amenities without becoming a full scale construction project.
Quick Specs
The primary footprint for this build is ten feet wide by twenty five feet long. This layout optimizes the interior flow for a single occupant or a couple.
Total estimated costs range between fifteen thousand and twenty five thousand dollars. This varies based on your choice of interior finishes and utility connections.
The difficulty level is rated as advanced for the average homeowner. You will need a strong grasp of basic carpentry and structural geometry.
Estimated build time is approximately four to six months of weekend work. This timeline accounts for curing times and weather delays.
Disclaimer: I may earn a commission from purchases made through these links at no extra cost to you.


Materials and Tools
Lumber requirements include pressure treated four by four skids and two by six floor joists. You will also need standard two by four spruce for wall studs and plates.
For the roof structure, two by eight kiln dried rafters are necessary for load bearing. Ensure you purchase a high grade of lumber to prevent warping.
Hardware lists include three inch deck screws and galvanized hurricane ties for roof security. Do not forget heavy duty joist hangers for the floor perimeter.
Exterior materials consist of seven sixteenths inch oriented strand board and cedar lap siding. A high quality moisture barrier is essential for longevity.
Essential power tools include a miter saw and a circular saw for precision cuts. An impact driver and a cordless drill are required for assembly.
You will need a four foot level and a framing square for all layout work. A pneumatic framing nailer significantly speeds up the wall assembly.
Safety gear must include ANSI approved safety glasses and heavy duty work gloves. Hearing protection is mandatory when operating high speed saws.
Technical Layout
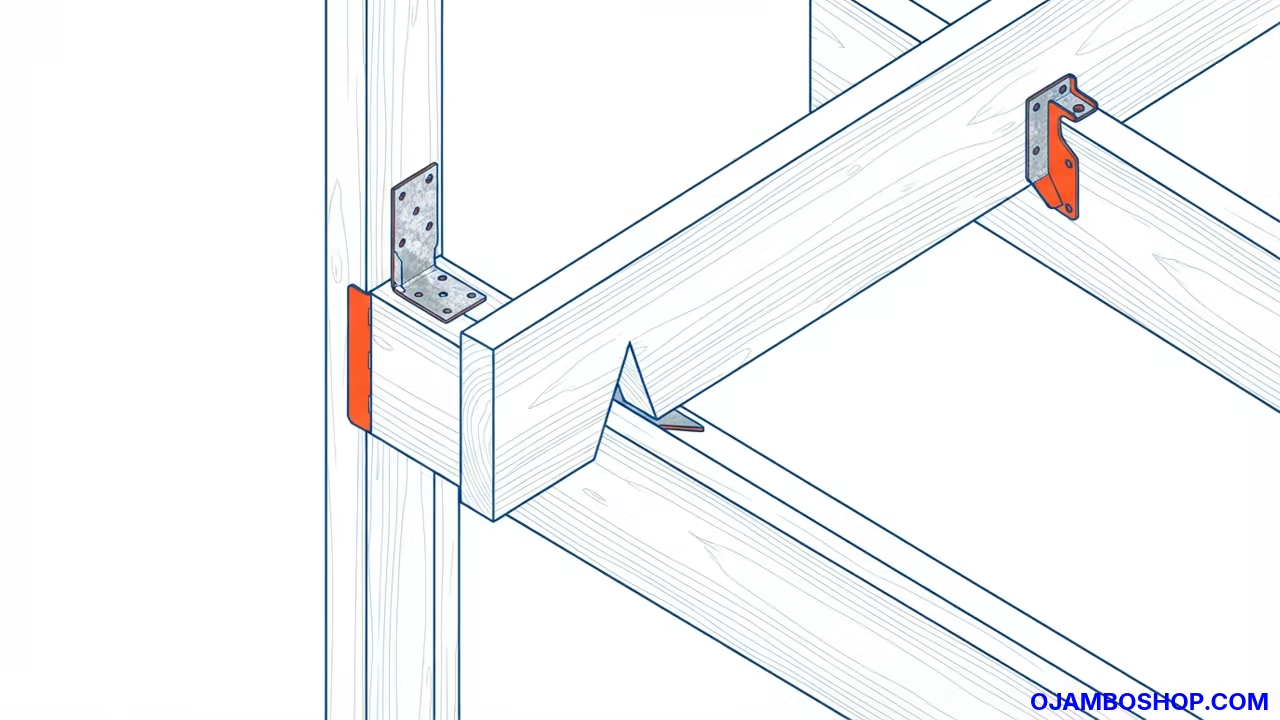
The structural integrity of the micro cottage relies on a rigid floor diaphragm and a plumb wall system. The foundation utilizes four pressure treated four by four skids resting on compacted gravel pads.
Two by six floor joists are spaced sixteen inches on center to prevent sagging under residential loads. This creates a stable platform that resists twisting and shifting over time.
Wall framing uses a traditional platform method with two by four studs spaced sixteen inches on center. The top plates are doubled to distribute the roof load evenly across the vertical members.
Headers for windows and doors are doubled two by sixs to ensure stability. The walls are tied together with a continuous rim joist to prevent lateral movement.
Step by Step Instructions
The first phase involves site preparation and foundation layout. Clear a twenty foot by thirty foot area and level the ground with crushed stone. Place your four by four pressure treated skids parallel to each other with precise spacing.
The second phase focuses on the floor frame assembly. Install two by six rim joists to create a ten by twenty five foot rectangle. Install the internal floor joists every sixteen inches on center using joist hangers.
The third phase is the construction of the four walls. Build each wall flat on the floor using two by four plates and studs. Space the studs sixteen inches on center to meet residential building standards.
The fourth phase involves the installation of the roof structure. Cut your two by eight rafters with a birdsmouth notch to sit flush on the wall plates. Install the ridge board and secure each rafter pair with a structural screw.
The fifth phase is the exterior sheathing process. Apply seven sixteenths inch oriented strand board to the walls and roof. Use a pneumatic nailer to secure the sheets every six inches along the edges.
The sixth phase covers the installation of windows and doors. Set your pre hung door and energy efficient windows into the framed openings. Use flashing tape around all edges to prevent water infiltration.
The seventh phase focuses on the roof decking and final roofing. Lay the roof sheathing and install a waterproof underlayment across the entire surface. Apply asphalt shingles or metal roofing panels starting from the eaves.
The eighth phase is the interior framing and loft installation. Build the loft floor using two by six joists and three quarter inch plywood. Install the internal partition walls for the bathroom and kitchen areas.
The ninth phase involves the installation of utilities. Run your electrical wiring through the studs and install the junction boxes. Plumb the kitchen sink and bathroom shower using PEX piping for durability.
The tenth phase is the final finishing and painting. Install the cedar lap siding on the exterior and paint it with high quality acrylic paint. Hang the interior drywall or wood paneling and sand the seams smooth.
| Parameter | Description | Value |
|---|---|---|
| Lumber | Standard Spruce vs Kiln Dried Douglas Fir | Better Stability |
| Screws | Zinc Coated vs 304 Stainless Steel | Zero Corrosion |
| Insulation | Fiberglass Batts vs Closed Cell Spray Foam | Higher R Value |
| Siding | T1 11 Plywood vs Clear Cedar Lap | Longer Life |
| Roofing | 3 Tab Shingles vs Standing Seam Metal | Maximum Durability |
| Parameter | Description | Value |
Common Mistakes
Many builders fail to install a proper moisture barrier between the sheathing and the siding. This mistake leads to trapped humidity and eventual rot in the wall studs. Always use a high quality house wrap and overlap the seams correctly.
Another frequent error is neglecting to square the floor frame before adding the subfloor. If the base is out of square by even an inch the walls will not align. Always measure the diagonals of the floor to ensure they are identical.
Some DIY builders use undersized fasteners for the roof rafters and ridge board. Using simple nails instead of structural screws can lead to roof failure under heavy snow. Always use rated structural fasteners for any load bearing connection.
A final mistake is ignoring the importance of proper ventilation in a small space. Without a ridge vent and soffit vents the cottage can develop mold issues. Ensure there is a continuous path for air to flow from the eaves to the ridge.
Maintenance and Safety
Pro Tip for structural longevity is to apply a flashing tape to the sill plate before installing the walls. This prevents ground moisture from wicking into the vertical studs. Use a high quality butyl tape for the best results.
Treat the exterior cedar siding with a UV resistant sealant every three years. This prevents the wood from graying and protects it from insect damage. Use a breathable stain that allows moisture to escape.
Check the roof for loose shingles or damaged flashing after every major storm. Clean the gutters and ensure water is draining away from the foundation. This prevents soil erosion and foundation settling.
Always wear safety glasses and a dust mask when cutting treated lumber. The chemicals in pressure treated wood are hazardous if inhaled. Work in a well ventilated area whenever possible.