

Introduction
Creating a high performance composting environment is the most effective way to enhance backyard soil quality and reduce household waste. A structured three bin system allows for a continuous cycle of organic decomposition by separating fresh materials from maturing compost.
This architectural approach to composting ensures that the gardener has a dedicated space for adding new scraps and a separate area for curing finished humus. By investing in a permanent raised structure the homeowner avoids the clutter of plastic bins and maximizes aeration for faster breakdown.
The utility of this system extends beyond simple waste management as it transforms the backyard into a productive ecosystem. Proper structural planning prevents the common issues of heap collapse and pest infiltration while providing a professional aesthetic to the property.
Disclaimer: I may earn a commission from purchases made through these links at no extra cost to you.


Quick Specs
The total footprint for this installation is twelve feet in length by four feet in depth with a height of three feet. This size optimizes the volume of organic matter while remaining manageable for manual turning and aeration.
The estimated cost for materials ranges between three hundred and five hundred dollars depending on the choice of lumber species. High grade cedar will increase the initial investment but significantly extend the lifespan of the structure.
The difficulty level for this project is intermediate as it requires basic framing knowledge and precise squaring. A builder with standard power tools and a level can complete the assembly comfortably.
The estimated build time is approximately eight to twelve labor hours. This includes site preparation and the final assembly of the removable front slats.
Materials and Tools
The primary lumber requirement includes eight 4×4 cedar posts for the vertical corners and dividers. You will also need twenty four 2×6 cedar boards cut to four feet and twelve 2×6 boards cut to four feet for the rear and side walls.
For the removable front slats you will need thirty six 1×6 cedar boards cut to forty eight inches. This allows for a sliding mechanism that can be adjusted based on the height of the compost pile.
Hardware requirements include three inch stainless steel deck screws to prevent corrosion from the moist environment. You will also need a box of two inch screws for the front slat guides and four heavy duty galvanized ground anchors.
The essential tool list includes a miter saw for precise cross cuts and a cordless impact driver for fastener installation. A four foot spirit level and a speed square are critical for ensuring the bins remain plumb and square.
Additionally a tape measure and a chalk line will help in marking the site for the ground anchors. Protective gear such as safety glasses and work gloves is mandatory during the cutting and assembly process.
| Parameter | Description | Value |
|---|---|---|
| Western Red Cedar | Longevity | High |
| Western Red Cedar | Cost | High |
| Western Red Cedar | Moisture Resistance | Excellent |
| Pressure Treated Pine | Longevity | Medium |
| Pressure Treated Pine | Cost | Low |
| Pressure Treated Pine | Moisture Resistance | Moderate |
| Redwood | Longevity | Very High |
| Redwood | Cost | Very High |
| Redwood | Moisture Resistance | Superior |
| Douglas Fir | Longevity | Low |
| Douglas Fir | Cost | Low |
| Douglas Fir | Moisture Resistance | Poor |
| Parameter | Description | Value |
Technical Layout
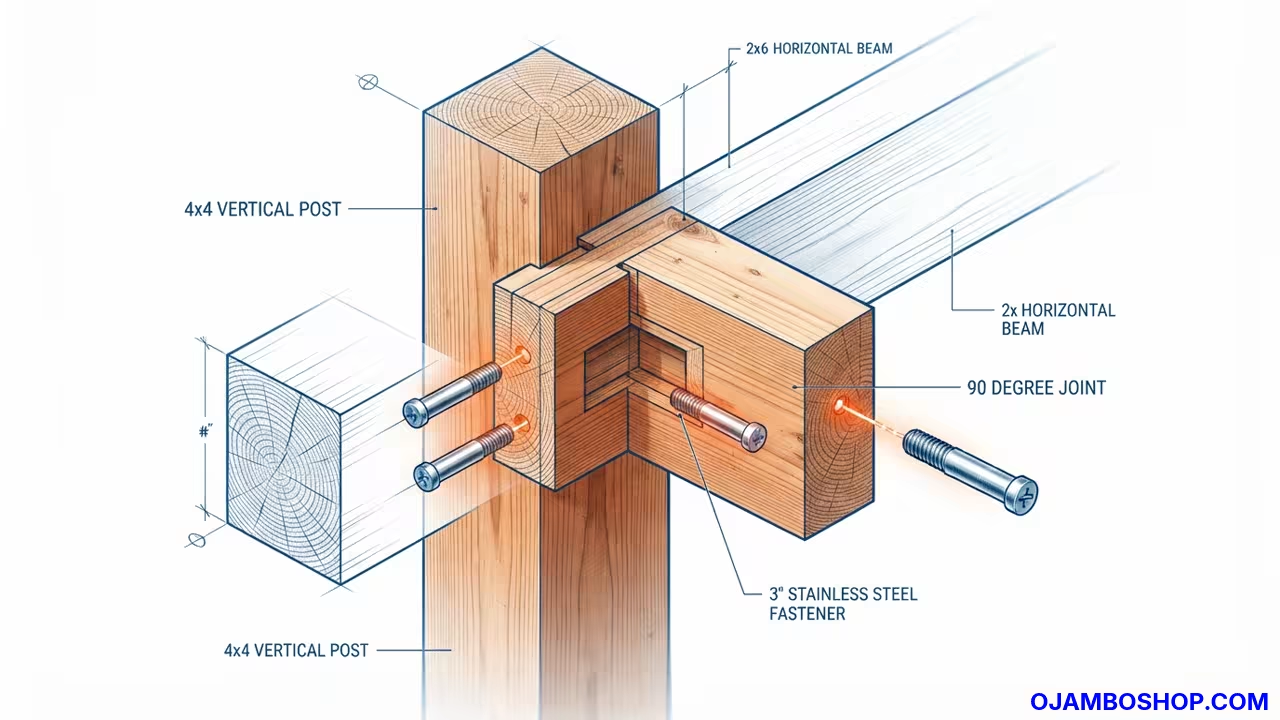
The structural integrity of the system relies on a heavy duty post and beam architecture designed to resist the outward pressure of decomposing organic matter. As the compost heap settles it exerts significant lateral force against the side walls which can cause thinner boards to bow or snap over time.
To counteract this the design utilizes 4×4 corner posts that act as primary load bearing members anchored directly into the soil. The 2×6 horizontal wall members are fastened using a butt joint configuration with stainless steel screws driven through the face of the board into the core of the post.
This creates a rigid box frame that distributes the weight of the soil evenly across the foundation. The interior dividers are mirrored versions of the side walls ensuring that each bin possesses equal structural strength.
A critical element of the layout is the front slat channel created by attaching two vertical 2×2 cleats to the front posts. These cleats form a track that allows the 1×6 slats to slide up and down based on the fill level of the bin. This prevents the need for heavy lifting when harvesting finished compost from the bottom of the pile.
The overall geometry is calculated to maintain a four foot depth which is the maximum distance a person can comfortably reach for turning the pile. By maintaining this depth the builder ensures that the center of the pile receives adequate airflow without requiring specialized machinery for aeration.
Step by Step Instructions
The first phase involves selecting a level area of the yard that receives a balance of sun and shade. Use a shovel to clear any large rocks or thick turf from the twelve by four foot footprint. Use the spirit level and chalk line to mark the exact positions of the eight corner posts.
The second phase focuses on the installation of the ground anchors to prevent the system from shifting during seasonal freeze and thaw cycles. Drive the galvanized anchors into the four outer corners and the six interior divider points. Ensure each anchor is perfectly vertical to provide a stable base for the 4×4 posts.
The third phase involves cutting the 4×4 cedar posts into eight pieces each measuring thirty six inches in length. Set the posts into the anchors and secure them using heavy duty fasteners. Use the speed square to verify that every post is at a ninety degree angle relative to the ground.
The fourth phase requires the assembly of the rear wall and the two outer side walls. Fasten the 2×6 boards horizontally across the posts leaving a half inch gap between each board to allow for essential airflow. These gaps are critical for introducing oxygen to the aerobic bacteria that break down the organic matter.
The fifth phase focuses on the installation of the two interior dividers that separate the three bins. Repeat the horizontal boarding process used for the outer walls ensuring the dividers are perfectly centered. This creates three distinct chambers each measuring four feet in length and four feet in depth.
The sixth phase involves the construction of the front slat guides on each of the front facing posts. Attach the 2×2 cedar cleats vertically to the inside edge of the posts using two inch stainless steel screws. Ensure the guides are aligned perfectly so the slats can slide without binding or jamming.
The seventh phase requires the insertion of the 1×6 removable slats into the guides. Slide the boards in one by one starting from the bottom and working upward. These boards should fit snugly but allow for a small amount of movement to accommodate the expanding compost pile.
The eighth phase focuses on the final structural audit and the application of a protective finish. Tighten all fasteners and check the squareness of the entire twelve foot assembly. While cedar is naturally rot resistant a coat of food safe sealant can further protect the wood from the acidic environment of the compost.
The ninth phase involves the initial loading of the first bin with a layer of coarse brown materials like dried leaves or straw. This provides a base for aeration and prevents the organic matter from compacting against the soil. Begin adding green materials such as kitchen scraps and grass clippings in alternating layers.
The tenth phase consists of the final site integration and the addition of a compost thermometer. Install the thermometer in the center of the first bin to monitor the internal temperature. This allows the gardener to know when the pile has reached the thermophilic stage required to kill weed seeds and pathogens.
Common Mistakes
One frequent error is failing to leave adequate gaps between the horizontal 2×6 boards. Without these gaps the compost pile becomes anaerobic which leads to foul odors and a significantly slower decomposition rate.
Another common mistake is using standard steel nails instead of stainless steel screws. The high moisture and acidity levels of a compost heap will corrode standard nails within a single season leading to structural failure.
Some builders neglect to level the ground properly before installing the anchors. A sloping foundation causes the removable front slats to slide out under the pressure of the compost or prevents them from fitting into the guides.
Using lumber that is too thin for the side walls is a recurring issue for novice builders. 2×4 boards often bow under the weight of a full bin whereas 2×6 boards provide the necessary rigidity to maintain the shape.
Maintenance and Safety
Professional maintenance begins with a monthly inspection of all fastener heads to ensure they have not backed out due to wood shrinkage. Use a screwdriver to tighten any loose screws and replace any hardware that shows signs of unexpected corrosion.
To maximize the lifespan of the cedar the exterior of the bins should be cleaned of algae or mold using a soft brush and water. Avoid using chemical cleaners or bleach as these can seep into the compost and kill the beneficial microorganisms.
Safety during the build requires the use of a dust mask when cutting cedar to avoid inhaling fine particles. Always wear safety glasses when operating the miter saw or impact driver to protect against flying wood chips.
When operating the system ensure that the compost pile does not exceed the height of the rear wall. Overfilling the bins can put excessive pressure on the side walls and may cause the front slats to buckle or pop out of the guides.
Pro Tip for Longevity
To significantly increase the lifespan of the base members implement a moisture barrier by placing a layer of heavy duty permeable landscape fabric at the bottom of each bin. This prevents the bottommost boards from sitting in a constant pool of leachate and reduces the risk of premature rot at the ground contact points.