
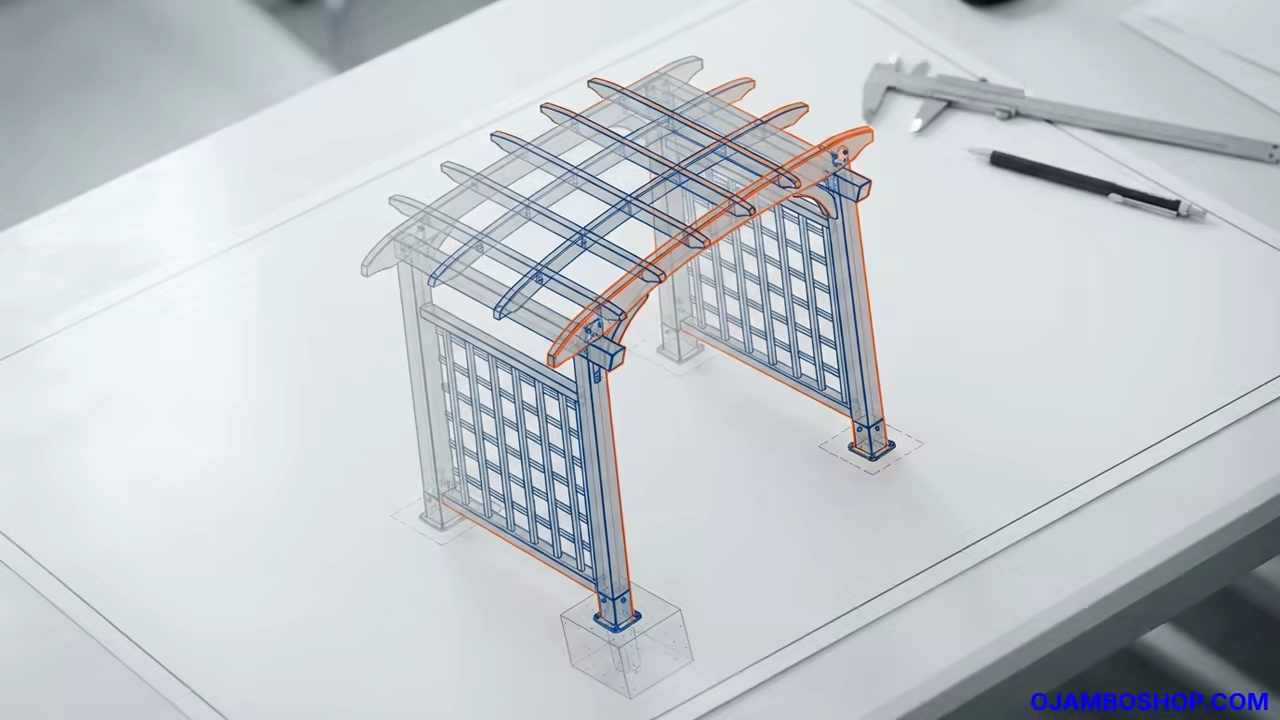
A decorative garden arbor serves as a stunning focal point for any residential landscape. It creates a formal entrance to a garden path while providing a structural support for climbing plants.
Adding a permanent structure like this increases the overall curb appeal of a property. It defines the transition between different outdoor living spaces with grace and architectural intent.
A well built arbor provides a sense of enclosure and intimacy along a walkway. This project blends functional carpentry with artistic design to enhance the natural beauty of your backyard.
Disclaimer: I may earn a commission from purchases made through these links at no extra cost to you.


Quick Specs
Dimensions 72 inches wide by 84 inches high by 48 inches deep.
Estimated Cost 220 to 350 dollars depending on the choice of lumber.
Difficulty Level Intermediate.
Estimated Build Time 16 to 20 total working hours.
Materials and Tools
You will need four 4×4 pressure treated posts for the main vertical supports. These should be eight feet long to allow for grounding.
Purchase six 2×6 cedar boards for the headers and side beams. Cedar is preferred for its natural resistance to decay and insects.
Gather ten 2×4 cedar boards for the rafters and decorative bracing. These provide the structural rigidity and the visual detail of the top.
Acquire a box of three inch stainless steel deck screws for all major joints. Stainless steel prevents rust streaks from forming on the wood.
Get four bags of fast setting concrete mix to secure the posts. This ensures the arbor remains plumb during high wind events.
For tools you will need a miter saw for precise angle cuts. A cordless drill and driver are essential for fastening.
Use a four foot level to ensure every post is perfectly vertical. A tape measure and speed square will help with layout accuracy.
A post hole digger or auger is required for the foundation. Finally use 80 grit sandpaper for smoothing all rough edges.
Technical Layout
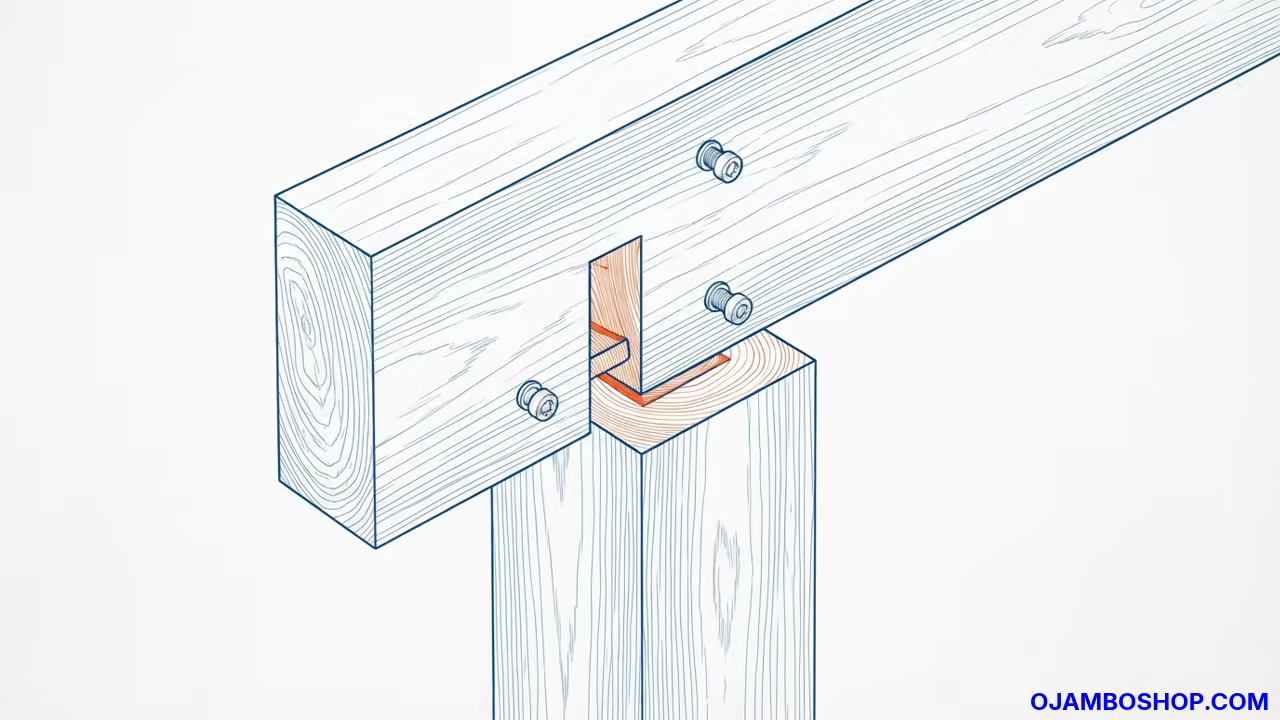
The structural integrity of the arbor relies on the relationship between the vertical posts and the primary header. The header is a double 2×6 beam that spans the full width of the structure to prevent sagging.
This beam is notched into the top of the 4×4 posts using a half lap joint. This joint transfers the vertical load of the roof directly into the posts rather than relying solely on screws.
The rafters are spaced every 12 inches to provide a stable grid for climbing vines. Each rafter is cut with a slight 5 degree pitch to allow rainwater to runoff.
Diagonal braces are installed at 45 degree angles between the posts and the header. These braces eliminate lateral sway and lock the structure into a rigid rectangle.
The foundation depth is calculated at 24 inches to get below the typical frost line. This prevents the arbor from shifting or leaning during the winter freeze and thaw cycles.
Step by Step Instructions
Phase 1 begins with the site layout using batter boards and string lines. You must mark the exact center of your walkway to ensure the arbor is centered.
Check the distance between the outer edges of the posts to match your 72 inch width. Use a speed square to ensure the footprint is a perfect rectangle.
Dig four post holes to a depth of 24 inches each. Ensure the holes are slightly wider than the 4×4 posts to allow for concrete.
Clear any loose debris from the bottom of the holes before placing the lumber. This creates a solid base for the concrete to bond with the earth.
Phase 2 involves setting the posts in the prepared holes. Place the first post and use a level on two adjacent sides to ensure it is plumb.
Fill the hole with dry fast setting concrete and add water according to the package. Hold the post in place for several minutes until the mix begins to set.
Repeat this process for the remaining three posts ensuring they remain square to each other. Measure the diagonals of the rectangle to verify the structure is not skewed.
Allow the concrete to cure for at least 24 hours before adding any weight. This ensures the foundation is fully hardened and capable of supporting the roof.
Phase 3 focuses on the installation of the main header beams. Cut two 2×6 boards to the total width of the structure.
Create the half lap notches at the ends of the beams to fit the posts. Use the miter saw to remove a section of the post top as well.
Lift the header into place and align it exactly 84 inches from the ground. Drive two stainless steel screws through the header into the post core.
Repeat this for the second header beam to create a thick structural sandwich. This double beam design provides the necessary strength for heavy climbing plants.
Phase 4 involves adding the side beams to connect the two sets of posts. These 2×6 beams run perpendicular to the header and define the depth.
Cut the side beams to 48 inches and notch them into the posts. Ensure the beams are level across the entire span of the arbor.
Fasten these beams using the same stainless steel screws used for the header. Check that the corners are perfectly square using your speed square.
These side beams act as the primary support for the subsequent rafter array. They lock the front and back sections of the arbor together.
Phase 5 is the installation of the rafter system across the top. Cut ten 2×4 boards to the length of the side beams.
Apply a 5 degree miter cut to the ends of each rafter for runoff. Space the rafters exactly 12 inches apart along the length of the header.
Toe screw each rafter into the header and the side beams for a secure fit. Ensure the rafters are aligned perfectly with each other across the top.
This grid creates the visual ceiling of the arbor and the support for vines. It provides the necessary depth for the structure to feel substantial.
Phase 6 adds the decorative diagonal bracing to the four corners. Cut eight 2×4 pieces with 45 degree angles on both ends.
Fit these braces between the vertical posts and the horizontal headers. The braces should extend approximately 12 inches from each corner point.
Secure the braces with two screws at each end to prevent any rotation. These pieces are critical for preventing the arbor from leaning over time.
The braces add a professional architectural look while significantly increasing structural stability. They transform the simple box into a formal garden element.
Phase 7 involves the addition of the top lattice or trellis work. Attach thin cedar strips across the rafters to create a woven pattern.
Use one inch screws to fasten these strips every 6 inches. Ensure the strips are flush with the top of the rafters.
The lattice should cover the center section of the roof to invite plant growth. Leave a small gap at the edges to maintain a clean silhouette.
This layer provides the final decorative touch and a surface for vines to climb. It completes the transition from a frame to a finished arbor.
Phase 8 focuses on the finishing touches and surface preparation. Use 80 grit sandpaper to remove all splinters from the edges.
Round over the sharp corners of the posts and beams for a softer look. Pay close attention to the areas where people might touch the wood.
Wipe down the entire structure with a tack cloth to remove all sawdust. This ensures the sealant adheres properly to the wood fibers.
A smooth finish prevents injuries and makes the final stain look professional. It is a mark of high quality craftsmanship in any DIY project.
Phase 9 is the application of a professional grade weatherproof sealant. Apply a clear UV resistant sealer to all surfaces of the wood.
Use a natural bristle brush to work the sealer deep into the grain. Apply two coats allowing the first to dry completely between applications.
Focus heavily on the joints and the bottom of the posts near the ground. These areas are most susceptible to moisture and rot.
Proper sealing extends the life of the arbor by several years. It protects the cedar from graying and prevents the wood from cracking.
Phase 10 integrates the arbor into the existing walkway design. Plant climbing roses or clematis at the base of the main posts.
Train the vines to grow upward using soft garden twine for support. Ensure the plants have enough room to grow without blocking the path.
Add a layer of mulch around the base of the posts to retain moisture. This creates a polished look and protects the foundation from erosion.
Your decorative arbor is now a functional piece of garden art. It defines the walkway and adds lasting value to your outdoor space.
Hardware and Material Comparison
| Parameter | Description | Value |
|---|---|---|
| Pressure Treated | Durability | High |
| Western Red Cedar | Durability | High |
| Redwood | Durability | Very High |
| Pine | Durability | Low |
| Stainless Steel | Fastener Life | Eternal |
Common Mistakes
One frequent error is failing to square the posts during the concrete pour. If the foundation is skewed the header will not fit correctly.
Another mistake is using standard nails instead of deck screws for the joints. Nails can pull out as the wood shrinks and expands with the weather.
Some builders forget to pre drill the holes in the cedar boards. Cedar is prone to splitting if screws are driven directly into the end grain.
Ignoring the slope of the ground can lead to an arbor that looks tilted. Always use a level rather than relying on the visual line of the path.
Maintenance and Safety
Always wear safety glasses and hearing protection when operating the miter saw. Use a dust mask when sanding cedar to avoid inhaling fine particles.
Check the tightness of all fasteners every six months during the spring. Tighten any screws that may have loosened due to wood movement.
Reapply a fresh coat of UV sealant every two years to maintain the color. This prevents the sun from bleaching the wood to a silver gray.
Inspect the base of the posts for any signs of rot or termite activity. Early detection allows for simple repairs before the structure is compromised.
Pro Tip To maximize longevity use joist tape on top of the header beams before installing rafters. This moisture barrier prevents water from seeping into the joint where the two beams meet.