
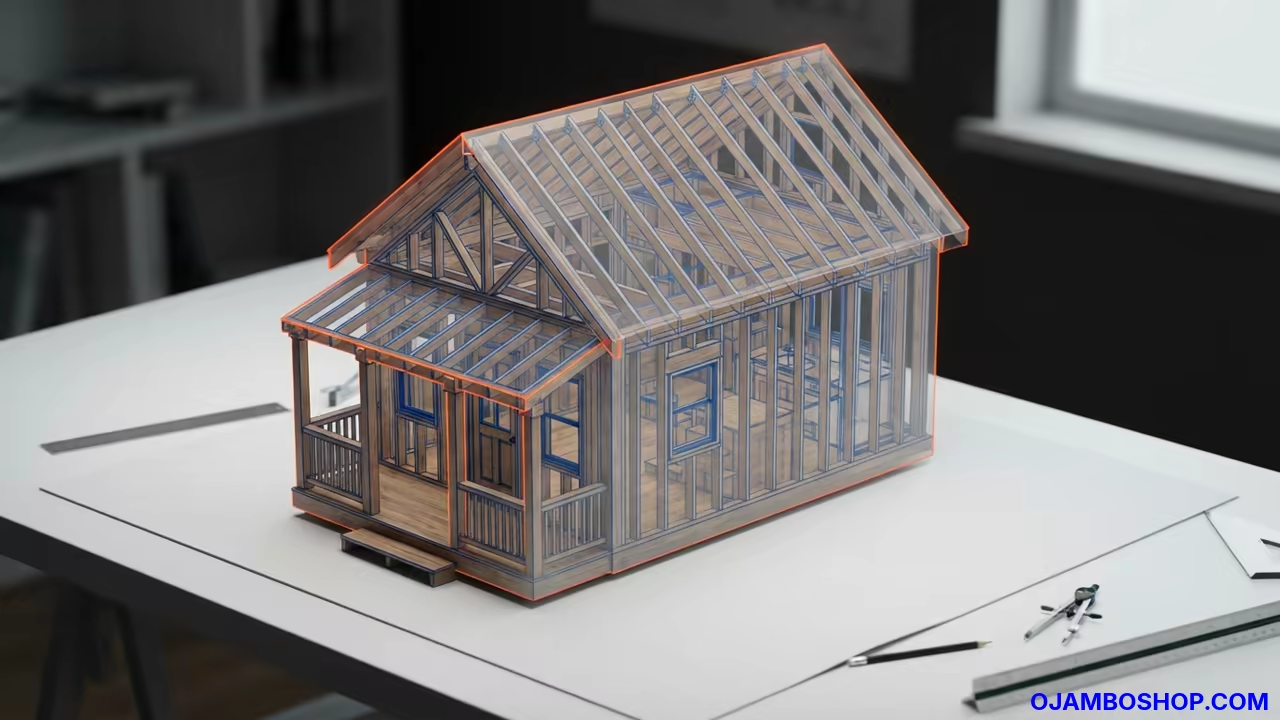
A 450 square foot cabin style tiny home provides the perfect balance between minimalism and functional comfort. This specific design emphasizes open living areas and a welcoming front porch for outdoor integration.
Adding a structured tiny home to a property increases land value and provides a versatile space for guests or full time residence. This blueprint focuses on durability and efficient space management for the modern homesteader.
The transition to small living requires a strategic approach to spatial geometry and material selection. By utilizing a cabin style aesthetic, the builder can blend modern efficiency with timeless architectural charm.
Disclaimer: I may earn a commission from purchases made through these links at no extra cost to you.


Quick Specs
Dimensions: 15 feet by 30 feet interior with a 6 foot by 15 foot front porch.
Estimated Cost: 35000 to 55000 USD depending on finish materials.
Difficulty Level: Advanced.
Estimated Build Time: 8 to 14 months.
Materials and Tools
Lumber requirements include pressure treated 4×4 skids for the primary foundation support. You will need 2×6 kiln dried joists for the floor system and 2×4 spruce studs for the wall framing.
The roof requires 2×8 rafters and a substantial ridge beam to support the weight of the roof pitch. Cedar tongue and groove siding is recommended for the exterior to provide natural weather resistance and a rustic look.
Standard CDX plywood sheathing is necessary for the subfloor and wall backing. Ensure all exterior grade plywood is rated for moisture exposure to prevent premature rot in the lower wall plates.
Hardware needs include 3 inch deck screws and heavy duty hurricane ties for roof stability. Joist hangers are required for all perimeter floor beams to ensure a rigid structural connection.
Galvanized anchor bolts will secure the foundation to the concrete piers. High strength exterior grade wood glue should be used on all critical joints to increase the shear strength of the frame.
Essential tools for this build include a professional miter saw and a heavy duty table saw. An impact driver and a framing hammer are necessary for the rapid assembly of the skeletal structure.
A 4 foot level and a laser level are critical for ensuring the foundation is perfectly flat. A pneumatic nailer will significantly reduce build time during the sheathing and framing phases.
| Parameter | Description | Value |
|---|---|---|
| Deck Screws | Flooring | High Durability / Medium Cost |
| Galvanized Nails | Framing | Medium Durability / Low Cost |
| Stainless Steel | Exterior | Ultra High Durability / High Cost |
| Structural Bolts | Foundation | Ultra High Durability / Medium Cost |
Technical Layout
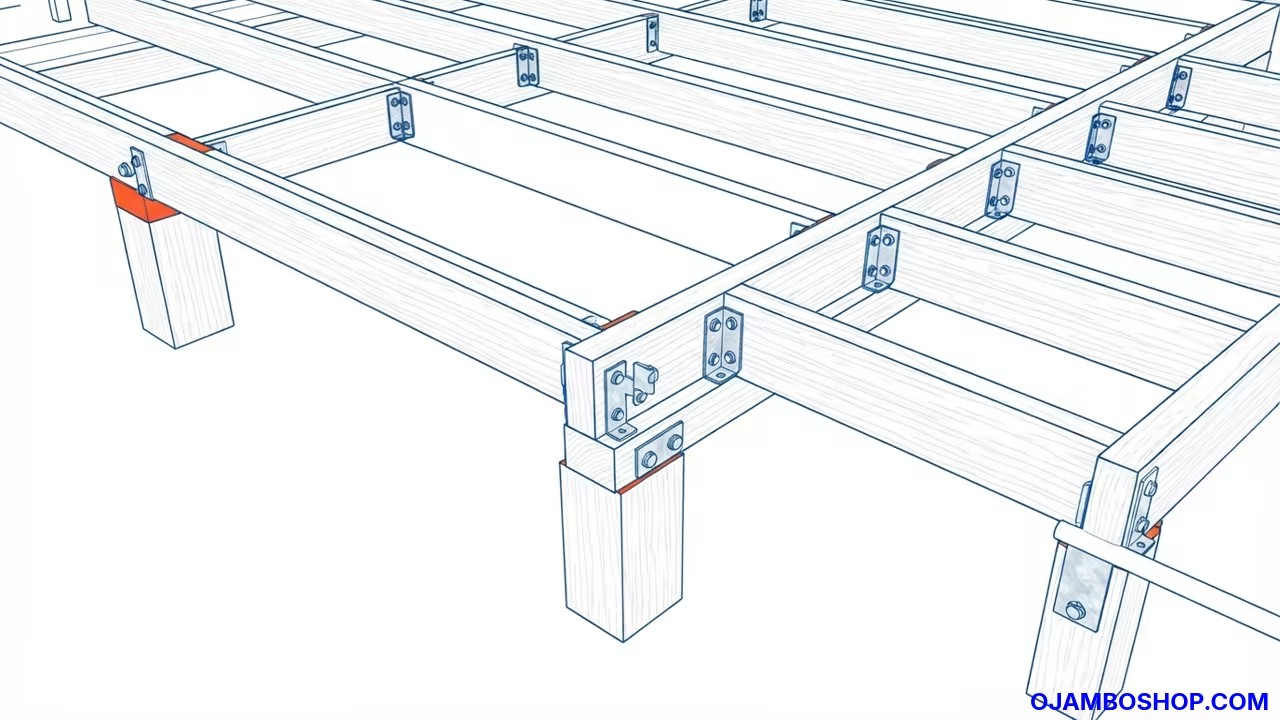
The load bearing architecture of this cabin relies on a reinforced floor chassis and a standard 16 inch on center stud arrangement. The foundation utilizes heavy duty 4×4 skids that distribute the structure weight evenly across a leveled gravel pad.
This prevents settling and ensures the front porch does not pull away from the main cabin body over time. The interaction between the skids and the joists creates a rigid platform that minimizes floor bounce.
The roof system employs a 6 over 12 pitch to ensure efficient snow and rain runoff in all climates. Rafters are tied into a central ridge beam using structural hangers to eliminate the need for interior load bearing walls.
This allows for a wide open interior floor plan that makes 450 square feet feel significantly larger than it is. The ridge beam carries the primary load down to the gable end walls which are reinforced with double studs.
Pro Tip: To maximize material longevity, install a high density polyethylene moisture barrier between the pressure treated skids and the first layer of floor joists. This prevents capillary action from pulling ground moisture directly into the main floor frame.
This simple step can add decades to the life of the subfloor by preventing dry rot in the critical lower chords.
Step by Step Instructions
Begin by clearing a level area of land and laying a six inch bed of compacted crushed stone. Dig holes for concrete piers below the local frost line to prevent the cabin from shifting during winter freezes.
Pour the concrete and set your galvanized anchor bolts into the wet mix with precise spacing. Ensure the perimeter is perfectly square by measuring the diagonals of the site.
Lay your pressure treated 4×4 skids across the concrete piers and secure them with heavy duty bolts. Install 2×6 floor joists perpendicular to the skids using galvanized joist hangers every 16 inches.
Check for crown in the lumber and ensure all joists face the same direction to maintain a level surface. Nail 3/4 inch tongue and groove plywood subflooring across the entire 15 by 30 foot area.
Construct the wall frames on the flat subfloor to ensure they are square before raising them. Use 2×4 studs spaced 16 inches apart and include double top plates for added structural rigidity.
Frame the rough openings for the windows and doors using headers that can support the weight of the roof. Raise the walls and brace them temporarily with 2×4 diagonals until the roof is installed.
Cut your 2×8 rafters with a precise birdsmouth notch to seat them securely on the wall plates. Install the central ridge beam and use hurricane ties to connect each rafter to the beam and the wall.
Ensure the 6 over 12 pitch is consistent across the entire length of the cabin. Install the roof sheathing using 1/2 inch OSB panels and secure them with ring shank nails.
Apply a layer of exterior grade sheathing to the wall studs to provide lateral stability to the structure. Wrap the entire cabin in a breathable house wrap to protect the framing from moisture and air infiltration.
Carefully seal all seams with flashing tape to prevent water from entering the wall cavities. This creates a tight envelope that significantly improves the energy efficiency of the small home.
Insert the pre hung exterior doors and double pane windows into the rough openings. Use low expansion spray foam to seal the gaps between the window frames and the wall studs.
Install drip caps above every opening to direct rainwater away from the interior framing. Secure the trim around the windows using stainless steel finish nails for a professional appearance.
Extend the floor joists from the main cabin frame to create the 6 foot by 15 foot porch area. Install 4×4 support posts at the outer corners of the porch and secure them to concrete footings.
Use cedar decking boards for the surface to provide a naturally rot resistant walking area. Build a simple railing system that matches the architectural style of the main cabin.
Install the electrical wiring and plumbing lines before closing the walls with insulation. Use rockwool or fiberglass batts to fill the wall cavities for maximum thermal retention.
Hang drywall or install cedar tongue and groove planks for the interior walls and ceilings. Sand all joints and apply a high quality primer to prepare for the final paint.
Install the cedar siding starting from the bottom and working your way up the walls. Overlap the boards slightly to ensure water sheds effectively away from the structure.
Use stainless steel nails to prevent black streaks from forming on the cedar over time. Install the corner trim and fascia boards to seal the edges of the building envelope.
Apply a high quality UV resistant sealant to all exterior wood surfaces to protect against sun damage. Install the interior flooring using a durable laminate or hardwood that can withstand high traffic.
Fit the kitchen cabinetry and bathroom fixtures into their designated spaces. Perform a final walkthrough to ensure all doors and windows operate smoothly.
Common Mistakes
Many builders fail to install a proper vapor barrier which leads to condensation and mold inside the walls. This is especially common in tiny homes where the volume of air is small and humidity rises quickly.
Always use a high quality house wrap and breathable paint.
Incorrectly cutting the birdsmouth notch in the rafters is another frequent error that weakens the roof. If the notch is too deep, it removes too much of the load bearing wood from the rafter.
This can lead to sagging rooflines or structural failure under heavy snow loads.
Poorly leveled foundations are a critical mistake that causes doors and windows to stick. Even a half inch deviation over thirty feet can throw the entire framing system out of square.
Use a laser level to verify the foundation multiple times before the floor is nailed down.
Maintenance and Safety
Always wear safety goggles and hearing protection when operating power tools or using pneumatic nailers. Maintain a clean workspace to prevent tripping hazards during the heavy lifting phases of framing.
Use a sturdy ladder and always have a spotter when working on the roof system.
Treat the exterior cedar every two to three years with a penetrating oil stain to prevent graying. Check the foundation piers annually for any signs of shifting or cracking in the concrete.
Inspect the roof flashing and sealant around windows every spring to catch leaks early.
Weatherproofing requires constant vigilance especially at the junction where the porch meets the cabin. Ensure that the flashing is intact and that water is not pooling against the main sill plate.
Keep the perimeter of the cabin clear of debris to allow air to circulate under the floor.