
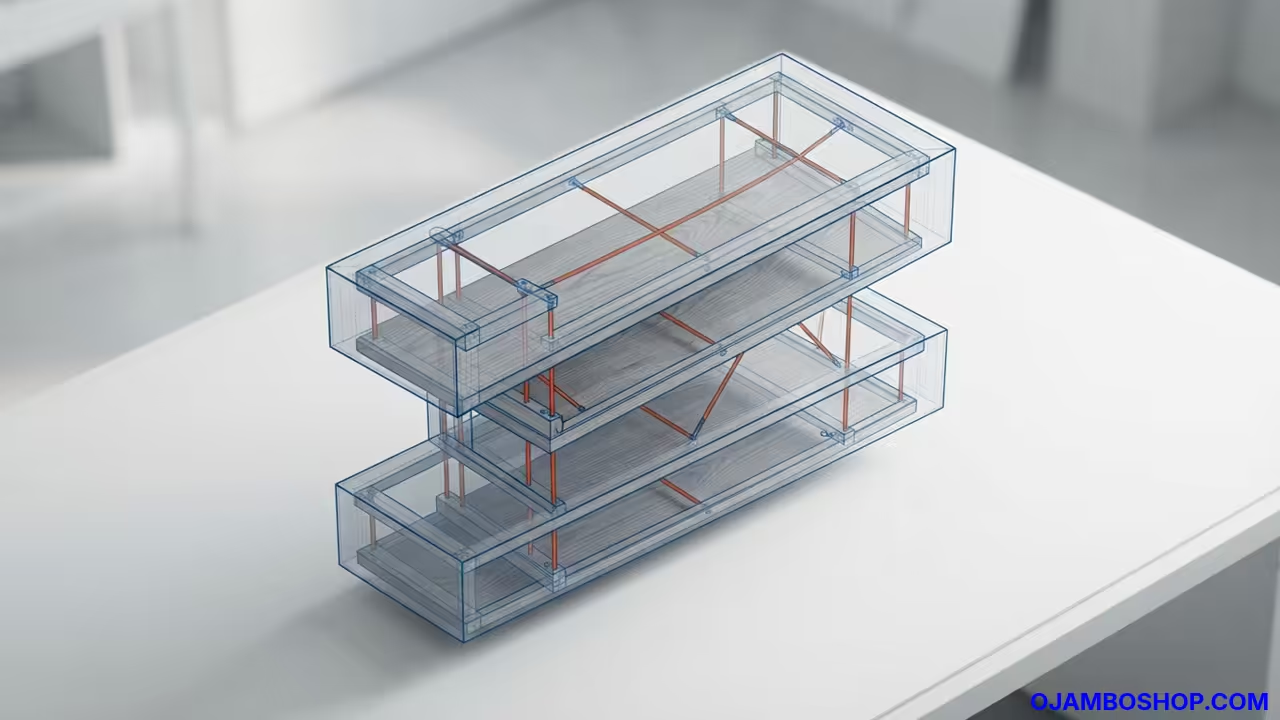
Integrating clean lines into a home creates a sense of openness and sophisticated order. Floating shelves offer a perfect blend of functional storage and high end architectural design for any room.
These pieces remove the visual noise associated with traditional brackets and heavy supports. They transform a blank wall into a curated gallery of books and personal artifacts.
Adding these elements to a property significantly increases the perceived value of the interior space. They provide a modern touch that appeals to contemporary design tastes and maximizes vertical utility.
Quick Specs
Dimensions feature a staggered three piece set with profiles measuring one and five eighths inches thick. The depths vary between six and eight inches to accommodate different book sizes.
Disclaimer: I may earn a commission from purchases made through these links at no extra cost to you.


Estimated cost for high grade white oak and heavy duty brackets ranges between one hundred and two hundred dollars. The difficulty level is intermediate because it requires absolute precision during the boring phase.
Estimated build time is approximately twelve hours including the necessary curing time for hardwax oils. This timeline ensures a professional finish that resists wear and tear over many years.
Materials and Tools
The primary lumber required is premium white oak or American walnut for maximum structural stability. You will need three distinct lengths to create a visually appealing staggered asymmetric layout.
Hardware includes a heavy duty steel rod bracket system such as the TLOC series for high load capacity. High quality wood glue and a selection of medium grit sandpaper are also essential for this project.
For the finish choose a professional hardwax oil like Rubio Monocoat or a matte polyurethane. Ensure you have a lint free cloth and a high quality applicator brush for a streak free result.
Essential tools include a miter saw for square cuts and a drill press or portable drill guide. A high precision Forstner bit set is required to create the internal bores for the steel brackets.
You will also need a digital stud finder and a professional spirit level for perfect alignment. Painters tape is necessary for marking depth stops on the drill bit to prevent blowouts.
Clamps and a rubber mallet are required to secure the wood during assembly and mounting. Safety glasses and a N95 dust mask are mandatory during the cutting and sanding phases.
| Parameter | Description | Value |
|---|---|---|
| Load Capacity | Standard Floating Bracket | Moderate |
| Load Capacity | Heavy Duty Steel Rod System | Very High |
| Installation | Standard Floating Bracket | Simple Screws |
| Installation | Heavy Duty Steel Rod System | Precision Boring |
| Material | Standard Floating Bracket | Thin Steel |
| Material | Heavy Duty Steel Rod System | Aircraft Grade Steel |
| Visual Profile | Standard Floating Bracket | Minimal |
| Visual Profile | Heavy Duty Steel Rod System | Completely Hidden |
Technical Layout
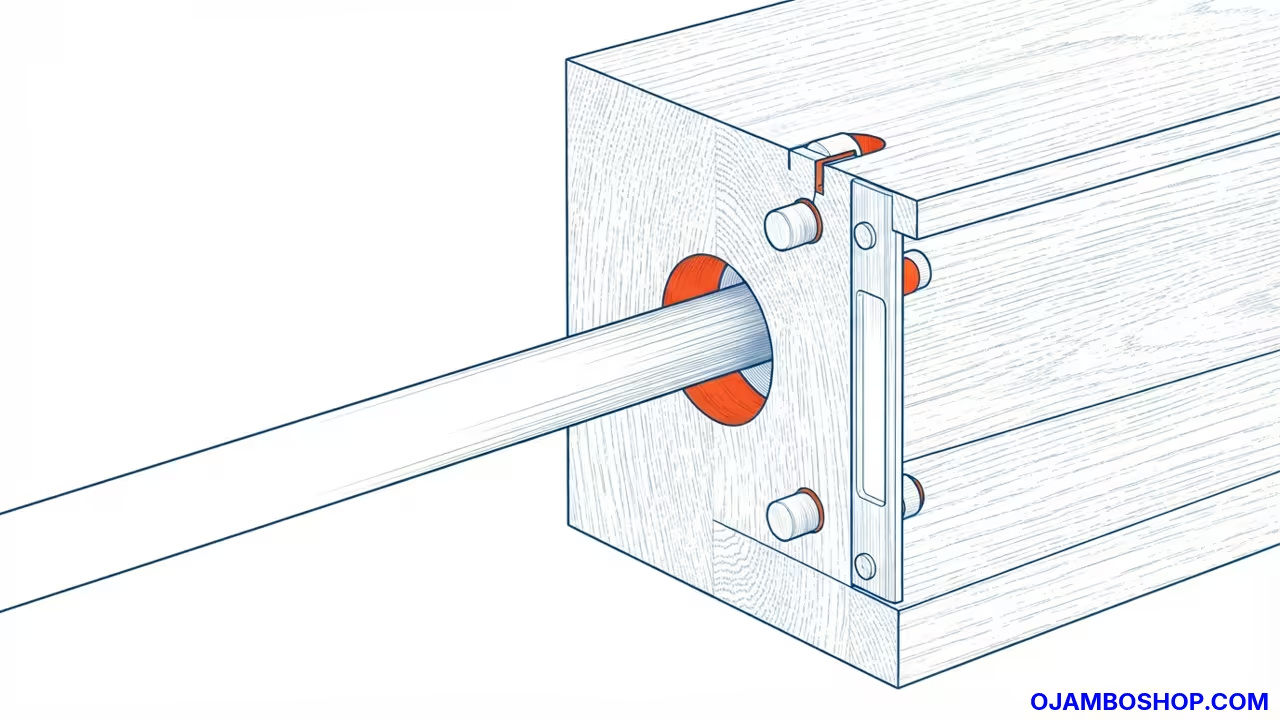
The structural integrity of this system relies on a high torque sleeve and spine architecture. The spine consists of aircraft grade steel rods that are anchored directly into the center of the wall studs. Each shelf acts as a hollow sleeve that slides over these rods to create a seamless connection. To ensure a perfect friction fit a microscopic clearance of one thirty second of an inch is maintained.
Load distribution is managed by the steel rods which transfer the vertical weight of the books back to the wall. This mechanical relationship eliminates the need for external supports or visible mounting angles. Ensuring the internal bore is perfectly perpendicular prevents the shelf from tilting forward or backward. A small amount of internal clearance allows the wood to expand and contract with humidity changes.
The depth of the bore is controlled using painters tape markers to avoid breaking through the front face. This precision ensures that the steel rod is fully encased within the hardwood for maximum shear strength. Proper bore placement is essential for the overall stability of the floating system. This structural design allows for a clean look without compromising on heavy load capacities.
Step by Step Instructions
Phase one begins with selecting a closed grain hardwood like white oak and allowing it to acclimate. Bring the boards into the room where they will be installed for at least forty eight hours. This process prevents the wood from shrinking or expanding after the shelves are permanently mounted. Check the boards for any warping or bowing using a straight edge before starting any cuts.
Phase two involves cutting the boards to their final staggered lengths using a precision miter saw. Cut the smallest shelf to sixteen inches and the medium shelf to twenty four inches. The final largest piece should be cut to thirty six inches with a clean square edge. Every cut must be a perfect ninety degree angle to maintain a clean interface with the wall.
Phase three focuses on the layout and marking of the internal bores for the steel brackets. Mark the exact center point of the rear edge on each of the three hardwood boards. Use a combination square to ensure the marks are perfectly aligned with the long axis of the shelf. This alignment prevents the shelf from twisting once it is slid onto the brackets.
Phase four is the process of drilling the internal bores using a drill press or guide. Select a Forstner bit that matches the exact diameter of your steel floating brackets. Drill slowly to avoid burning the dense hardwood or causing the bit to wander off center. Use a pilot hole to guide the larger bit and prevent it from skidding on the surface.
Phase five is dedicated to meticulous surface preparation and professional sanding of the wood. Start with eighty grit sandpaper to remove any rough marks left by the saw. Gradually move to one hundred twenty and then two hundred twenty grit for a smooth finish. Sand in the direction of the grain to avoid creating unsightly scratch marks on the wood.
Phase six involves applying a high performance protective finish to the white oak or walnut. Apply a thin layer of hardwax oil using a high quality lint free applicator. Allow the oil to penetrate the fibers according to the manufacturer instructions for the specific product. Use a buffing cloth to remove excess oil and create a natural matte appearance.
Phase seven requires identifying the wall studs using a professional grade digital stud finder. Mark the center of each structural stud where the brackets will be positioned. Ensure that your marks are perfectly vertical to avoid a slanted or uneven installation. Use a pencil to create clear indicators for the bracket screw placement on the wall.
Phase eight is the installation of the steel brackets to the wall surface. Align the bracket with your marks and level it carefully using the spirit level. Drive the heavy duty screws through the bracket and into the center of the stud. Ensure the screw heads are flush with the bracket surface to allow the shelf to sit flat.
Phase nine is the final mounting of the wooden sleeves onto the installed brackets. Carefully slide the first shelf over the rods until it sits flush against the wall. If the fit is too tight use a rubber mallet to gently tap it into place. Do not force the wood as this could cause the internal bore to split or crack.
Common Mistakes
Many builders ignore the necessity of hitting the wall studs during the installation phase. Relying on drywall anchors often leads to the shelves sagging or failing under book weight.
Over sanding the wood can lead to uneven thickness and a distorted visual appearance. Always maintain a consistent pressure across the surface of the board during the sanding process.
Some installers forget to acclimate the wood to the room environment before beginning the build. This mistake causes the wood to shrink and ruins the precision friction fit.
Using the wrong size drill bit creates a loose connection between the shelf and bracket. A loose fit results in a shelf that wobbles or tilts forward when loaded.
Maintenance and Safety
Dust the shelves regularly with a microfiber cloth to prevent debris buildup in the grain. Avoid using harsh chemical cleaners that could strip the protective hardwax oil finish.
Check the stability of the shelves every six months by gently applying pressure to the front. Tighten the wall screws if any movement or torque is detected over time.
Reapply a fresh coat of hardwax oil every few years to maintain the natural glow. This keeps the wood hydrated and protected from the drying effects of indoor heating.
Always wear a dust mask when sanding to protect your lungs from fine hardwood particles. Use safety glasses during the drilling phase to avoid eye injuries from flying wood chips.