
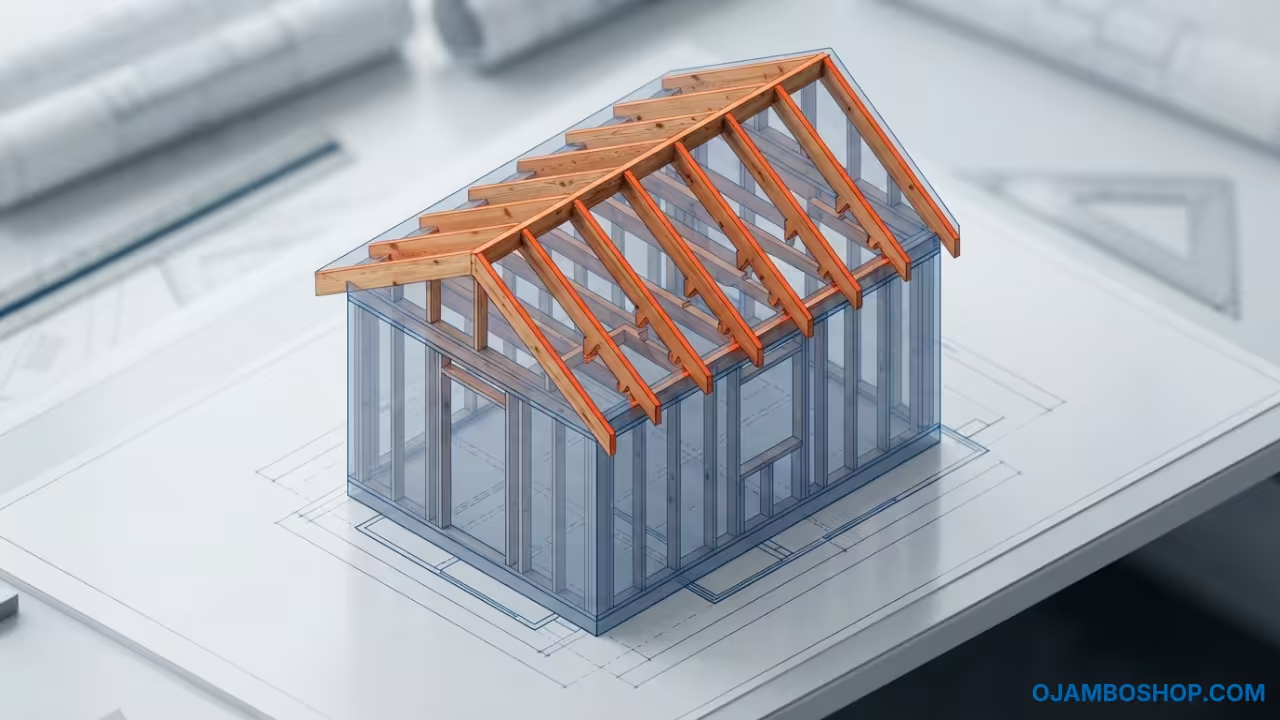
Designing a small living space requires a strategic balance between functionality and structural efficiency. A 400 square foot lofted tiny house provides a sophisticated alternative to traditional housing by maximizing vertical volume.
This project transforms a compact footprint into a full scale residence with a dedicated sleeping area. It adds significant value to any property by providing a sustainable guest house or a primary residence.
Disclosure: article includes affiliate links.

Quick Specs
Dimensions are 12 feet wide by 32 feet long with 14 foot peak height.
Estimated Cost is 45000 to 90000 dollars depending on finish materials.
Difficulty Level is Advanced DIY.
Estimated Build Time is 6 to 9 months.
Materials and Tools
Lumber Requirements
- Pressure treated 4×4 skids for the foundation.
- 2×6 floor joists and 3/4 inch tongue and groove subflooring.
- 2×4 wall studs and 2×6 ceiling joists for the loft.
- 2×8 roof rafters and 5/8 inch CDX plywood sheathing.
- Cedar lap siding and metal roofing panels.
Hardware and Fasteners
- Galvanized 3 inch framing nails and 2.5 inch wood screws.
- Hurricane ties and joist hangers for structural connections.
- Heavy duty carriage bolts for skid to floor frame attachment.
- Weather resistant flashing tape and silicone sealant.
- Interior grade screws for cabinetry and trim work.
Required Tool List
- Miter saw and circular saw with a framing blade.
- Impact driver and cordless drill set.
- Professional grade level and laser square.
- Pneumatic framing nailer and air compressor.
- Stud finder and heavy duty clamps.
| Parameter | Description | Value |
|---|---|---|
| Flooring | Budget vs Premium | Vinyl Plank vs Engineered Hardwood |
| Insulation | Budget vs Premium | Fiberglass Batts vs Closed Cell Spray Foam |
| Siding | Budget vs Premium | T111 Plywood vs Clear Western Red Cedar |
| Roofing | Budget vs Premium | Asphalt Shingles vs Standing Seam Metal |
| Windows | Budget vs Premium | Single Pane PVC vs Argon Double Pane |
| Parameter | Description | Value |
Technical Layout
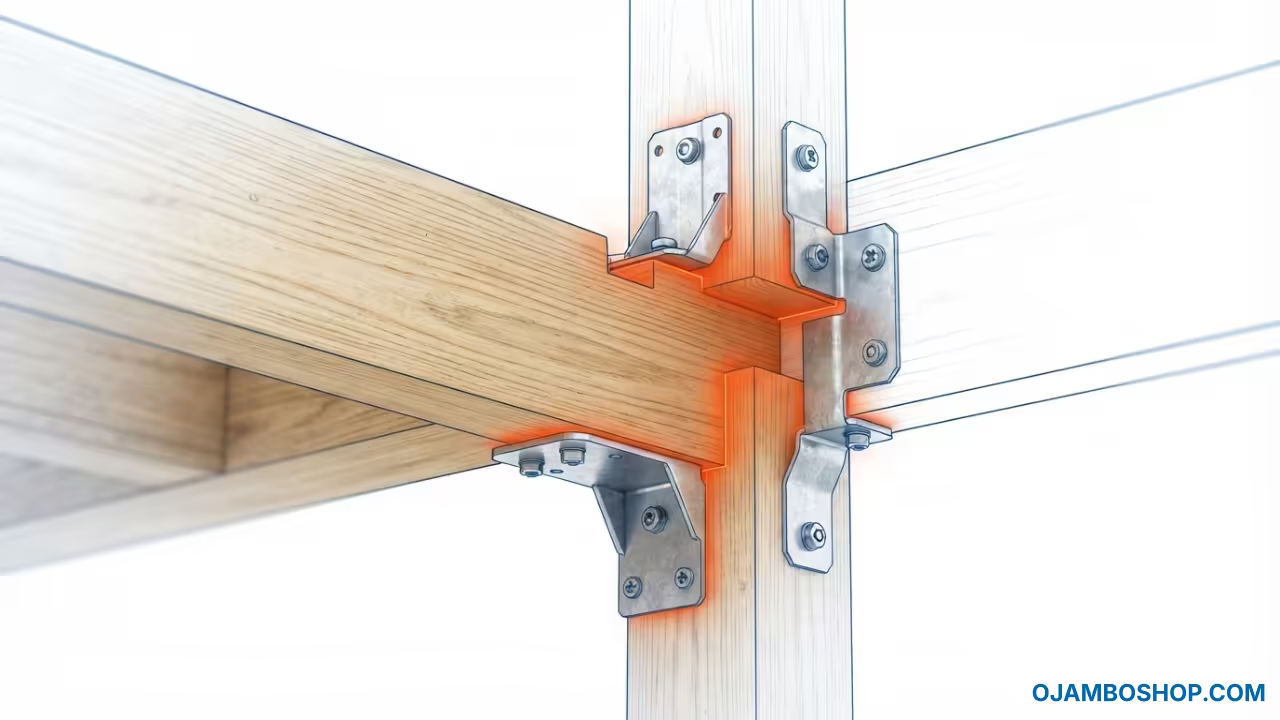
The structural integrity of this 400 square foot home relies on a reinforced floor chassis and a load bearing loft system. The foundation utilizes triple 4×4 skids spaced equally to distribute the total dead load across the site.
Floor joists are spaced 16 inches on center to prevent deflection under the weight of interior walls and furniture. The vertical framing employs a standard 2×4 stud array with double top plates to support the weight of the loft and roof.
The loft floor is the critical structural nexus where 2×6 joists are notched into the wall plates. This ensures that the sleeping platform transfers its load directly into the vertical studs rather than relying solely on fasteners.
The roof system uses a steep pitch to ensure efficient water runoff and maximize the head height in the loft area. Rafters are tied into the ceiling joists using specialized hangers to prevent lateral spreading of the walls.
Step by Step Instructions
Phase 1 Foundation and Base Frame
Begin by leveling the building site with compacted crushed stone to ensure a stable base. Lay the pressure treated 4×4 skids parallel to each other with precise spacing for the 12 foot width.
Construct the outer perimeter frame using 2×6 lumber and square the box by measuring diagonals. Install the internal floor joists at 16 inch intervals and secure them with joist hangers.
Phase 2 Subfloor Installation
Lay the 3/4 inch tongue and groove subflooring across the joists using construction adhesive. Secure the panels with 2 inch screws every 8 inches along the edges and 12 inches in the field.
Ensure all seams align perfectly with the joist centers to prevent future floor squeaks. Check the entire platform for level across the width and length before proceeding to the walls.
Phase 3 Wall Framing
Build the four exterior walls on the flat floor deck to ensure they remain square. Use 2×4 studs spaced 16 inches on center and include double top plates for added strength.
Frame out the rough openings for windows and doors using double headers to support the roof load. Raise the walls and secure them to the floor frame using heavy duty framing nails.
Phase 4 Loft Structural Assembly
Install the loft joists using 2×6 lumber spanning the width of the house. Notch the ends of the joists to sit securely on the wall plates for maximum load bearing.
Install the loft subfloor using 5/8 inch plywood to keep the weight manageable while maintaining rigidity. Ensure the loft height allows for at least 3 feet of headroom for the sleeping area.
Phase 5 Roof Rafter Installation
Cut the 2×8 rafters with a consistent pitch to create the peaked roof profile. Install the ridge board at the center and connect the rafters using a birdsmouth cut at the top plate.
Secure every rafter with hurricane ties to prevent uplift during severe weather events. Install the roof sheathing and apply a high quality synthetic underlayment immediately.
Phase 6 Exterior Sheathing and Weatherproofing
Apply the exterior wall sheathing using a house wrap to create a moisture barrier. Install the window and door units and seal them with professional grade flashing tape.
Wrap the entire structure in a breathable membrane to prevent condensation buildup within the walls. This layer is critical for protecting the framing from rot and insect infiltration.
Phase 7 Roofing and Siding
Install the metal roofing panels starting from the eaves and working toward the ridge. Secure the panels with gasketed screws to prevent leaks at the fastener points.
Apply the cedar lap siding starting from the bottom and overlapping each course for water shedding. Install the corner trim and fascia boards to seal all exposed edges of the structure.
Phase 8 Electrical and Plumbing Rough In
Run the electrical wiring through the wall studs and loft joists using Romex cabling. Install the plumbing lines for the kitchen and bathroom using PEX piping for flexibility and freeze resistance.
Mount the electrical boxes and plumbing manifolds in accessible locations for future maintenance. Ensure all penetrations through the exterior shell are sealed with expanding foam.
Phase 9 Insulation and Interior Walls
Fill the wall and ceiling cavities with insulation to meet local climate R value requirements. Install the interior wall panels using pine tongue and groove or drywall depending on the desired finish.
Build the interior partition walls to separate the bathroom and kitchen areas from the main living space. Secure the trim around the windows and doors for a professional finished look.
Phase 10 Final Finishes and Fixtures
Install the kitchen cabinetry and bathroom vanity to maximize the available floor space. Mount the plumbing fixtures and connect the electrical panel to the main power source.
Sand all exposed wood surfaces and apply a protective sealant or stain to the interior. Perform a final walkthrough to ensure all doors and windows operate smoothly.
Common Mistakes
Overlooking the floor slope is a frequent error that leads to interior doors not closing properly. Many builders fail to use a laser level during the foundation phase which causes cumulative errors.
Using standard interior screws for exterior framing reduces the structural lifespan of the house significantly. Always use hot dipped galvanized fasteners for any member exposed to the elements.
Underestimating the weight of the loft floor can lead to sagging over time if 2x4s are used instead of 2x6s. Ensure the loft joists are properly supported by the wall plates.
Neglecting the drip edge on the roof often results in water wicking back into the fascia boards. Always install a metal drip edge before the roofing panels to direct water away.
Maintenance and Safety
Pro Tip for Longevity Apply a high quality borate treatment to all framing members before closing the walls to prevent termite and rot damage. This barrier is essential for tiny homes.
Wear a professional grade respirator and safety glasses when cutting pressure treated lumber or applying sealants. Always use a fall protection harness when working on the roof.
Check the roof fasteners and sealant every six months to prevent leaks from compromising the interior. Reapply a UV protective finish to the cedar siding every three years.
Ensure the house is anchored to the ground using steel cables or anchor bolts to prevent movement. Verify that all electrical connections are grounded and pass inspection.