
Introduction
A geometric slat coffee table represents the perfect fusion of modern architectural design and functional craftsmanship. This versatile piece serves as a stunning centerpiece for both indoor living spaces and outdoor patio environments. The parallel slat construction creates visual depth while providing exceptional structural rigidity against lateral forces.
Homeowners consistently report that this design elevates property aesthetics while delivering decades of reliable service. The open slat profile allows water drainage and air circulation when positioned outdoors. The build process requires only basic woodworking tools and intermediate joinery skills.
Quick Specs
- Dimensions: 48 inches wide by 24 inches deep by 18 inches high
- Estimated Cost: $120 to $180 depending on lumber selection
- Difficulty Level: Intermediate
- Estimated Build Time: 8 to 10 hours including finishing
Materials and Tools
Lumber Requirements
- 4 pieces of 2x6x96 inch cedar or redwood for the tabletop slats
- 4 pieces of 4x4x20 inch cedar or redwood for the vertical legs
- 2 pieces of 2x4x48 inch cedar or redwood for the horizontal apron rails
- 2 pieces of 2x4x24 inch cedar or redwood for the rear cross brace
Hardware Requirements
- 32 pieces of 2 and 1/2 inch stainless steel deck screws for slat attachment
- 16 pieces of 3 inch stainless steel structural screws for apron to leg connections
- 8 pieces of 3 inch stainless steel pocket hole screws for cross brace attachment
- 1 tube of exterior grade polyurethane adhesive for slat bonding
Finishing Materials
- 1 quart of exterior grade spar urethane or tung oil finish
- 1 can of wood cleaner and brightener for surface preparation
Tool Requirements
- Circular saw or miter saw with a 10 inch blade
- Power drill with 1/8 inch and 3/16 inch drill bits
- Random orbit sander with 80 grit, 120 grit, and 220 grit sandpaper
- Speed square and combination square for layout accuracy
- Clamps ranging from 6 inch to 24 inch bar clamps
- Measuring tape and pencil for precise marking
Technical Layout
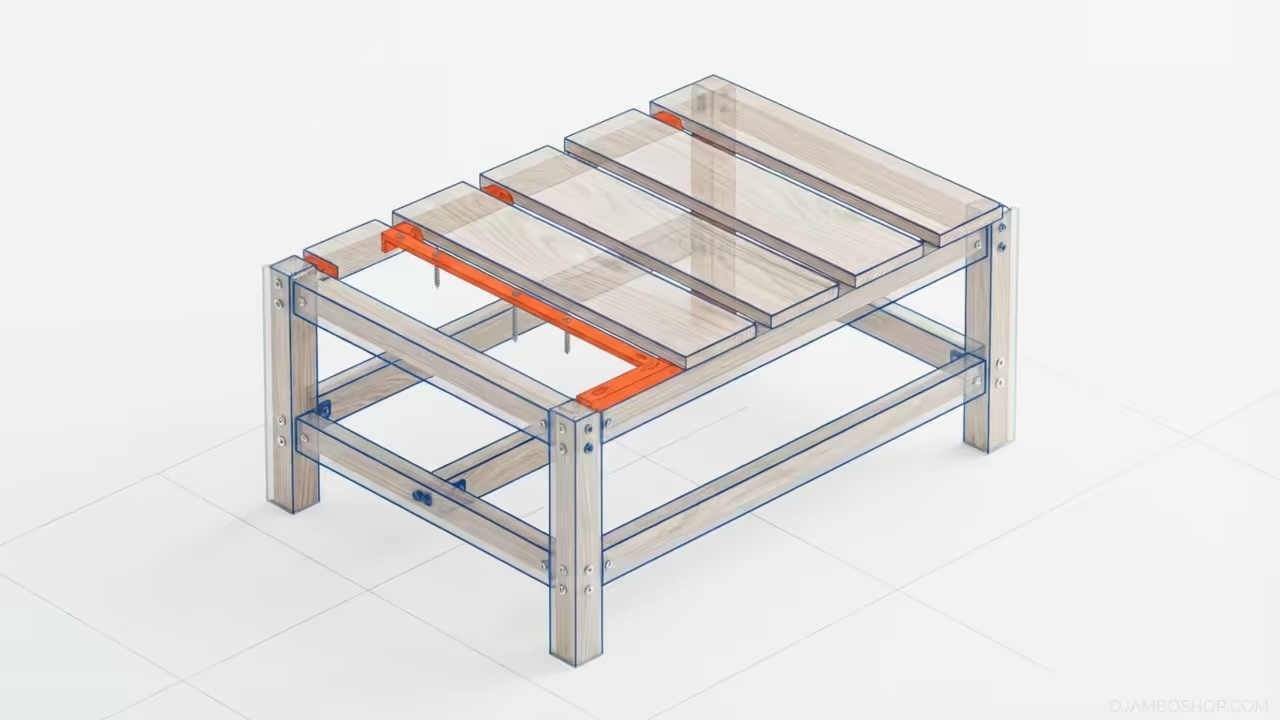
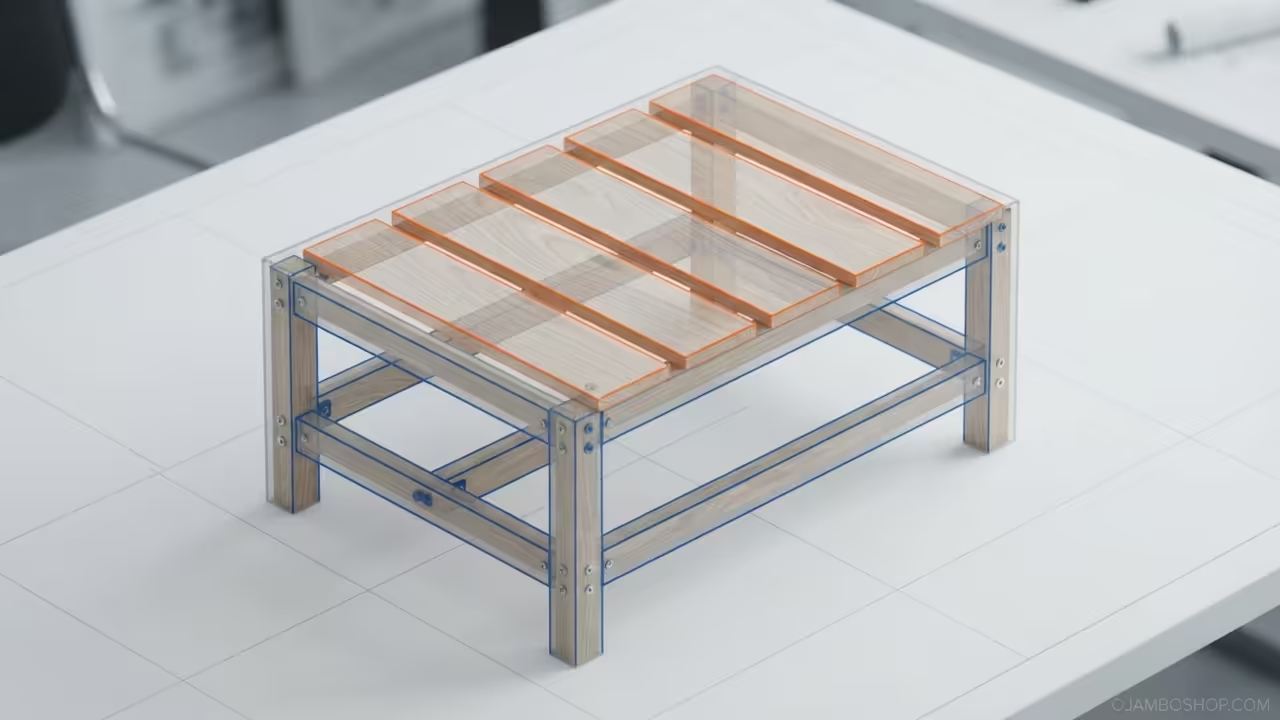
The structural framework of this geometric slat coffee table relies on a perimeter box construction with four vertical support members positioned at each corner. The 4×4 legs serve as the primary load-bearing columns, transferring the tabletop weight directly to the ground surface through a stable rectangular footprint. Each leg measures 20 inches in length before accounting for the 2 inch height contribution from the apron rails.
The horizontal apron rails connect the four legs using a butt joint reinforced with three 3 inch structural screws per connection point. This creates a rigid rectangular frame measuring 44 inches by 20 inches on the interior dimension. The rear cross brace provides additional lateral stability by connecting the two rear legs with a perpendicular 2×4 member.
The tabletop consists of four 2×6 cedar or redwood slats laid flat and spaced 1/2 inch apart. Each slat measures 48 inches in length and overhangs the apron frame by 2 inches on each side. The slats attach to the apron rails from below using 2 and 1/2 inch stainless steel screws driven upward through pre-drilled pilot holes.
Pro-Tip: Use stainless steel 316 grade screws rather than standard 304 grade when building for outdoor environments. The 316 alloy contains molybdenum, which provides superior resistance to chlorides and coastal salt exposure. This small hardware investment prevents unsightly rust staining on your wood surface and extends fastener life by approximately ten years in harsh weather conditions.
Step-by-Step Instructions
Phase 1: Layout and Material Preparation
Begin by inspecting all lumber for straightness, checking for warping, twisting, or cupping defects. Set aside any boards with significant deviations as they will compromise the flat tabletop surface. Measure and mark all cut lines using a speed square and sharp pencil. Cut the four 2×6 slats to exactly 48 inches using a circular saw guided by a straight edge.
Cut the four 4×4 legs to 20 inches each. Cut the two apron rails to 44 inches and the rear cross brace to 20 inches. Verify all measurements before proceeding to assembly.
Phase 2: Leg Preparation and Plumb Verification
Position the four 4×4 legs on a flat work surface in a rectangular arrangement matching the final 48 by 24 inch footprint. Use a level to verify that each leg stands perfectly vertical. Mark the height at which the apron rails will attach, positioning the bottom edge of each rail exactly 2 inches above the floor contact point.
This establishes the 18 inch total table height when combined with the 6 inch slat thickness. Double-check all markings before beginning the frame assembly.
Phase 3: Apron Frame Assembly
Lay the first 4×4 leg on its side on your workbench. Position one 44 inch apron rail against the top face of the leg, aligning the ends flush. Pre-drill three 3/16 inch pilot holes through the rail into the leg end grain. Drive three 3 inch structural screws to secure the connection.
Repeat this process for all four leg to rail connections, creating a complete rectangular apron frame. Verify squareness by measuring both diagonals, which should read identically at approximately 53.1 inches. Adjust any connections that show diagonal discrepancies.
Phase 4: Rear Cross Brace Installation
Position the 20 inch rear cross brace between the two rear legs on the interior face of the apron frame. The brace should sit flush against the bottom edge of the rear apron rail. Pre-drill two 3/16 inch pilot holes through each end of the brace into the leg faces.
Drive two 3 inch pocket hole screws at each connection point. This brace eliminates lateral flex and prevents the frame from parallelogram distortion under asymmetric loading. Verify that the brace is square to the apron rails before tightening the final screws.
Phase 5: Slat Layout and Spacing
Lay the apron frame upside down on a clean, flat surface. Arrange the four 2×6 slats on top of the frame, positioning them parallel to the 44 inch apron rails. Space the slats evenly with 1/2 inch gaps between each board. Use 1/2 inch thick wooden shims or metal washers as spacing jigs to maintain consistent gaps.
Center the slat array so that the outer edges overhang the apron frame by exactly 2 inches on both sides. Clamp the slats temporarily in position to verify alignment before permanent attachment.
Phase 6: Slat Attachment and Fastening
Flip the entire assembly right side up. Working from underneath, mark screw locations through the apron rails where they contact the bottom faces of the slats. Pre-drill 1/8 inch pilot holes at each marked location to prevent wood splitting.
Drive 2 and 1/2 inch stainless steel screws upward through the apron rails into the slat bottoms. Use four screws per slat, spacing them 12 inches apart. Apply exterior grade polyurethane adhesive to each slat to apron contact surface before driving the final screws for maximum bond strength.
Phase 7: Sanding and Surface Preparation
Begin sanding with 80 grit paper on the random orbit sander, working along the grain direction of each slat. Focus on removing mill marks, splintering, and rough edges from the cutting process. Progress to 120 grit for general smoothing, then finish with 220 grit for a silky surface ready for finishing.
Pay special attention to the end grain areas, which absorb finish more aggressively than face grain. Use a soft bristle brush or compressed air to remove all sanding dust from the slat gaps before applying any finish products.
Phase 8: Finish Application and Curing
Apply the first coat of exterior grade spar urethane or tung oil using a high-quality natural bristle brush. Work in the direction of the wood grain, applying thin, even coats to each slat surface. Allow the first coat to cure for 24 hours in a dust-free environment with temperatures between 65 and 75 degrees Fahrenheit.
Lightly sand with 320 grit paper between coats to promote adhesion. Apply a second coat following the same technique. A third coat is recommended for outdoor installations to maximize UV and moisture protection.
Common Mistakes
Failing to pre-drill pilot holes before driving screws into end grain will cause the wood to split, particularly in hardwood species like redwood. Always drill pilot holes 1/8 inch in diameter when fastening into end grain or within 2 inches of a board edge.
Neglecting to verify squareness during the apron frame assembly will result in a table with uneven leg contact on flat surfaces. Measure both diagonals after assembling the frame and adjust until they match within 1/16 inch tolerance.
Using interior grade polyurethane or paint for outdoor installations will result in premature finish failure within one to two seasons. Exterior grade spar urethane contains UV inhibitors and flexible binders that accommodate wood expansion and contraction cycles without cracking.
Insufficient spacing between slats will trap water and debris when the table is used outdoors. Maintain a minimum 1/2 inch gap between slats to allow adequate drainage and air circulation. Narrower gaps may appear visually tighter but will accelerate wood rot and fastener corrosion.
Maintenance and Safety
Inspect the table annually for loose fasteners, particularly after the first full seasonal cycle of expansion and contraction. Tighten any screws that have worked loose and replace any showing signs of corrosion. Clean the surface twice yearly using a mild detergent solution and a soft bristle brush.
Apply a fresh coat of exterior grade spar urethane every two years for outdoor installations or every three years for indoor use. Sand lightly with 220 grit paper before each recoat to ensure proper adhesion. Store the table under a covered patio or bring indoors during extended periods of inclement weather to significantly extend service life.
Always wear safety glasses and hearing protection when operating power saws and sanders. Use a dust mask rated N95 or higher when sanding to prevent inhalation of fine wood particles. Keep a first aid kit accessible in your workshop and maintain sharp cutting tools to reduce the force required during cutting operations.