
Introduction
The Writer’s Gable represents more than just a simple backyard shed or a small storage unit. It is a purpose-built architectural sanctuary designed specifically for deep focus, creative output, and physical solitude. Adding a structure of this caliber to your property provides an immediate increase in market value while offering a functional escape from the distractions of a primary residence.
A well-executed small living space requires a balance between structural rigidity and aesthetic appeal. By focusing on a classic gable silhouette, we maximize interior vertical space while ensuring efficient water runoff and snow load management. This project is the ideal entry point for an ambitious DIY builder looking to master residential-grade framing on a manageable, 150 square foot scale.
Quick Specs
The Writer’s Gable is designed with a 10-foot by 15-foot footprint to meet the 150 square foot target exactly. The estimated cost for materials ranges between 4,500 and 6,500 USD depending on local lumber prices and interior finish selections. We categorize this build as an advanced-intermediate project due to the precision required for the roof rafters and the weatherproofing integration.
A dedicated crew of two can expect to complete the dried-in shell within three to four weekends of active labor. The interior build-out, including insulation and cabinetry, will vary based on the level of detail the builder desires. Proper planning and staging of materials are essential to maintaining this timeline and preventing weather-related delays during the framing phase.
Materials and Tools
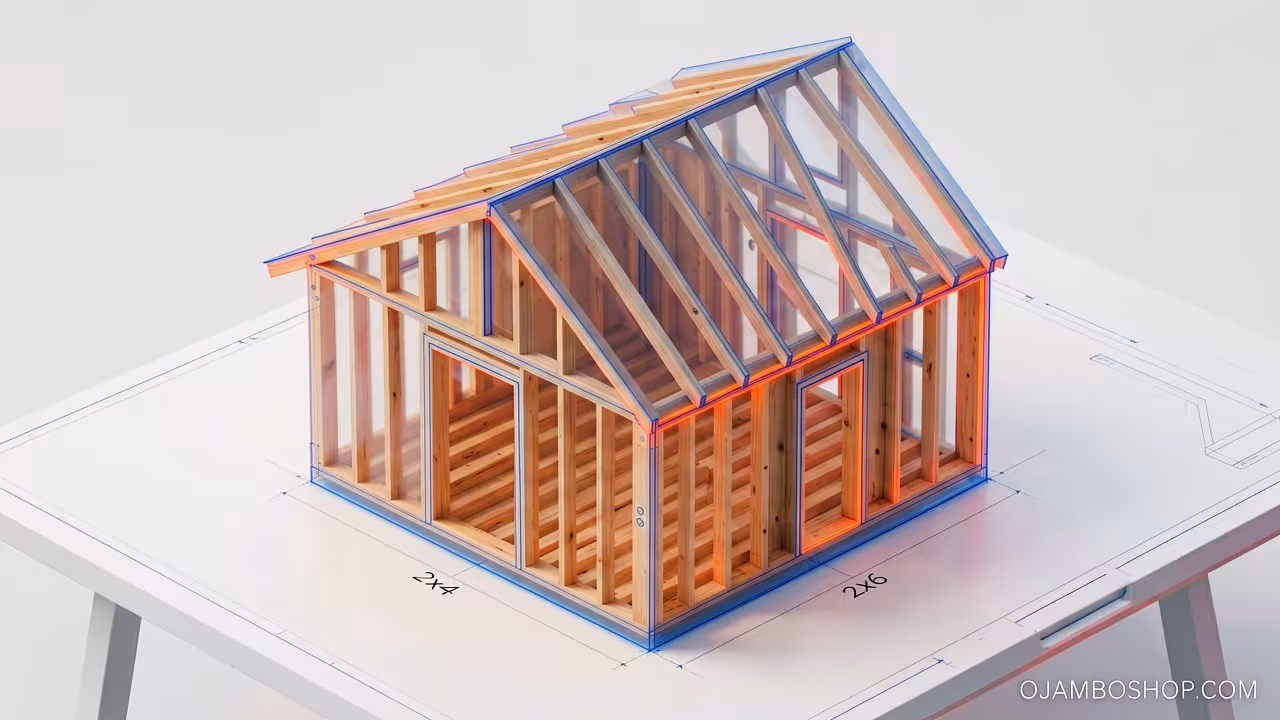
Your lumber package will primarily consist of pressure-treated 2×6 members for the floor joists and standard kiln-dried 2×4 studs for the wall assemblies. You will need 18 sheets of 3/4-inch tongue-and-groove plywood for the subfloor and approximately 24 sheets of 7/16-inch OSB for the exterior wall and roof sheathing. Finish materials include fiber cement siding, cedar trim, and architectural asphalt shingles to ensure the structure lasts for several decades.
The hardware requirements are extensive and include 3-inch and 3.5-inch framing nails, 1.5-inch roofing nails, and various structural ties. You will need a significant supply of high-quality exterior-grade screws for the decking and trim work. Specialized items like a pre-hung entry door, three double-pane windows, and a complete drip edge system for the roof must be sourced prior to starting the foundation work.
The essential tool kit for this project starts with a high-torque miter saw and a reliable circular saw with a framing blade. You will also require a pneumatic framing nailer, a level of at least four feet in length, and a chalk line for marking long layout runs. For the roof phase, a sturdy extension ladder and a fall protection harness are non-negotiable safety requirements for any responsible builder.
Technical Layout

The structural integrity of the Writer’s Gable relies on a standard platform framing system anchored to a robust floor diaphragm. We utilize 2×6 pressure-treated floor joists spaced at 16 inches on center, which are then capped with 3/4-inch subflooring to create a rigid, level base. This foundation must be perfectly square, as any deviation at the base will multiply into significant alignment issues once the 10-foot tall walls and the 8/12 pitch roof rafters are installed.
The load-bearing capacity is distributed through double top plates on the long walls, which support the common rafters without the need for a structural ridge beam. Instead, we use a non-load-bearing ridge board with collar ties every 32 inches to prevent the walls from spreading under heavy snow loads or high winds. Each wall stud is meticulously aligned with the floor joists below to ensure a continuous load path from the roof peak down to the ground-contact skids. This alignment, known as stack framing, maximizes the efficiency of the lumber and provides the most stable environment for interior drywall or wood paneling.
Material Comparison Table
| Material Type | Pros | Cons | Best Use Case |
|---|---|---|---|
| Pressure Treated Pine | High rot resistance, low cost | Can warp during drying | Floor joists and skids |
| Western Red Cedar | Natural beauty, insect proof | High cost, soft wood | Exterior trim and accents |
| Fiber Cement Siding | Fireproof, holds paint well | Heavy, requires special blades | Primary exterior cladding |
| OSB Sheathing | Cost-effective, consistent | Swells if exposed to moisture | Wall and roof structural skin |
| CDX Plywood | Stronger than OSB, handles rain | Higher price point | Roof sheathing in wet climates |
Step-by-Step Instructions
Phase 1: Foundation and Floor Framing
Start by clearing a level 12-foot by 17-foot area and laying down a 4-inch bed of compacted gravel for drainage. Position four 4×4 pressure-treated skids across the site, ensuring they are perfectly level and parallel to one another. Build your 10×15 floor frame using 2×6 joists, checking the diagonals to ensure the frame is perfectly square before nailing the 3/4-inch subfloor sheets into place.
Phase 2: Wall Assembly and Layout
Mark your wall plates for 16-inch on center stud spacing, ensuring you account for the window and door rough openings as specified in your blueprint. Build the two 15-foot long walls first on the flat floor surface, including the double top plates for structural rigidity. Raise the walls, brace them temporarily with 2x4s, and then construct and raise the 10-foot end walls to tie the entire rectangular structure together.
Phase 3: Roof Rafter Cutting and Installation
Calculate the length of your common rafters based on an 8/12 pitch, which provides excellent water shedding and interior headspace. Cut a master rafter with the appropriate birdsmouth notch and use it as a template for the remaining 22 rafters to ensure total consistency. Install the ridge board first, then pair the rafters across the span, securing them to the top plates with H2.5 structural ties for wind uplift protection.
Phase 4: Exterior Sheathing
Apply the 7/16-inch OSB sheathing to the wall studs first, ensuring the panels overlap the floor rim joist for maximum lateral strength. Use a staggered pattern for the roof sheathing to avoid continuous seams, which significantly strengthens the roof diaphragm against racking forces. Nail every 6 inches along the edges and every 12 inches in the field of the board using 8d galvanized nails.
Phase 5: Weather Barrier and Windows
Wrap the entire structure in a high-quality house wrap, overlapping the seams by at least six inches and sealing them with specialized seam tape. Install the windows and the entry door according to the manufacturer’s instructions, paying close attention to the sill flashing to prevent water intrusion. Pro-Tip: Always use a self-adhering flexible flashing membrane around all openings, as this is the single most effective way to prevent long-term rot in the wall cavity.
Phase 6: Roofing and Drip Edge
Install a metal drip edge along the eaves and rakes, followed by a layer of synthetic roofing underlayment over the entire OSB surface. Begin laying your architectural shingles at the bottom edge, maintaining the proper offset to ensure the tabs do not align vertically. Flash the ridge of the roof with a ridge vent system to allow for proper attic ventilation, which prevents heat buildup and moisture condensation in the winter.
Phase 7: Siding and Exterior Trim
Install your chosen siding material, starting from the bottom and working upward while maintaining a level line around the entire building. Use cedar or composite trim boards to cap the corners and frame the windows, providing a clean, professional finish to the exterior. Ensure all joints are tight and that a small gap is left for high-quality exterior caulk at the intersections of the siding and trim.
Phase 8: Interior Insulation and Utilities
If you plan on using the space year-round, install R-15 fiberglass batts or mineral wool insulation in the wall cavities and R-30 in the ceiling. Run any necessary electrical conduit for lighting and outlets before closing the walls with your choice of finish material. Popular options for a writer’s cabin include tongue-and-groove pine planks or classic painted drywall for a clean and bright interior aesthetic.
Common Mistakes
The most frequent error in small cabin construction is failing to square the foundation at the very beginning of the process. If the floor is even half an inch out of square, the roof rafters will not sit correctly on the top plates, leading to gaps. You must measure the diagonals of the floor frame and adjust them until they are identical before you drive a single nail into the subfloor.
Another common mistake is neglecting the proper installation of flashing around the windows and doors during the weatherproofing phase. Water is the primary enemy of wood structures, and even a small leak can cause significant structural rot within just a few years. Many builders rely too heavily on caulk alone, which eventually cracks and fails, rather than using mechanical flashing to shed water away from the openings.
Finally, many DIYers underestimate the importance of ventilation in a small, enclosed space like the Writer’s Gable. Without a ridge vent and soffit vents, moisture from your breath and the environment will get trapped inside the ceiling assembly. This leads to mold growth and can prematurely rot the roof sheathing from the inside out, so never skip the ventilation hardware during the roofing stage.
Maintenance and Safety
To ensure the longevity of your cabin, you must apply a high-quality UV-resistant stain or exterior paint to all wood surfaces every three to five years. Check the perimeter of the foundation annually to make sure no soil or debris has built up against the pressure-treated skids or siding. Keeping the gutters clean and ensuring the ground slopes away from the cabin will prevent moisture from pooling and damaging the floor system.
Safety during the build is paramount, especially when working on the roof or operating high-speed power tools. Always wear impact-rated safety glasses and hearing protection when using the miter saw or the pneumatic nailer to prevent permanent injury. When working at heights, ensure your ladder is on stable ground and have a partner nearby to assist with the placement of heavy roof rafters or sheathing panels.