
The allure of a subterranean dwelling extends far beyond cinematic fantasy into the realm of high-efficiency modern living. An earth-bermed Accessory Dwelling Unit, often called a Hobbit House, offers unparalleled thermal mass benefits and aesthetic integration with the natural landscape. By utilizing the earth as a natural insulator, these structures maintain stable internal temperatures year-round, significantly reducing the energy required for heating and cooling. Building a 400 square foot unit provides the perfect balance between a functional living space and a manageable DIY construction project for those with advanced carpentry skills.
Beyond the ecological advantages, adding a well-crafted earth-bermed ADU can substantially increase your property value and provide a unique rental opportunity. This specific design focuses on a reinforced semi-circular arch and a heavy-duty moisture management system to ensure the structure remains dry and safe for decades. This guide provides the technical roadmap to transform a patch of land into a high-performance, underground sanctuary that stands the test of time and weather.
Quick Specs
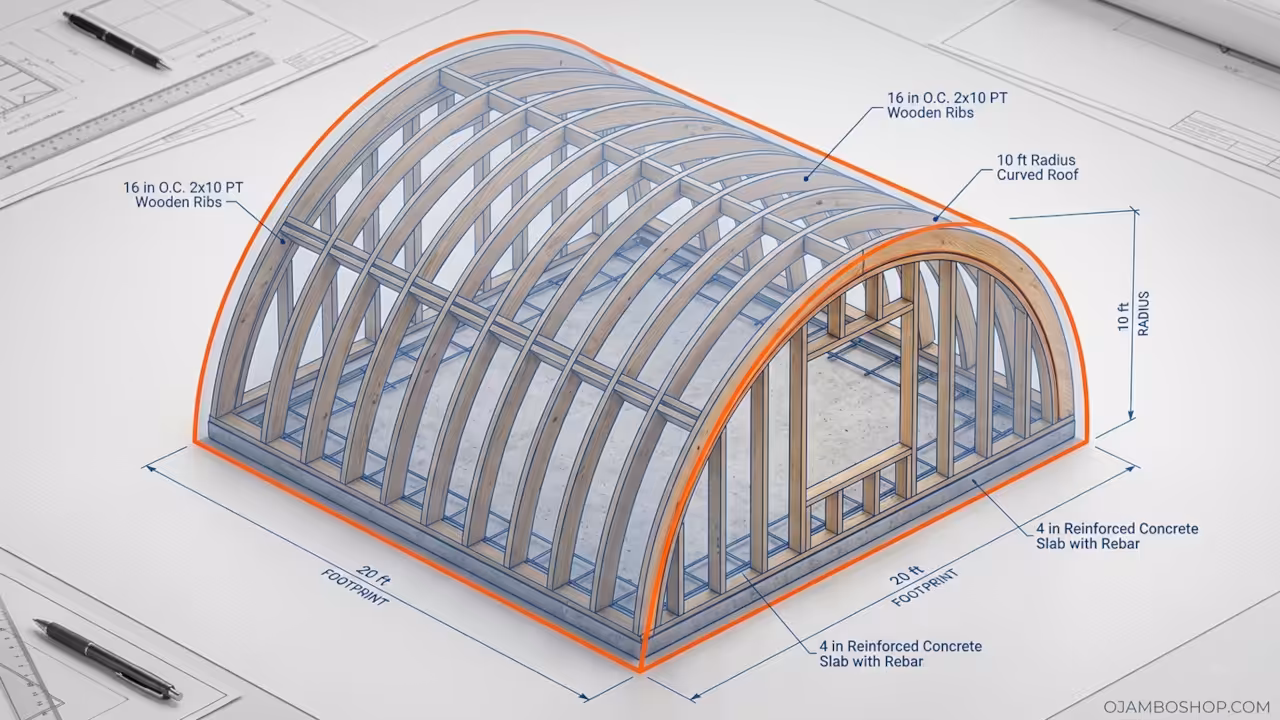
Dimensions: 20 feet by 20 feet internal footprint (400 sq ft)
Estimated Cost: $45,000 to $65,000 depending on interior finishes
Difficulty Level: Advanced / Professional
Estimated Build Time: 4 to 6 months including excavation and curing
Materials and Tools
The foundation of a subterranean build requires specific materials rated for ground contact and extreme hydrostatic pressure. You will need 4000 PSI fiber-reinforced concrete for the slab and rear retaining walls to ensure structural stability. The framing requires pressure-treated 2×10 lumber for the primary ribs and 3/4-inch marine-grade plywood for the exterior sheathing. High-density polyethylene (HDPE) drainage mats and a 60-mil EPDM waterproofing membrane are non-negotiable components for the envelope.
Essential tools for this project include a 12-inch sliding compound miter saw for complex bevel cuts on the curved arch ribs. You will require a heavy-duty rotary hammer drill for setting anchors into the concrete foundation and a professional-grade pneumatic framing nailer. A laser level is mandatory for ensuring the floor slab and the spring line of the arch remain perfectly true across the twenty-foot span. Do not overlook the necessity of a plate compactor for preparing the sub-base and a specialized heat gun for seaming the EPDM membrane.
Technical Layout
The structural integrity of a 400 square foot earth-bermed ADU relies on the principles of the compression arch and the distribution of lateral earth pressure. Unlike a standard stick-built home, this structure must support a dead load of approximately 100 to 150 pounds per square foot from the soil overburden. We utilize a hybrid system where a reinforced concrete “U” shaped bunker forms the back and side walls, while a heavy-timber glulam arch system supports the living roof. The radius of the arch is calculated at 10 feet, creating a peak interior height of approximately 9 feet at the center of the room.
To prevent the side walls from splaying under the weight of the earth, we incorporate a reinforced concrete tension tie within the floor slab itself. Each wooden rib is fastened to a heavy-gauge steel shoe that is cast directly into the concrete stem walls. This creates a continuous load path that transfers the weight of the soil through the arch and into the footings. The rear wall features weep holes and a dedicated gravel backfill zone to relieve hydrostatic pressure, which is the primary cause of subterranean structural failure. By combining these masonry and timber elements, we create a rigid exoskeleton capable of withstanding the massive weight of a fully saturated earth roof.
Material Comparison for Subterranean Walls
| Material | Durability | Cost | Moisture Resistance |
|---|---|---|---|
| Poured Concrete | 100+ Years | High | Excellent |
| CMU Blocks | 50+ Years | Medium | Good (Requires Sealing) |
| Pressure Treated Wood | 30 Years | Low | Moderate |
| Insulated Concrete Forms | 80+ Years | High | Superior |

Step-by-Step Instructions
Phase 1: Excavation and Footings
Begin by marking a 24-foot by 24-foot area to allow for a two-foot over-dig on all sides for drainage access. Excavate to a depth of 9 feet if you intend for the structure to be fully bermed, ensuring the floor sits on undisturbed native soil or engineered fill. Pour 24-inch wide by 12-inch deep reinforced concrete footings around the perimeter. Install a continuous runs of #4 rebar to tie the footings to the eventual wall and slab pour for maximum rigidity.
Phase 2: Slab and Stem Walls
Lay a 15-mil vapor barrier over a 6-inch compacted gravel base before pouring your 4-inch thick reinforced concrete floor slab. At the same time, form and pour the 4-foot high stem walls that will serve as the base for your timber arches. Ensure that the anchor bolts or steel shoes for the arches are placed with extreme precision using a transit level. Allow the concrete to cure for at least 21 days before subjecting it to the lateral loads of backfilling.
Phase 3: Arch Fabrication and Installation
Construct a master template for the semi-circular ribs using two layers of 3/4-inch plywood glued and screwed together with staggered joints. Each rib should be spaced 16 inches on center to handle the heavy soil loads of the living roof. Lift the ribs into place using a temporary center support ridge beam to maintain the radius until all rafters are secured. Install 2×6 blocking between the ribs every 24 inches to prevent lateral buckling under the weight of the overburden.
Phase 4: Sheathing and Mechanical Rough-in
Apply two layers of 1/2-inch CDX plywood over the exterior of the arches, ensuring that all joints are staggered and land on a rib. This double-layer approach allows the plywood to follow the curve of the arch without splintering or creating flat spots. Once the shell is closed, install your rough plumbing and electrical conduits within the interior wall cavities. Keep all penetrations through the exterior shell to a minimum and group them together to simplify the upcoming waterproofing process.
Phase 5: Primary Waterproofing Membrane
Clean the entire exterior surface of the plywood shell to remove any dust, debris, or protruding nail heads that could puncture the membrane. Apply a primer specifically designed for EPDM or TPO membranes over the wood and concrete surfaces. Roll out the 60-mil membrane starting from the bottom and working upward, overlapping all seams by at least six inches. Use a heavy weighted roller and specialized seam tape to create a monolithic, watertight skin around the entire structure.
Phase 6: Drainage Layer and Protection Board
Install a dimpled HDPE drainage mat over the entire membrane to provide a dedicated path for water to flow down to the footings. This layer also acts as a physical protection board that prevents rocks or roots from damaging the primary waterproofing skin. At the base of the walls, install a 4-inch perforated French drain pipe encased in filter fabric and surrounded by clean 3/4-inch crushed stone. This system ensures that water never sits against the structure but is instead moved away to a daylight exit or dry well.
Phase 7: Soil Overburden and Landscaping
Begin backfilling the sides of the structure in 12-inch lifts, compacting each layer carefully to prevent future settling or shifting. Use a lightweight engineered soil mix for the top 12 inches of the roof to reduce the total dead load while supporting plant life. Plant native grasses or low-maintenance ground cover with shallow root systems to stabilize the soil and provide natural camouflaging. Avoid planting large trees or shrubs with aggressive taproots near the structure as they can eventually breach the drainage layers.
Phase 8: Interior Finishing and Ventilation
Install a high-efficiency Heat Recovery Ventilator (HRV) to ensure constant fresh air exchange within the airtight subterranean envelope. Finish the interior walls with moisture-resistant gypsum board or natural lime plaster, which helps regulate humidity levels naturally. Install the signature circular door and windows on the exposed front facade, ensuring they are flashed correctly to the waterproofing membrane. Finalize the flooring with a breathable material like polished concrete or stone tile to take advantage of the slab’s thermal mass.
Pro-Tip for Structural Longevity
Pro-Tip: When fastening the double-layered plywood sheathing to the curved arches, avoid using standard galvanized nails. Instead, use 2-inch stainless steel structural screws with an oversized head. Subterranean environments are inherently high-moisture zones, and even the best membranes can allow microscopic amounts of vapor to reach the fasteners. Stainless steel prevents the corrosion that leads to “nail sickness,” where the wood around the fastener rots away, compromising the structural integrity of the entire arch under the weight of the earth.
Common Mistakes to Avoid
The most frequent error in Hobbit-style builds is neglecting the “umbrella” effect of the waterproofing. Many builders only waterproof the roof, but in an earth-bermed structure, the entire shell must be encapsulated from the footings to the peak. Any gap in the membrane will act as a funnel for groundwater, leading to catastrophic leaks that are nearly impossible to fix once the soil is in place.
Another common mistake is failing to account for the weight of saturated soil during the design phase. A foot of dry soil weighs significantly less than a foot of soil after a heavy rainstorm; your arch must be engineered for the worst-case scenario. Always over-build the structural ribs and never increase the spacing beyond 16 inches on center.
Finally, inadequate ventilation is a silent killer for subterranean ADUs, leading to mold and poor air quality. Because these homes are effectively airtight, standard passive venting is rarely sufficient to move the volume of air required for a healthy living environment. Always integrate a mechanical ventilation system that runs continuously to manage interior moisture produced by cooking, cleaning, and breathing.
Maintenance and Safety
Regular maintenance for an earth-bermed home focuses primarily on the exterior drainage and the health of the living roof. Inspect the French drain outlets twice a year to ensure they are not clogged with silt or debris, as standing water is the greatest threat to your foundation. Monitor the vegetation on the roof to ensure no invasive species with deep roots have taken hold, and keep the soil lightly fertilized to maintain a thick, protective mat of greenery.
Safety during the build is paramount, especially during the excavation and backfilling phases. Always use trench shoring if you are working in deep excavations and never work alone when moving heavy timber arches. Ensure that all electrical circuits are protected by GFCI breakers, particularly in the early stages of the build when the environment is damp. Wear a respirator when applying primers and adhesives for the EPDM membrane, as these chemicals often off-gas potent fumes in confined outdoor spaces.