
The concept of the biophilic glass box forest retreat represents the pinnacle of modern small living by merging industrial transparency with organic warmth. Adding a structure of this caliber to your property does more than just increase your square footage; it fundamentally changes how you interact with your environment. By prioritizing expansive sightlines and natural materials, you create a sanctuary that serves as a high-value asset for both personal wellness and long-term property equity.
Building a glass-heavy structure requires a disciplined approach to framing and a deep understanding of load distribution. This is not a simple shed project but a sophisticated architectural endeavor that demands precision at every corner. When executed correctly, the retreat becomes a seamless extension of the woods, offering a four-season experience that captures the shifting light and seasonal colors of the landscape.
Quick Specs
Dimensions: 20 feet by 20 feet (400 Square Feet)
Estimated Cost: $28,000 to $35,000 depending on glass specifications
Difficulty Level: Advanced DIY / Professional
Estimated Build Time: 6 to 8 weeks with a two-person crew
Materials and Tools
The success of this build relies on the quality of your timber and the thermal efficiency of your glazing units. For the primary skeleton, we utilize 6×6 Douglas Fir posts and 4×10 glulam beams to ensure the structure can handle significant lateral wind loads. The floor system consists of pressure-treated 2×10 joists spaced 16 inches on center to provide a rigid foundation for the interior finishes.
Your hardware list must include heavy-duty galvanized post bases, 8-inch structural timber screws, and high-performance silicone sealant for the glass channels. You will also need a substantial amount of EPDM rubber roofing membrane and specialized aluminum pressure plates for securing the large-scale glass panels. Do not compromise on the quality of your moisture barriers, as the interface between glass and wood is the most common point of failure.
Required tools include a sliding compound miter saw, a heavy-duty circular saw with a framing blade, and a laser level for ensuring the foundation is perfectly planar. You will also need a glass suction cup lifter rated for at least 200 pounds and a high-torque impact driver for the structural fasteners. Safety gear such as cut-resistant gloves and wrap-around eye protection is non-negotiable when handling the large tempered glass units required for the walls.
Hardware and Material Comparison
| Material Type | Durability | Cost | Best Use Case |
|---|---|---|---|
| Standard Pine | Low | $ | Interior non-load bearing trim |
| Douglas Fir | Medium-High | $$ | Primary structural posts and beams |
| Glulam Beams | High | $$$ | Long spans and heavy roof loads |
| Tempered Glass | High | $$$ | Standard wall panels for safety |
| Low-E Glazing | Very High | $$$$ | Maximum thermal efficiency and UV protection |
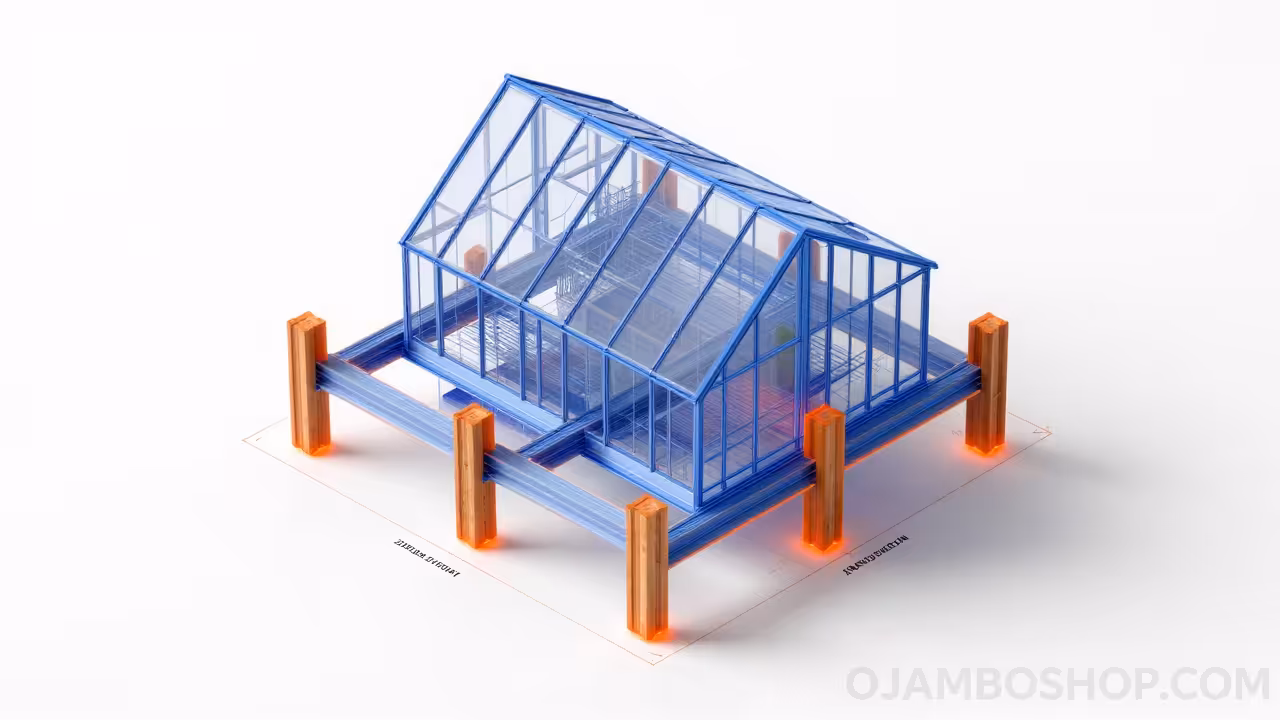
Technical Layout
The structural integrity of a glass-box retreat relies entirely on a rigid-frame design, often referred to as a post-and-beam system. Unlike traditional stick-framing which relies on plywood sheathing for shear strength, this biophilic design utilizes the mass of the 6×6 posts and the mechanical connection of the glulam beams to resist racking. Because the majority of the wall surface area is comprised of glass, we cannot rely on wall diaphragms for stability, making the roof and floor diaphragms critical.
The floor system is engineered to act as a horizontal plate, tied together with 3/4-inch tongue-and-groove subflooring that is both glued and screwed to the joists. At the roof level, we utilize a 2:12 pitch to ensure proper drainage while maintaining the sleek, low-profile aesthetic characteristic of modern glass structures. The rafters are notched over the primary beams using birdsmouth cuts that provide a flat bearing surface, ensuring that downward pressure from snow loads is transferred directly into the vertical posts. This creates a continuous load path from the peak of the roof down to the concrete pier footings.
Step-by-Step Instructions
Step 1: Foundation and Site Preparation
Begin by clearing the building site of all organic debris and establishing a clear perimeter that extends five feet beyond the footprint. Use a transit level to mark the heights for your concrete piers, ensuring they are positioned precisely at the 20-foot intervals required for the main posts. Excavate below the frost line for your area to prevent heaving, which could easily shatter the glass panels later in the project.
Once the holes are dug, pour your concrete footings and set your galvanized post bases while the concrete is still wet for maximum adjustment. It is vital to double-check the squareness of the foundation using the 3-4-5 triangle method or by measuring the diagonals to ensure they are identical. A foundation that is out of square by even a half-inch will make the installation of large glass sheets nearly impossible during the final phases.
Step 2: Floor Joist Installation
Install your 2×12 pressure-treated rim joists around the perimeter of the post bases, securing them with structural bolts. Fill in the field with 2×10 joists spaced 16 inches on center, using joist hangers at every connection point to ensure a flush top surface. This floor system must be perfectly level, as it serves as the primary reference plane for the entire vertical structure.
Pro-Tip: Apply a joist tape or a thin strip of butane membrane to the top of every joist before installing the subfloor. This prevents moisture from trapping between the wood layers and eliminates the squeaking caused by the natural expansion and contraction of the lumber. This small step significantly increases the longevity of the floor system and provides a professional, high-end feel to the interior walking surface.
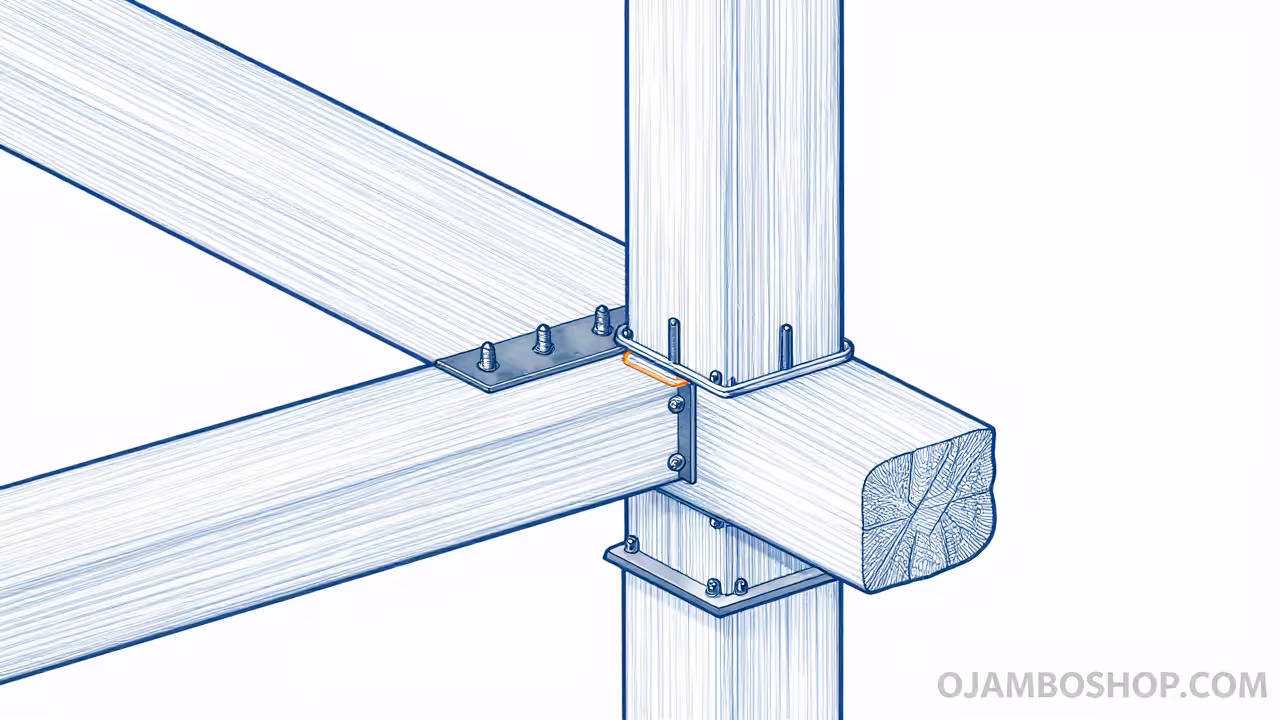
Step 3: Vertical Post and Beam Framing
Raise the 6×6 Douglas Fir posts into the bases and secure them temporarily with 2×4 bracing in two directions. Cut your 4×10 glulam beams to length and prepare the lap joints or steel connector plates that will marry them to the top of the posts. This stage requires at least two people and a set of heavy-duty scaffolding to safely lift and position the heavy horizontal members.
Once the beams are in place, check for plumb on every post once again before driving the final structural screws. Use 8-inch timber fasteners to pull the beams tight against the posts, creating a rigid skeleton that can stand independently of any wall sheathing. This skeleton is the heart of the glass box, so any gaps in the joinery should be addressed now with stainless steel shims if necessary.
Step 4: Roof Rafters and Sheathing
Install the rafters at a 2:12 pitch, spacing them 24 inches on center to allow for a clean, open-ceiling look from the interior. Secure each rafter to the glulam beams using hurricane ties to ensure the roof cannot be lifted by high-velocity winds. Sheath the roof with 5/8-inch CDX plywood, ensuring all edges land on a rafter and are nailed every six inches along the perimeter.
Immediately after sheathing, apply a high-temperature ice and water shield over the entire surface to protect the structure from rain. Since this is a low-slope roof, the waterproofing layer is the most important element of the overhead assembly. Install the EPDM rubber membrane according to the manufacturer’s specifications, paying close attention to the termination bars and the flashing at the roof edges.
Step 5: Glass Channel Preparation
To accommodate the large glass panels, you must install a series of recessed channels or “stops” along the floor, posts, and beams. These stops are typically made from 2×2 clear cedar or aluminum extrusions that provide a 1-inch deep pocket for the glass to sit within. Ensure that the bottom channel has integrated weep holes to allow any condensation or intruding water to drain toward the exterior of the building.
Line the inside of these channels with EPDM setting blocks, which act as cushions for the glass and prevent direct contact between the glazing and the wood. The glass must “float” within the frame to allow for the different expansion rates of the two materials. Failure to provide this gap will result in the glass cracking as the wood moves with changes in humidity.
Step 6: Glazing Installation
This phase requires extreme care and the use of heavy-duty glass suction cups to maneuver the tempered units into place. Start with the largest panels first, lifting them into the top channel and then dropping them gently onto the setting blocks in the bottom channel. This “up-and-over” movement is the standard method for installing fixed glass panels in a post-and-beam structure.
Once the glass is centered in the opening, secure it with exterior pressure plates or matching wood stops. Apply a thick bead of high-performance neutral-cure silicone along the entire perimeter of the glass on both the interior and exterior sides. This creates the primary weather seal and provides a secondary layer of structural bonding that helps the glass resist wind pressure.
Step 7: Interior Finishing and Insulation
With the structure dried in, you can begin the interior work by installing the tongue-and-groove ceiling planks directly to the underside of the rafters. If you are including a bathroom or kitchen area, run your plumbing and electrical lines through the floor system or within specialized conduits to keep them hidden from view. Use high-quality floor insulation between the joists to maintain a comfortable temperature throughout the winter months.
For the walls that are not glass, such as the rear utility wall, use mineral wool batts for their superior fire resistance and acoustic properties. Finish the interior walls with natural wood cladding or smooth-finish drywall to contrast with the industrial look of the glass. The goal is to keep the interior palette neutral so that the forest outside remains the primary visual focus of the space.
Step 8: Exterior Decking and Transition
A biophilic retreat is incomplete without a proper transition to the surrounding forest floor. Build a wrap-around deck using matching materials to extend the living space and provide easy access to the glass cleaning surfaces. The deck should be slightly lower than the interior floor height to prevent water from splashing against the bottom glass seals during heavy rainstorms.
Ensure that the deck footings are independent of the main structure to prevent any movement from transferring to the glass walls. Use hidden fasteners for the decking boards to maintain a clean, modern look that complements the lines of the glass box. This exterior space acts as a functional buffer and enhances the overall biophilic experience by encouraging outdoor interaction.
Common Mistakes to Avoid
The most frequent error in glass-box construction is failing to account for the weight of the glazing during the framing stage. Builders often use standard 4×4 posts which can bow under the combined weight of the roof and the heavy glass, leading to seal failure or shattered panels. Always over-engineer your vertical members and use glulam beams for their superior dimensional stability.
Another mistake is neglecting the importance of high-quality silicone; using cheap painter’s caulk will lead to leaks within the first year. Specialized glazing silicone is designed to remain flexible for decades and resist the UV degradation that occurs with constant sun exposure. Finally, many DIYers forget to include adequate ventilation, turning the glass box into a greenhouse that becomes uncomfortably hot during the summer months.
Maintenance and Safety
Maintaining a glass retreat involves regular inspections of the exterior seals and the wood finishes to prevent rot. Every six months, walk the perimeter and check for any gaps in the silicone or signs of moisture penetration at the base of the glass channels. Re-apply a high-quality UV-protective oil to the Douglas Fir posts every two to three years to prevent the wood from silvering or checking.
Safety during the build is paramount, especially when working with large-format glass and heavy timbers. Always use a crew of at least three people when setting the glass panels to ensure they are supported at all times. Keep the work site clean and free of debris to prevent trips, and never attempt to install glass in high-wind conditions. Proper weatherproofing and regular maintenance will ensure your forest retreat remains a safe and beautiful sanctuary for a lifetime.