
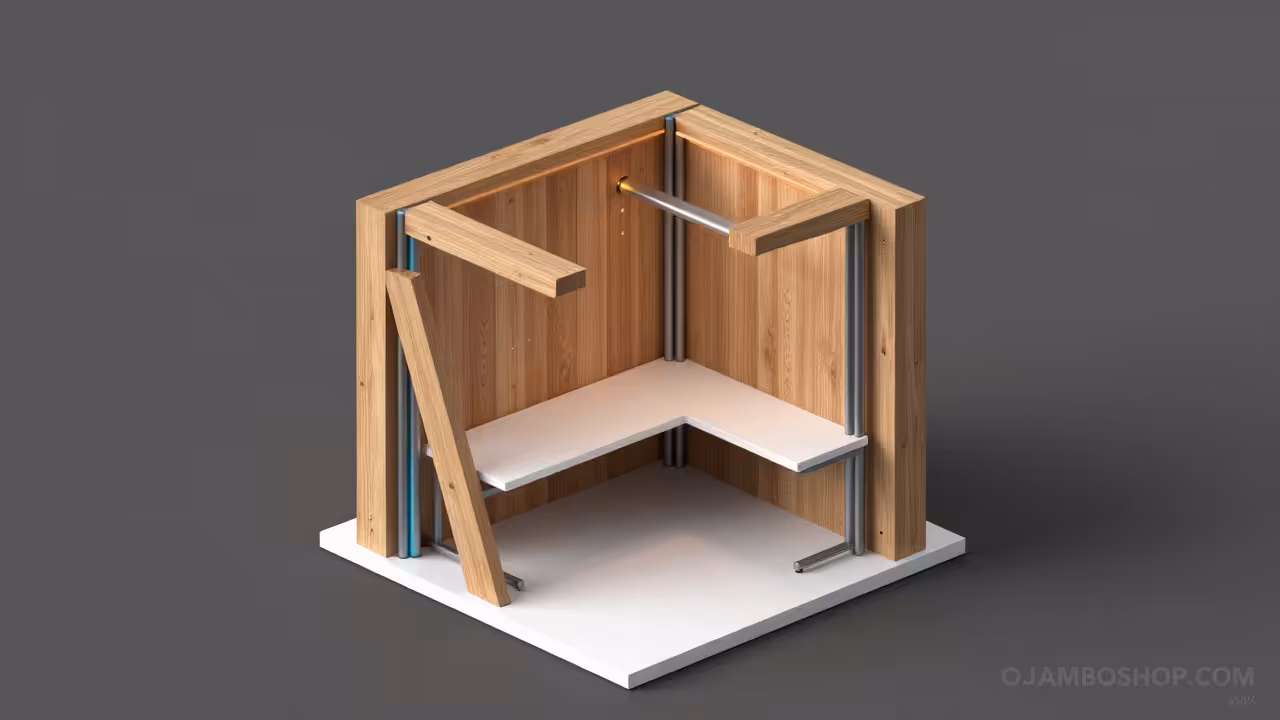
The shift toward remote work has transformed the backyard from a leisure space into a primary center of productivity. Building a dedicated micro studio offers a professional sanctuary that separates your home life from your professional career. This 200 square foot structure is specifically designed to maximize every inch of its footprint while maintaining a minimalist aesthetic.
Beyond the immediate functional benefits, adding a high quality conditioned structure to your property significantly increases total real estate value. This project focuses on a modern shed roof design that simplifies construction while providing ample height for a comfortable interior atmosphere. By following this guide, you will master the art of small scale timber framing and interior spatial optimization.
Quick Specs
Dimensions: 10 Feet by 20 Feet (200 Square Feet Total Footprint).
Roof Pitch: 2/12 Single Slope Shed Style for maximum solar efficiency and runoff.
Estimated Cost: 12,500 to 18,000 USD depending on local lumber prices and finish grade.
Difficulty Level: Advanced Intermediate (Requires knowledge of framing and basic electrical).
Estimated Build Time: 120 to 160 Labor Hours for a two person crew.
Materials and Tools
Building a structure of this caliber requires premium materials to ensure longevity and structural stability over decades of use. You will need pressure treated 2×6 lumber for the floor joists and standard kiln dried 2×4 studs for the wall framing. The exterior should be finished with LP SmartSide or similar engineered wood siding for superior moisture resistance and ease of painting.
For the integrated Murphy office, select 3/4 inch Baltic Birch plywood to ensure the moving components do not warp under stress. High quality hardware is non negotiable for the folding mechanisms to prevent sagging over time. Ensure you have 3 inch deck screws for framing and 1.5 inch galvanized nails for the siding and trim installation.
Essential tools include a sliding compound miter saw for precision cuts and a circular saw for ripping large sheets of sheathing. A pneumatic framing nailer will significantly speed up the assembly process compared to manual hammering. You also need a high quality 4 foot level and a laser level to ensure the foundation remains perfectly plumb and square during the initial layout.
| Material Item | Standard Grade | Premium Grade |
|---|---|---|
| Framing Lumber | Spruce-Pine-Fir (SPF) | Douglas Fir |
| Siding | T1-11 Plywood | LP SmartSide Panels |
| Insulation | Fiberglass Batts | Closed Cell Spray Foam |
| Flooring | Laminate Plank | Engineered Hardwood |
| Roof Material | Asphalt Shingles | Standing Seam Metal |
Technical Layout
The structural integrity of this micro studio relies on a 10 by 20 foot floor diaphragm constructed with 2×6 pressure treated joists spaced 16 inches on center. This spacing ensures a rigid walking surface that eliminates the bounce common in substandard DIY builds. The load bearing rear wall stands at 8 feet while the front wall rises to 10 feet to create the necessary 2/12 roof pitch.
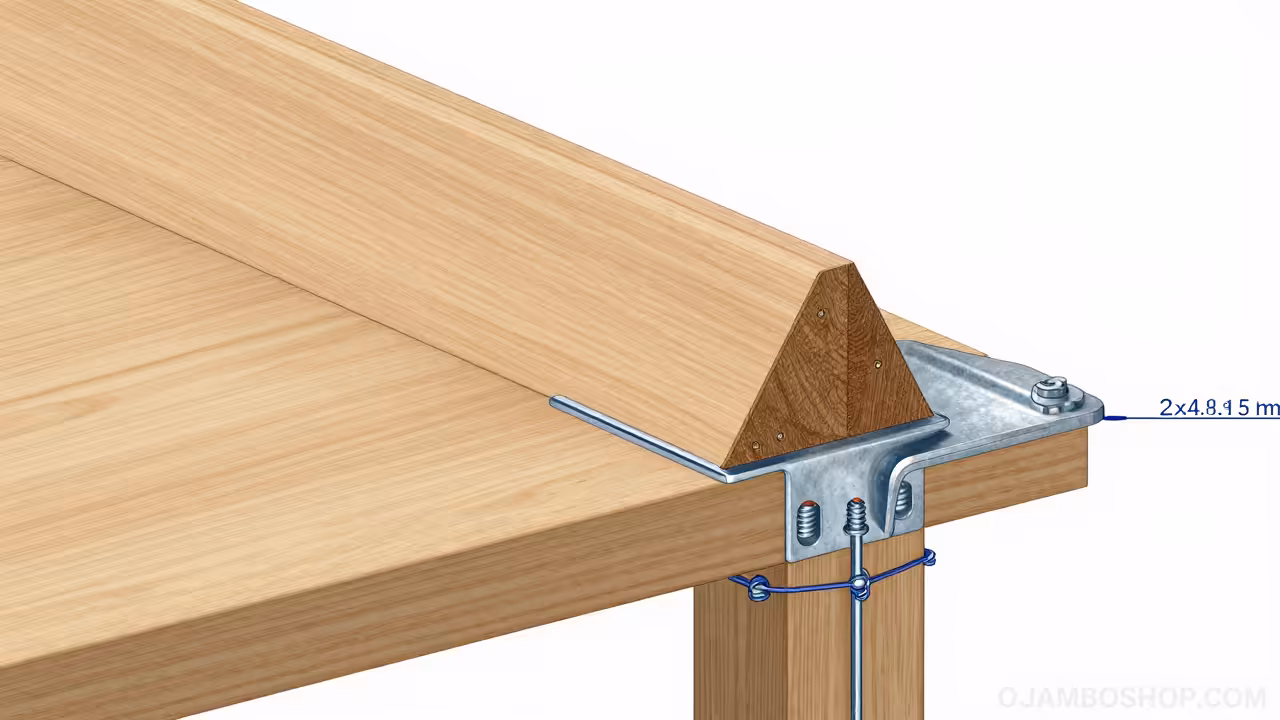
We utilize double top plates on all four walls to provide a continuous tie around the perimeter of the structure. This technique distributes the weight of the 2×8 roof rafters evenly across the vertical studs to prevent bowing over time. The header for the main entrance must be a double 2×10 member to support the concentrated load of the rafters above the door opening.
Pro-Tip: Always install a continuous 6 mil polyethylene vapor barrier on the warm side of the insulation before hanging your interior wall panels. This prevents moisture from your breath and coffee from condensing inside the wall cavity, which would otherwise lead to structural rot and mold. Proper moisture management is the single most important factor in the longevity of a small, airtight living space.
Step-by-Step Instructions
Phase 1: Foundation and Floor Framing
Start by clearing a level site and installing concrete pier blocks or a gravel pad with pressure treated skids. Build the outer rim joist box and verify that the diagonal measurements are exactly equal to ensure a perfectly square base. Install the internal floor joists and secure them with joist hangers before topping the frame with 3/4 inch tongue and groove subflooring.
Phase 2: Wall Construction
Build your walls flat on the subfloor to ensure they stay square and manageable during the assembly process. Use 2×4 studs spaced 16 inches on center and include double studs at all window and door openings. Lift the rear wall first followed by the side walls and finally the taller front wall, bracing them temporarily with long 2x4s until they are all tied together.
Phase 3: Roof Rafter Installation
Cut your 2×8 rafters with a birdsmouth notch at both the high and low wall contact points to ensure a flat seating surface. Overhang the rafters by 12 inches on all sides to provide necessary shade and protection for the siding from rain. Sheath the roof with 5/8 inch OSB and immediately cover it with synthetic underlayment to protect the interior from weather during the rest of the build.
Phase 4: Exterior Sheathing and Siding
Apply a high quality house wrap over the wall studs before installing your chosen siding material. Ensure that you leave a 1/8 inch gap at all butt joints to allow for the natural expansion and contraction of the wood. Install metal Z-flashing above all windows and doors to divert water away from the openings and prevent rot.
Phase 5: Windows and Doors
Install a 36 inch insulated steel entry door and at least two large windows to provide natural cross ventilation. Use high quality silicone caulk around the perimeter of all units before installing the exterior trim boards. Level and shim every unit carefully so that they operate smoothly without binding or catching on the frames.
Phase 6: Electrical and Rough-In
Plan your electrical layout to include dedicated circuits for your computer equipment and a small air conditioning unit. Run 14/2 or 12/2 Romex cable through the center of the studs and install deep plastic junction boxes for all outlets. Ensure you include an external disconnect box if you are tying the studio into your main house electrical panel.
Phase 7: Insulation and Interior Walls
Stuff the wall and ceiling cavities with R-15 and R-30 insulation respectively to maintain a stable internal temperature. Cover the studs with the vapor barrier mentioned in the pro tip and then install your interior finish material. Plywood or shiplap provides a more durable and nomad friendly finish than standard drywall in a small space.
Phase 8: The Integrated Murphy Office
Build the Murphy desk cabinet as a standalone unit that anchors directly into the wall studs for maximum safety. Use a piano hinge for the main desk flap and heavy duty gas struts to assist with the weight of the desktop. Design the interior shelving to accommodate dual monitors and cable management so the workspace remains organized when folded away.
Phase 9: Flooring and Trim
Install your finished flooring starting from the back wall and working toward the door to ensure a clean visual line. Install baseboards and window casings to hide the gaps between the flooring and the walls. This step is critical for achieving a professional architectural look that elevates the micro studio above a simple storage shed.
Phase 10: Final Finishes and Paint
Apply two coats of high quality exterior paint to the siding and a durable semi gloss to all trim pieces. Seal the interior wood surfaces with a low VOC polyurethane to protect against spills and scuffs. Once the paint is dry, install your light fixtures and furniture to complete the transformation of the space.
Common Mistakes
The most frequent error is failing to level the foundation perfectly which causes every subsequent step to be slightly out of alignment. If your base is off by even half an inch, your roof rafters will not sit correctly and your door will eventually sag or stick. Take the extra hour at the beginning of the project to ensure the floor is dead level.
Another common mistake is neglecting the importance of a proper roof overhang for small structures. Many builders cut the rafters flush with the walls to save on materials, but this allows water to run directly down the siding and into the foundation. A 12 inch overhang is the minimum requirement for protecting your investment from the elements.
Finally, many DIYers underestimate the weight of a Murphy desk and fail to anchor it into the structural studs. Relying on drywall anchors or simple screws into the sheathing will result in the desk pulling away from the wall. Always use 3 inch lag bolts that penetrate at least two inches into the center of the vertical wall studs.
Maintenance and Safety
Inspect the exterior caulking every spring to ensure that no cracks have formed which could allow water to penetrate the envelope. Repaint the structure every five to seven years depending on your local climate and sun exposure. Keeping the roof clear of debris like leaves and branches will prevent moisture from sitting against the shingles and causing premature failure.
Safety should be your primary concern during the heavy lifting and high altitude phases of this project. Always wear a hard hat when coworkers are moving lumber above you and use a sturdy, rated ladder for all roof work. Never operate a circular saw with the guard pinned back and always wear eye protection when using pneumatic nail guns or power saws.
Proper ventilation is also a safety requirement for a small 200 square foot micro studio. Ensure that your windows are functional and consider installing a small HRV unit to exchange stale air for fresh air without losing heat. This maintains high air quality which is essential for cognitive performance during long work days in the digital nomad micro studio.