
Building a custom 4×4 elevated deer blind or observation tower is one of the most rewarding projects for any landowner. This structure provides a bird’s-eye view of your property while offering a weatherproof sanctuary for hunting, wildlife photography, or general land management.
A well-constructed tower increases the utility of your acreage and provides a safe, comfortable environment for long hours in the field. By following professional framing standards, you ensure the structure remains stable against high winds and heavy snow loads for decades.
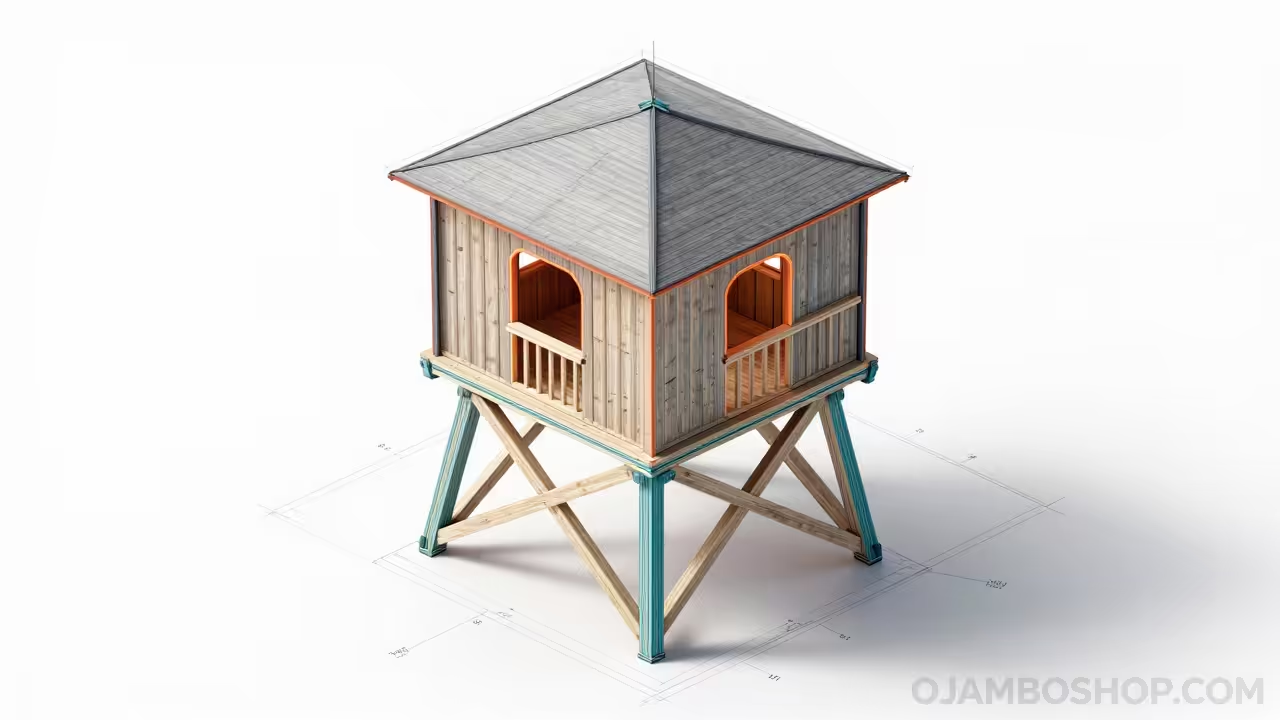
This specific design focuses on a compact 4×4 footprint, which is the industry standard for single-occupant efficiency. It allows for a manageable build process while providing enough interior space for gear, seating, and clear sightlines through all four cardinal directions.
Quick Specs and Project Overview
The project requires a moderate level of carpentry skill and a commitment to safety, especially during the elevation phase. You should expect to spend approximately two full weekends on construction, depending on your familiarity with structural framing and deck building.
- Dimensions: 4 feet wide by 4 feet deep with an 8-foot platform height and 7-foot interior ceiling.
- Estimated Cost: $650 to $900 depending on lumber grades and window selections.
- Difficulty Level: Intermediate to Advanced (due to heights and structural load-bearing requirements).
- Estimated Build Time: 16 to 24 man-hours.
Comprehensive Materials and Tools List
For the structural components, always opt for Pressure Treated (PT) lumber for any wood that remains in contact with the ground or is exposed to the elements. The siding and interior can be standard kiln-dried spruce or cedar if you plan on painting or staining the exterior immediately.
Lumber Requirements:
4 qty – 4x4x12 Pressure Treated Posts (for the legs)
6 qty – 2x6x8 Pressure Treated Joists
10 qty – 2x4x8 Wall Studs
4 qty – 4×8 Sheets of 5/8 inch CDX Plywood (Floor and Roof)
6 qty – 4×8 Sheets of T1-11 Exterior Siding
2 qty – 2x4x10 Pressure Treated (for cross-bracing)
Hardware and Fasteners:
1 box – 3-inch Deck Screws
1 box – 2-inch Exterior Siding Nails
8 qty – 1/2-inch x 6-inch Galvanized Carriage Bolts with Washers
4 qty – Heavy Duty Hurricane Ties
1 roll – Aluminum Drip Edge
1 bundle – Asphalt Shingles or Corrugated Metal Roofing
Technical Layout and Framing Logic
The structural integrity of an elevated 4×4 tower relies entirely on the transfer of weight from the roof and walls through the floor joists and into the 4×4 posts. Because the footprint is relatively small compared to the height, the center of gravity must be perfectly maintained. We utilize a box-frame floor system where 2×6 joists are hung between the main support posts using carriage bolts rather than simple screws. This ensures that the shear force of the cabin weight is supported by the steel bolts and the wood-on-wood contact of the rim joists.
The walls are constructed using standard 16-inch on-center framing, though for a 4-foot span, you can increase this to 24 inches to save weight if using 3/4-inch siding. The roof features a 2/12 pitch, which is sufficient for shedding water while keeping the overall profile low enough to resist wind lift. Cross-bracing between the 4×4 legs is the most critical element of the technical layout. Without diagonal bracing in an ‘X’ or ‘K’ pattern on at least three sides, the tower will develop a dangerous sway that can lead to structural failure during a storm.

Step-by-Step Instructions
Step 1: Foundation and Post Setting
The first phase involves establishing a level base for your four 4×4 main posts. You must dig holes at least 24 inches deep, or below your local frost line, to prevent the tower from heaving. Set the posts in the holes and use a post level to ensure they are perfectly vertical before pouring concrete. It is helpful to brace the posts with temporary 2×4 scrap wood while the concrete cures for at least 24 hours. Ensuring the posts are exactly 48 inches apart from the outside edges is vital for the floor joists to fit correctly later.
Step 2: Framing the Elevated Platform
Once the posts are set, mark your desired floor height on each post using a chalk line and a level. For an 8-foot platform, you will bolt your 2×6 rim joists to the posts using two 1/2-inch carriage bolts per corner. Install the interior floor joists 16 inches apart within the rim joist box to provide a rigid subfloor. Use metal joist hangers to increase the load-bearing capacity and prevent the floor from sagging over time. Lay your 5/8-inch plywood over the joists and secure it with 2-inch deck screws every 8 inches along the perimeter.
Step 3: Wall Construction and Window Openings
Build your four walls on the ground or directly on the platform if space permits. Each wall should be 48 inches wide with a bottom plate and a double top plate for extra stability. Frame in your window openings at roughly 36 inches from the floor, which is the ideal height for a seated observer or hunter. Ensure the window headers are doubled up to support the weight of the roof rafters. Once the frames are assembled, tilt them into place and nail them through the floor into the joists below.
Step 4: Installing the Rafters and Roof Deck
The roof requires a slight pitch to shed rain and snow effectively toward the rear of the structure. Cut your 2×4 rafters with a bird’s mouth notch so they sit securely on the top plates of the front and back walls. Space the rafters 24 inches apart and allow for a 6-inch overhang on all sides to protect the siding from water runoff. Nail your plywood roof sheathing onto the rafters, ensuring the edges are flush with the rafter ends. Install an aluminum drip edge around the entire perimeter before applying your roofing felt or synthetic underlayment.
Step 5: Siding and Exterior Sheathing
Apply your T1-11 siding or exterior plywood starting from the bottom of the floor joists to hide the subfloor seam. Use galvanized siding nails and leave a 1/8-inch gap between sheets to allow for natural wood expansion and contraction. Pro-Tip: Before installing the siding, apply a bead of exterior-grade caulk to the studs where the sheets meet to create a secondary moisture barrier. This prevents wind-driven rain from penetrating the interior of the cabin and causing rot in the wall cavities. Trim the corners with 1×4 cedar boards to provide a professional, finished look and to seal the vertical gaps.
Step 6: Roofing and Weatherproofing
Install your asphalt shingles or corrugated metal panels according to the manufacturer’s specific instructions. If using shingles, start at the low end of the roof and overlap each row by 5 inches to ensure water flows downward. Metal roofing is often preferred for these structures because it is lightweight and provides a distinct sound during rain, which many find relaxing. Use roofing screws with rubber gaskets for metal panels to prevent leaks at the fastener points. Finish the roof by installing a ridge cap or ensuring the top edge is tucked under the highest point of the drip edge.
Step 7: Ladder and Access Hatch
You can build a simple ladder using 2×4 side rails and 2×4 rungs spaced 12 inches apart for easy climbing. Attach the ladder to the platform using heavy-duty L-brackets or by bolting the rails directly to the floor joists. For an observation tower, an interior floor hatch is often safer than a side-door entry, as it keeps the center of gravity over the platform. If you choose a side door, ensure it opens inward so you do not have to lean out over the edge to pull it open. Install a sturdy handrail at the top of the ladder to assist with the transition from the ladder to the platform.
Step 8: Finishing Touches and Interior
Seal all gaps around the windows and door with a high-quality silicone caulk to keep out insects and drafts. Paint or stain the exterior with a UV-resistant product to protect the wood from sun damage and moisture. You may choose to carpet the interior floor to dampen sound, which is particularly useful for wildlife observation or hunting. Install simple flip-up or sliding window panes using Plexiglass or lightweight polycarbonate for clear visibility and protection from the wind. Finally, add a comfortable swivel chair and a small shelf for binoculars or gear to complete your tower.
Common Mistakes to Avoid
One frequent error is failing to use galvanized carriage bolts for the primary platform-to-post connections. Screws lack the shear strength required to hold a heavy cabin in the air, especially when multiple people are inside. Over time, the movement of the tower can cause screws to snap, leading to a catastrophic structural failure of the floor.
Another mistake is neglecting the cross-bracing on the legs of the tower. Many builders assume that burying the posts in concrete is enough to stop the tower from swaying. However, the leverage of an 8-foot or 10-foot tower is immense, and diagonal bracing is mandatory to triangulate the force of the wind.
Finally, many DIYers forget to treat the cut ends of pressure-treated lumber. When you saw a treated 4×4 or 2×6, you expose the untreated inner core of the wood to the elements. Always brush on a copper naphthenate solution or a similar wood preservative to every fresh cut to prevent internal rot.
Maintenance and Safety Procedures
Check your tower twice a year, specifically in the spring and late fall, to ensure all hardware remains tight. Wood naturally shrinks and expands with the seasons, which can loosen the carriage bolts and lag screws over time. Use a wrench to snug down every bolt and inspect the wood for any signs of carpenter ant or termite activity.
Always wear a safety harness when working on the roof or upper walls of the tower during the construction phase. It only takes a momentary loss of balance to cause a serious injury when working 10 to 15 feet off the ground. Keep a fire extinguisher inside the blind if you plan on using a portable propane heater during the winter months.
Proper weatherproofing will extend the life of your 4×4 tower by decades. Re-apply a water-shedding stain every 3 to 5 years, paying close attention to the end grain of the siding and the ladder rungs. By maintaining the exterior shell, you protect the structural framing from the moisture that leads to fungal decay.