
Building an Upside-Down Tiny House with Rooftop Living is the ultimate solution for maximizing small footprints. This 350 square foot architectural marvel flips the traditional floor plan to prioritize views and outdoor integration. By placing the primary living quarters elevated above the ground and incorporating a structural roof deck, you transform a standard dwelling into a multi-level experience. This design increases property value and provides a unique aesthetic that stands out in the growing small living market.
The core utility of this project lies in its vertical efficiency and the seamless transition between indoor and outdoor spaces. Homeowners seeking a secondary suite or a creative studio will find the rooftop access particularly beneficial for relaxation or urban gardening. The structural integrity required for a functional roof deck necessitates a Master Carpenter approach to framing and weight distribution. This guide provides the technical foundation needed to execute this ambitious build with professional precision and safety.
Quick Specs
Dimensions: 14 feet by 25 feet (Main Footing) with 10 foot ceiling height.
Estimated Cost: $45,000 to $65,000 depending on interior finishes and local lumber pricing.
Difficulty Level: Advanced (Requires experience with structural load calculations and waterproof membrane installation).
Estimated Build Time: 12 to 16 weeks for a dedicated two-person DIY team.
Materials and Tools
The foundation of this build relies on high-quality dimensional lumber and specialized hardware to support the live load of the rooftop deck. You will need 2×10 pressure-treated joists for the floor and roof systems to ensure long-term durability against the elements. The wall framing utilizes standard 2×6 studs spaced at 16 inches on center to allow for superior insulation values and structural rigidity. Exterior sheathing should consist of 5/8 inch CDX plywood, which provides a better substrate for moisture barriers than standard OSB in high-exposure areas.
| Material Category | Item Description | Quantity/Unit |
|---|---|---|
| Framing Lumber | 2x10x14 Pressure Treated Joists | 42 Units |
| Framing Lumber | 2x6x10 Kiln Dried Studs | 110 Units |
| Sheathing | 5/8 inch CDX Plywood Sheets | 55 Sheets |
| Fasteners | 3-inch Hot Dipped Galvanized Nails | 25 lbs |
| Decking | Composite or Ipe Hardwood Boards | 400 sq ft |
| Roofing | 60-mil EPDM Waterproof Membrane | 450 sq ft |
| Hardware | Hurricane Ties and Joist Hangers | 80 Units |
Your tool kit must be comprehensive to handle the precision required for a leveled rooftop living space. A sliding compound miter saw is essential for clean cross-cuts, while a heavy-duty framing nailer will significantly speed up the structural phase. You will also need a rotary laser level to ensure the foundation and the roof deck are perfectly true across the entire 25-foot span. Do not overlook the necessity of a high-quality impact driver for securing structural SDS screws into the ledger boards and corner posts.
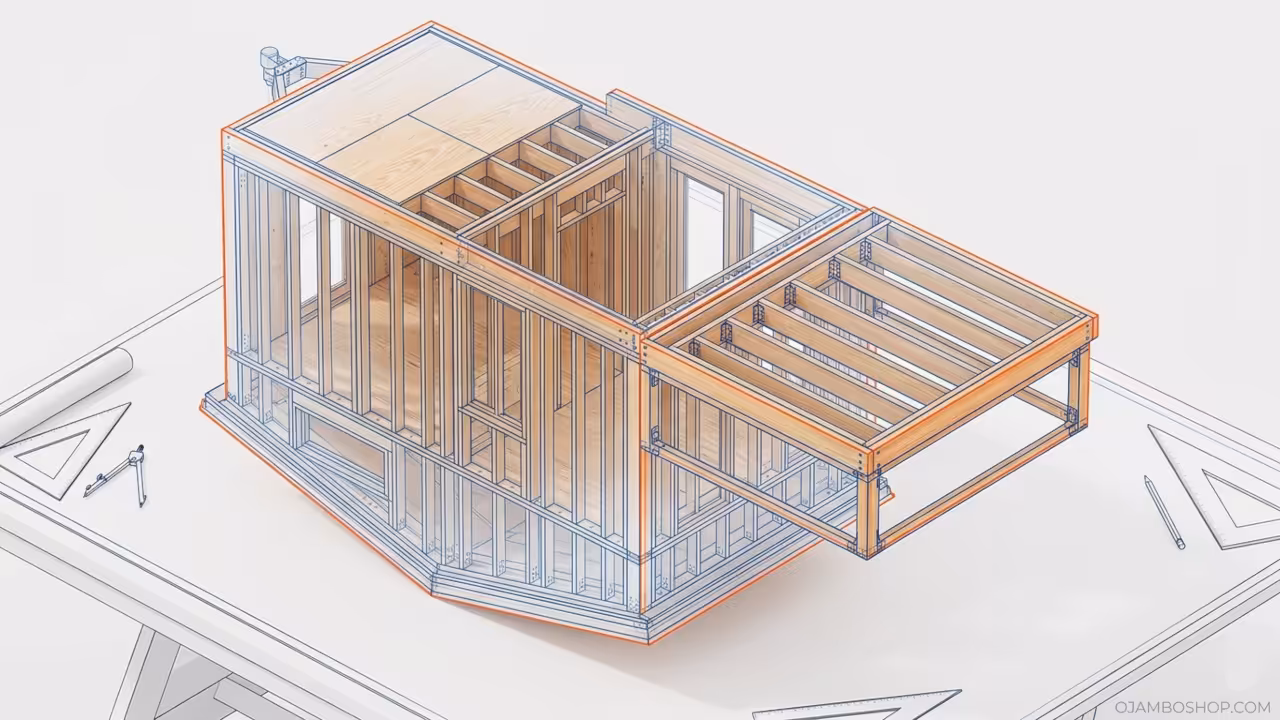
Technical Layout
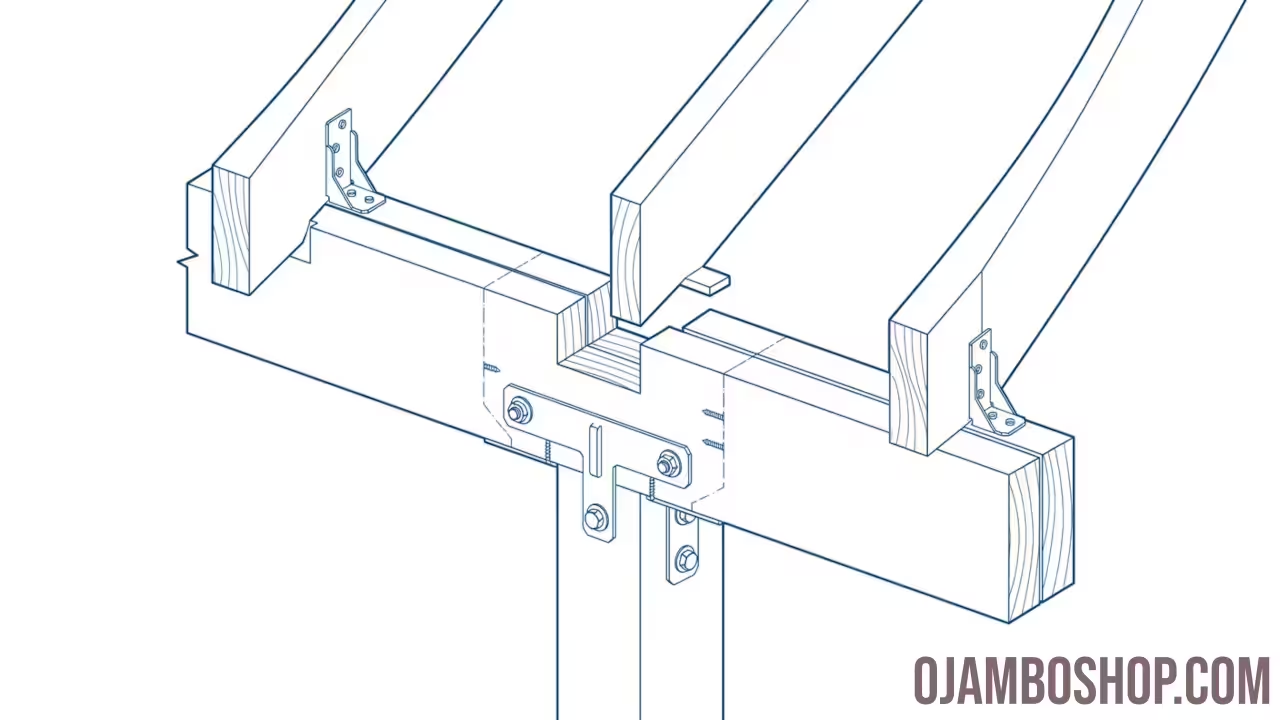
The technical success of the “Upside-Down” Tiny House depends entirely on the transfer of loads from the rooftop deck down to the ground-level foundation. Because the roof serves as a living floor, it must be engineered to handle a live load of at least 60 pounds per square foot, which is significantly higher than a standard snow load. We utilize a post-and-beam configuration where 6×6 structural posts are notched to receive double 2×10 headers. This creates a continuous load path that prevents sagging over time and allows for the large window openings typical of this design style.
The floor joists for the rooftop deck are installed with a slight 1/8 inch per foot taper toward the drainage side to prevent water from pooling under the decking. This subtle pitch is achieved by ripping the top of the joists or using tapered furring strips before the EPDM membrane is applied. The interior ceiling remains flat by using a dropped-ceiling framing technique or by leveling the interior drywall furring. This dual-layer approach ensures that while the roof sheds water effectively, the interior living space remains aesthetically pleasing and easy to finish.
Step-by-Step Instructions
Phase 1: Foundation and Site Prep
Begin by clearing the site and excavating for a thickened edge slab or a series of engineered concrete piers. Given the 350 square foot footprint, a pier foundation is often more cost-effective and allows for easier plumbing access. Set your 6×6 post bases in wet concrete, ensuring they are perfectly aligned using a string line and transit level. Once the concrete cures, install your pressure-treated 6×6 posts and brace them temporarily to maintain verticality during the primary floor framing.
Phase 2: Floor Framing
Install the main floor joists using 2×10 lumber spaced at 12 inches on center to create a rock-solid base for the living area. Secure the rim joists with structural lags and install solid blocking every 8 feet to prevent joist rotation. This subfloor must be insulated from below before the 3/4 inch tongue-and-groove plywood is glued and screwed down. Pro-Tip: Use a subfloor adhesive in addition to screws to eliminate future squeaks and increase the shear strength of the entire platform.
Phase 3: Wall Construction
Frame the exterior walls on the flat platform using 2×6 studs, which provides extra depth for R-21 mineral wool insulation. Ensure all window and door headers are sized correctly for the superimposed load of the rooftop deck above. Raise the walls and secure them to the floor system using 1/2 inch anchor bolts or heavy-duty structural screws. Check for square by measuring diagonals and install temporary diagonal bracing on the interior to hold the structure true until the sheathing is applied.
Phase 4: Rooftop Deck Framing
This phase is the most critical for the “Upside-Down” concept as you are building a floor that also acts as a roof. Install 2×10 roof joists at 12 inches on center, ensuring they are notched correctly over the load-bearing walls. Incorporate the 1/8 inch per foot slope mentioned in the technical layout to facilitate proper drainage. Once the joists are set, install 5/8 inch CDX plywood sheathing, ensuring all edges are supported by blocking for maximum rigidity under foot traffic.
Phase 5: Waterproofing the Roof
Apply a 60-mil EPDM membrane over the roof sheathing, following the manufacturer’s instructions for adhesive application and seam sealing. This membrane must wrap up the inside of the parapet walls by at least 8 inches to prevent leaks during heavy rain or snow melt. Install drip edges and specialized drains that integrate directly with the EPDM system to move water away from the structure. Test the system by performing a 24-hour flood test before moving on to the final decking surface.
Phase 6: Exterior Siding and Windows
Install high-performance windows and doors, paying close attention to the flashing details around the rooftop access point. Apply a high-quality house wrap over the wall sheathing, overlapping all seams by at least 6 inches and taping them securely. Install your chosen siding, such as cedar lap or modern metal panels, ensuring a 3/4 inch rainscreen gap is maintained for moisture management. This gap allows the building to breathe and prevents rot in the structural sheathing over the lifespan of the tiny house.
Phase 7: Rooftop Finishing
Install a pedestal system or sleeper joists over the EPDM membrane to support your final decking material. This allows water to flow freely to the drains while providing a perfectly level surface for your outdoor furniture and guests. Install a code-compliant railing system that is at least 36 inches high, ensuring the posts are side-mounted to the building’s structure rather than piercing the roof membrane. Using composite decking here is recommended for its low maintenance and resistance to the high UV exposure found on rooftops.
Phase 8: Interior Utilities and Finishing
Rough-in your electrical, plumbing, and HVAC systems within the 2×6 wall cavities, taking advantage of the extra space for modern efficiencies. Install a vapor barrier on the warm side of the insulation before hanging and finishing your interior drywall or wood paneling. Install the interior staircase or ladder system that provides access to the rooftop deck, ensuring it meets local egress codes. Finish the floors, install cabinetry, and add the final trim pieces to complete the 350 square foot living space.
Common Mistakes
One frequent error is failing to account for the “live load” of people on the roof, leading to undersized joists that bounce or sag. Always over-engineer the roof framing to handle at least 60 pounds per square foot to ensure the structure feels solid and safe. Another common mistake is poor flashing at the junction where the roof deck meets the parapet walls or the access hatch. Water is relentless, and any gap in the membrane or flashing will eventually lead to structural rot that is expensive to repair.
Builders often forget to plan for the weight of the rooftop furniture and planters when calculating the foundation requirements. A fully loaded rooftop garden can add thousands of pounds of static weight that must be transferred directly to the ground via the 6×6 posts. Finally, neglecting the rainscreen gap behind the siding can lead to trapped moisture, especially in the “Upside-Down” design where roof drainage is managed differently. Ensure there is a clear path for air to move behind the exterior finish to keep the structural members dry.
Maintenance and Safety
Maintaining a tiny house with a rooftop deck requires a biannual inspection of the drainage systems and the waterproof membrane. Clear any debris from the roof drains to prevent standing water, and check the EPDM seams for any signs of lifting or wear. If you used natural wood for the decking or siding, apply a high-quality UV-resistant sealer every two years to prevent graying and checking. Always wear a safety harness when working on the rooftop during the construction phase to prevent falls from height.
Safety is paramount when building any structure, but particularly one with an elevated living component. Use specialized fasteners like RSS structural screws for all primary load connections rather than relying on standard nails which can pull out over time. Ensure that your electrical system is properly grounded and that all exterior outlets on the rooftop are GFCI protected and housed in weatherproof covers. Following these professional standards will ensure your “Upside-Down” Tiny House remains a safe and valuable asset for decades to come.