
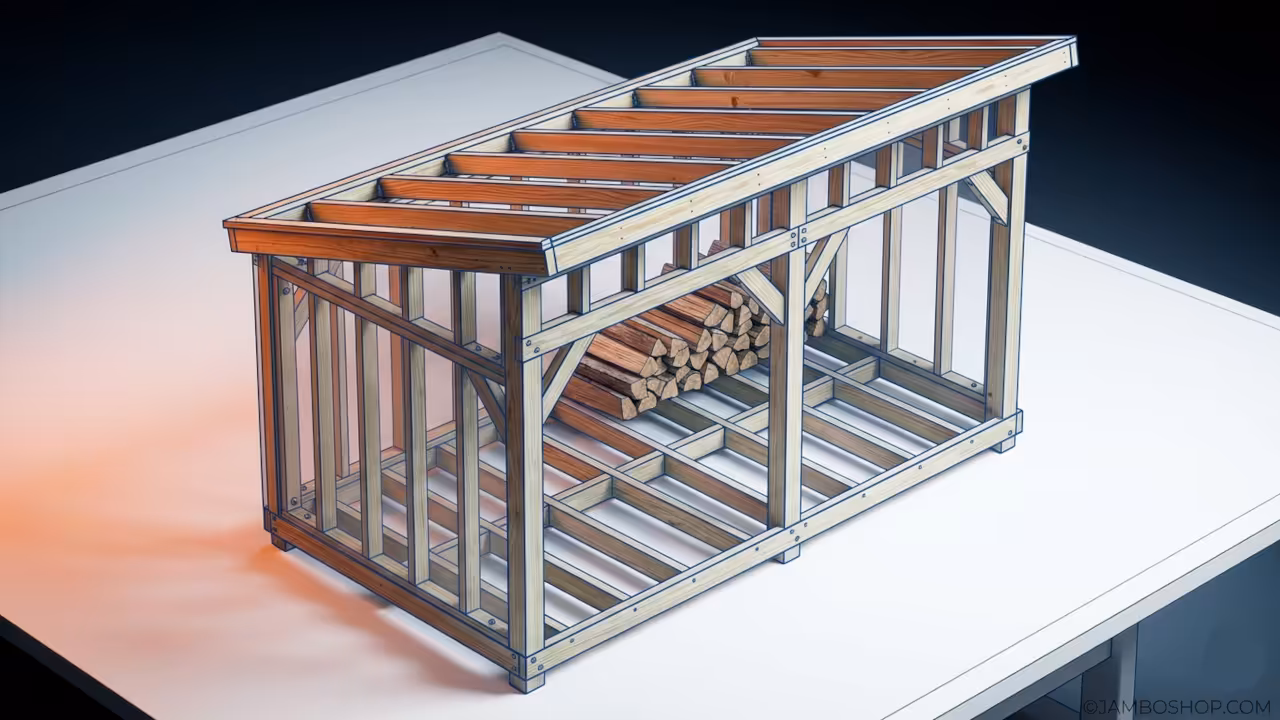
Introduction to the Slanted Roof 4×8 Firewood Woodshed
A well-constructed firewood shed is more than just a storage solution for your backyard. It is a functional piece of infrastructure that ensures your fuel stays dry and efficient throughout the coldest winter months.
By elevating your wood and providing a sloped roof for moisture runoff, you prevent rot and wood-destroying insect infestations. This 4×8 design is the industry standard for homeowners who want to store exactly one full cord of seasoned firewood.
Investing a weekend into this build will significantly increase the value and organization of your property. Proper seasoning of wood requires airflow and protection from direct precipitation, both of which this specific design provides in abundance.
Quick Specs
Dimensions: 4 Feet Deep x 8 Feet Wide x 7 Feet High (Front)
Estimated Cost: 250 to 350 Dollars depending on local lumber prices
Difficulty Level: Intermediate DIY
Estimated Build Time: 8 to 12 Hours
Materials and Tools
For this project, we recommend using pressure-treated lumber for any component in contact with the ground. This ensures that your foundation resists rot and remains structurally sound for decades regardless of soil moisture levels.
You will need ten 2x4x8 pressure-treated boards for the framing and floor joists. For the vertical posts, four 4x4x8 pressure-treated posts are required to support the weight of the roof and the heavy wood stack.
The decking and siding require sixteen 1x6x8 fence pickets or pressure-treated slats to allow for proper airflow. For the roof, two sheets of 4×8 OSB or plywood will serve as the substrate, covered by your choice of metal roofing or asphalt shingles.
Hardware Comparison Table
| Hardware Item | Purpose | Benefit |
|---|---|---|
| 3-inch Deck Screws | Main Framing | Superior pull-out resistance and corrosion coating |
| 1.5-inch Galvanized Nails | Siding/Slats | Prevents rust streaks on exterior wood surfaces |
| Heavy Duty Joist Hangers | Floor Integrity | Supports the immense weight of a full cord of wood |
| 5-inch Lag Bolts | Post to Base | Ensures the structure does not rack or lean over time |
The essential tool list includes a miter saw for clean cross-cuts and a circular saw for ripping plywood sheets. You will also need a power drill with various bits, a level at least four feet long, a framing square, and a chalk line.
Technical Layout and Structural Design
The structural integrity of a 4×8 woodshed relies heavily on the distribution of weight across the floor joists. A full cord of oak or hickory can weigh upwards of 4,000 pounds when green, meaning the floor must be over-engineered to prevent sagging. We utilize a 16-inch on-center joist spacing for the base frame, which is standard for residential decking. This layout transfers the vertical load directly into the 4×4 corner posts and the skids below.
By using a slanted roof design, also known as a shed roof, we simplify the framing process while maximizing water shedding capabilities. The pitch is set at a 2/12 slope, which is sufficient for rain runoff but shallow enough to keep the front entry accessible. The rear posts are cut shorter than the front posts to create this incline naturally. This creates a geometric triangle in the side profile that provides natural bracing against lateral wind loads. Because the sides are left partially open with slats, the structure remains breathable, which is the most critical factor in drying firewood quickly.
Step-by-Step Instructions
Phase 1: Site Preparation and Foundation
Begin by clearing a level 5×9 area in your yard to allow for a small perimeter around the shed. Leveling the ground is the most important step because a slanted base will cause the entire frame to rack and eventually fail. Use four concrete deck blocks or solid cinder blocks at each corner to keep the wood from touching the soil. Check for level in both directions across the tops of the blocks before proceeding to the next step.
Phase 2: Constructing the Floor Frame
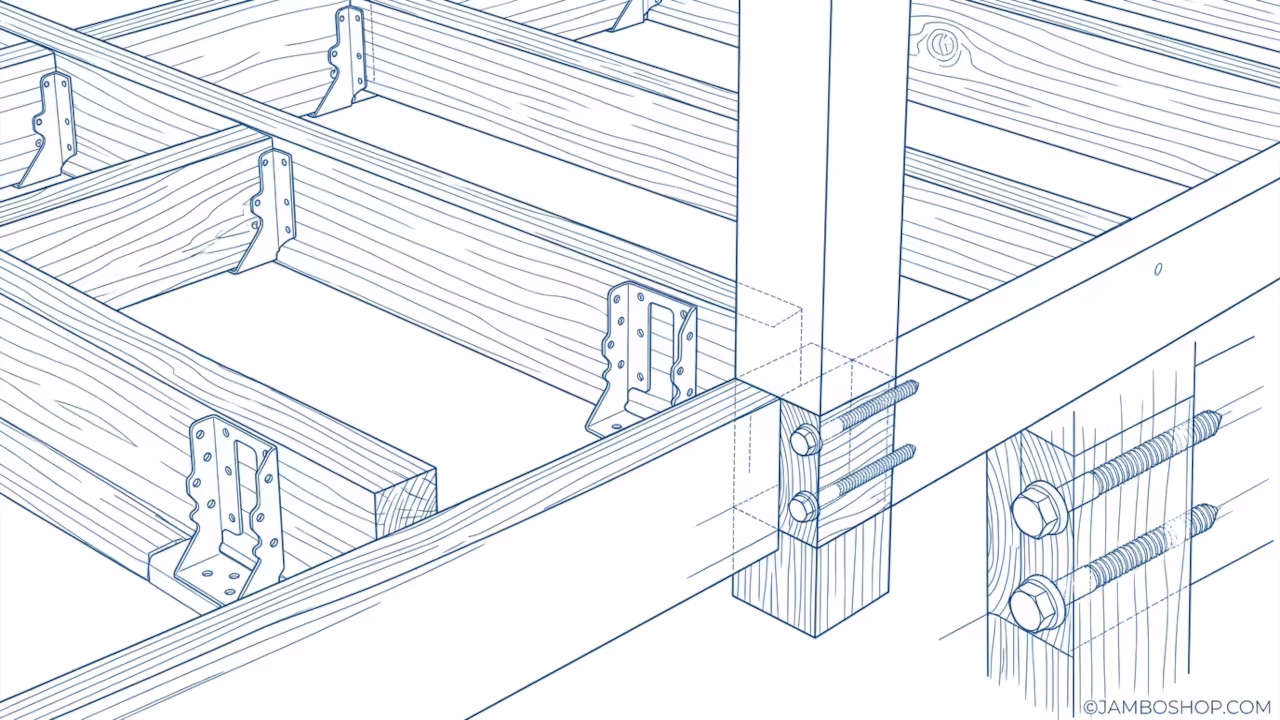
Assemble the outer 4×8 box using your 2×4 pressure-treated lumber and 3-inch deck screws. Install the interior joists every 16 inches, measuring from the center of each board to ensure uniformity. Attach joist hangers at every connection point to provide maximum shear strength for the heavy wood load. Once the frame is assembled, square it by measuring the diagonals; they must be exactly equal for the shed to be square.
Phase 3: Setting the Vertical Posts
Cut your four 4×4 posts to the required heights, making the front two posts 84 inches and the rear two 72 inches. Secure the posts to the inside corners of the floor frame using 5/16-inch lag bolts for a professional-grade connection. Use your level to ensure each post is perfectly plumb in both directions before tightening the fasteners. Temporary 2×4 bracing can be used to hold the posts in place while you work on the upper rafters.
Phase 4: Installing the Top Plate and Rafters
Connect the front posts with an 8-foot 2×4 top plate and repeat the process for the rear posts. Cut five rafters at 52 inches each, which allows for a small overhang on both the front and the back. Notch the rafters where they meet the top plates using a birdsmouth cut to ensure they sit flush and secure. Space these rafters 24 inches apart and secure them with hurricane ties to prevent uplift during high wind events.
Phase 5: Floor Decking and Airflow Gaps
Lay your 1×6 slats across the floor joists, leaving a half-inch gap between each board for ventilation. This gap is vital as it allows air to circulate up through the bottom of the wood pile to prevent mold growth. Fasten each slat with two 1.5-inch galvanized nails at every joist intersection to prevent the boards from warping or cupping. Make sure the ends of the slats are flush with the outer edge of the floor frame for a clean look.
Phase 6: Siding and Structural Bracing
Apply the side slats starting from the bottom and working your way up toward the roofline. Leave a 2-inch gap between the horizontal slats on the sides and back of the shed to maintain the drying effect. On the rear wall, install a diagonal 2×4 brace from the bottom corner to the opposite top corner. This prevents the shed from leaning over time due to the weight of the wood pushing against the walls.
Phase 7: Roof Sheathing and Drip Edge
Place your plywood or OSB sheets over the rafters, ensuring they are centered and have equal overhangs. Fasten the sheathing every 8 inches along the rafters using 2-inch wood screws for a solid roof deck. Install a metal drip edge around the entire perimeter of the roof to guide water away from the wood fascia. This small detail prevents the edges of your plywood from delaminating and rotting over the next several years.
Phase 8: Roofing and Finishing Touches
Apply a layer of roofing felt or synthetic underlayment over the sheathing to provide a secondary moisture barrier. Install your metal roofing panels or asphalt shingles according to the manufacturer’s specific instructions for the pitch you selected. If you choose shingles, start at the bottom edge and overlap each row to ensure water flows downward correctly. Finally, trim any protruding edges and sand down any rough spots on the front posts to prevent splinters.
Common Mistakes to Avoid
The most frequent error is failing to use pressure-treated lumber for the base, which leads to total structural collapse within five years. Many builders also forget to leave gaps between the floor slats, which traps moisture and ruins the bottom layer of firewood. Another common mistake is neglecting to square the floor frame at the beginning, which makes the roofing and siding impossible to align later.
Maintenance and Safety Tips
Always wear safety glasses and ear protection when operating power saws or driving large fasteners into pressure-treated wood. Pressure-treated lumber contains chemicals that should not be inhaled, so wear a dust mask when cutting these specific boards. Check the tightness of your lag bolts every two years, as wood naturally shrinks and expands with the changing seasons.
Apply a high-quality UV-rated wood sealer to the exterior every three years to maintain the aesthetic and structural integrity of the shed. Ensure that the area around the shed is kept clear of tall weeds or debris that could block the essential airflow. Following these maintenance steps will ensure your 4×8 firewood shed remains a staple of your backyard for over two decades.
Pro-Tip: When selecting fasteners, always use 304 or 316 stainless steel or hot-dipped galvanized screws for pressure-treated wood. The chemicals used in modern pressure treatments (ACQ) are highly corrosive to standard zinc-plated screws and will eat through them in just a few seasons. Using the correct coating ensures your woodshed stays standing through heavy snow loads and torrential rain without the joints weakening or failing prematurely.