
The Gold Standard of Backyard Competition
The cornhole board is more than just a wooden platform for tossing bean bags. In the world of competitive outdoor recreation, it is a precision instrument that requires specific geometry and structural rigidity. A well-built set according to American Cornhole Association (ACA) standards transforms a simple gathering into a professional-tier arena.
For the homeowner, crafting these boards provides an immediate boost to property utility and social value. High-quality woodworking projects like these demonstrate a level of craftsmanship that store-bought plastic versions simply cannot replicate. A set built with premium materials will last for decades, becoming a centerpiece for family traditions and neighborhood tournaments.
Investing your time in this build ensures that every toss lands on a surface designed for optimal slide and minimal bounce. By following professional carpentry protocols, you eliminate the common vibrations found in inferior builds. This guide provides the technical foundation needed to master the ultimate cornhole set, ensuring your project meets every regulatory benchmark.
Quick Specs and Project Overview
Before you make your first cut, it is essential to understand the scope of this professional woodworking project. These boards are designed to meet the exact 2×4 foot platform requirements used in national competitions. We have optimized the material list to balance portability with the heavy-duty density required for professional play.
- Dimensions: 48 inches by 24 inches with a 12 inch rear height
- Estimated Cost: 120 to 180 USD depending on lumber grade
- Difficulty Level: Intermediate (Requires precise miter cuts)
- Estimated Build Time: 6 to 8 hours excluding finish drying
| Material Type | Pros | Cons |
|---|---|---|
| ACX Baltic Birch | Extremely flat, high density, no voids | Higher cost, heavy weight |
| Radiata Pine | Affordable, easy to sand, lightweight | Prone to warping if not sealed |
| Pressure Treated | Weather resistant, rot proof | Heavy, difficult to get smooth finish |
| Cabinet Grade Maple | Professional aesthetics, very hard | Expensive, requires power sanding |
Comprehensive Materials and Tools List
To achieve a professional result, you must use high-quality fasteners and structural timber. We recommend using 2×4 kiln-dried framing lumber for the sub-structure to ensure the boards do not warp over time. The playing surface should be 3/4 inch thick plywood to provide the necessary weight and prevent the “trampoline effect” when a bag hits the board.
Materials:
- Two 24 inch x 48 inch pieces of 3/4 inch Baltic Birch plywood
- Four 2×4 studs at 8 feet long (Select the straightest pieces possible)
- Four 3/8 inch x 4 inch carriage bolts with washers and wing nuts
- One box of 2-1/2 inch Kreg pocket hole screws
- One bottle of Titebond II or III waterproof wood glue
- Professional grade wood filler and 120/220 grit sandpaper
- Exterior grade polyurethane or specialized cornhole slick-coat
Tools:
- Miter saw for precise cross-cuts and leg angles
- Table saw or circular saw with a straight edge guide
- Drill and impact driver set
- 6-inch hole saw attachment or a jigsaw for the target hole
- Pocket hole jig (highly recommended for hidden fasteners)
- Random orbital sander and a carpenter’s square
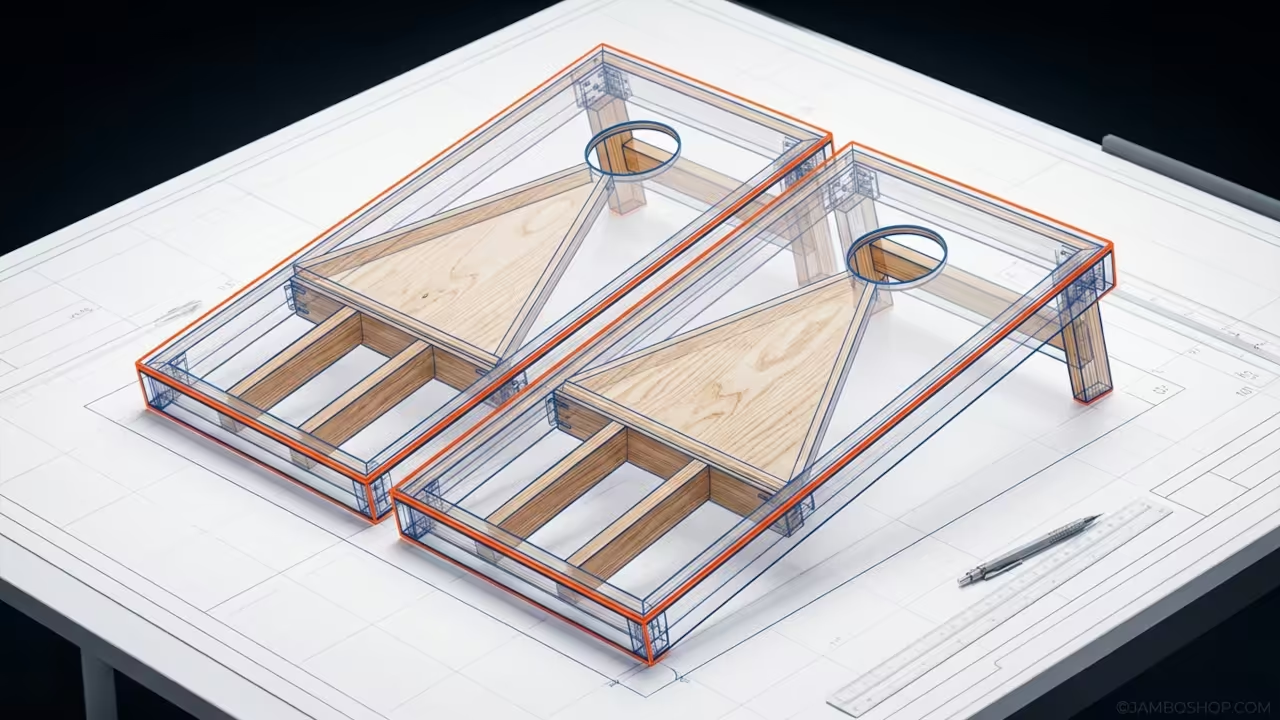
Technical Layout and Framing Geometry
The structural integrity of a regulation cornhole board relies entirely on the geometry of the box frame and the kick-stand leg assembly. In this design, the frame is constructed using a mitered or butt-jointed rectangle that measures exactly 24 inches by 48 inches on its outer perimeter. The internal joists are not necessary for a 3/4 inch top, but the frame must be perfectly square to ensure the board sits flat on the ground without wobbling. The most critical technical element is the rear height, which must place the top of the playing surface exactly 12 inches above the turf.
To achieve this, the legs are mounted on the interior of the frame using carriage bolts, allowing them to fold for easy transport and storage. The legs require a radius cut on the top to allow for smooth rotation, and a compound miter cut on the bottom to provide full surface contact with the ground at the specific 10-degree pitch of the board. This angle is calculated based on the 48-inch length and the 12-inch rise, creating a consistent slope that affects how the bags slide. By using 2×4 lumber for the legs and frame, we create a heavy ballast that absorbs the kinetic energy of the toss, preventing the board from shifting during a game.
Step-by-Step Instructions
Step 1: Material Preparation and Rough Cutting
Begin by breaking down your 2×4 lumber into the component parts for the frame and the legs. You will need four side rails cut to 48 inches and four end rails cut to 21 inches if you are using standard butt joints. Ensure that your saw blade is perfectly square to the fence to prevent gaps in your joinery which can lead to structural failure.
Measure your 3/4 inch plywood and cut two panels to exactly 24 inches by 48 inches. If you purchased pre-cut “handy panels,” verify their dimensions, as they are often slightly undersized from the factory. A precise fit between the plywood top and the 2×4 frame is the hallmark of a master build.
Step 2: Fabricating the Internal Frame
Layout your 21-inch end rails between the 48-inch side rails to create a rectangle. Use a pocket hole jig to drill two holes into each end of the 21-inch rails on the interior side. This hidden fastening system provides immense clamping pressure and keeps the exterior of the boards clean for painting or staining.
Apply a bead of wood glue to the mating surfaces before driving your 2-1/2 inch pocket screws. Use a framing square or a dedicated assembly square to verify that every corner is exactly 90 degrees. Any deviation here will result in a board that “walks” or rocks when placed on a flat driveway.
Step 3: Mounting the Playing Surface
Apply a continuous bead of wood glue along the top edge of your assembled 2×4 frame. Carefully lower the plywood top onto the frame, ensuring the edges are flush on all four sides. Professional builders often use a flush-trim router bit later, but an exact initial alignment saves significant sanding time.
Secure the top using 2-inch finish nails or countersunk wood screws spaced every 8 inches. If you prefer a seamless look, use a countersink bit to bury the screw heads slightly below the wood surface. Fill these holes immediately with a high-quality wood filler so they can dry while you work on the legs.
Step 4: Cutting the Regulation Hole
The ACA requires a 6-inch diameter hole centered 9 inches from the top of the board and 12 inches from each side. Mark this center point accurately using a tape measure and a straight edge. A 6-inch hole saw provides the cleanest results, but a jigsaw can be used if you follow the line with extreme care.
Once the hole is cut, use a round-over router bit or sandpaper to soften the edges. This prevents the bags from snagging or tearing when they drop through the target. Pro-Tip: Sand the interior of the hole to a higher grit than the rest of the board to ensure bags slide through effortlessly without catching on wood fibers.
Step 5: Leg Geometry and Radius Cuts
The legs are the most complex part of the build due to the radiused top and the angled bottom. Cut four pieces of 2×4 lumber to 12 inches in length for your leg blanks. Use a compass to draw a 1-3/4 inch radius circle on one end of each leg, which matches the center point for your bolt hole.
Cut the radius using a jigsaw or a band saw and sand it smooth until it is a perfect semi-circle. Drill a 3/8 inch hole through the center of this radius on all four legs. This rounded top allows the leg to rotate inside the frame without hitting the underside of the plywood deck.
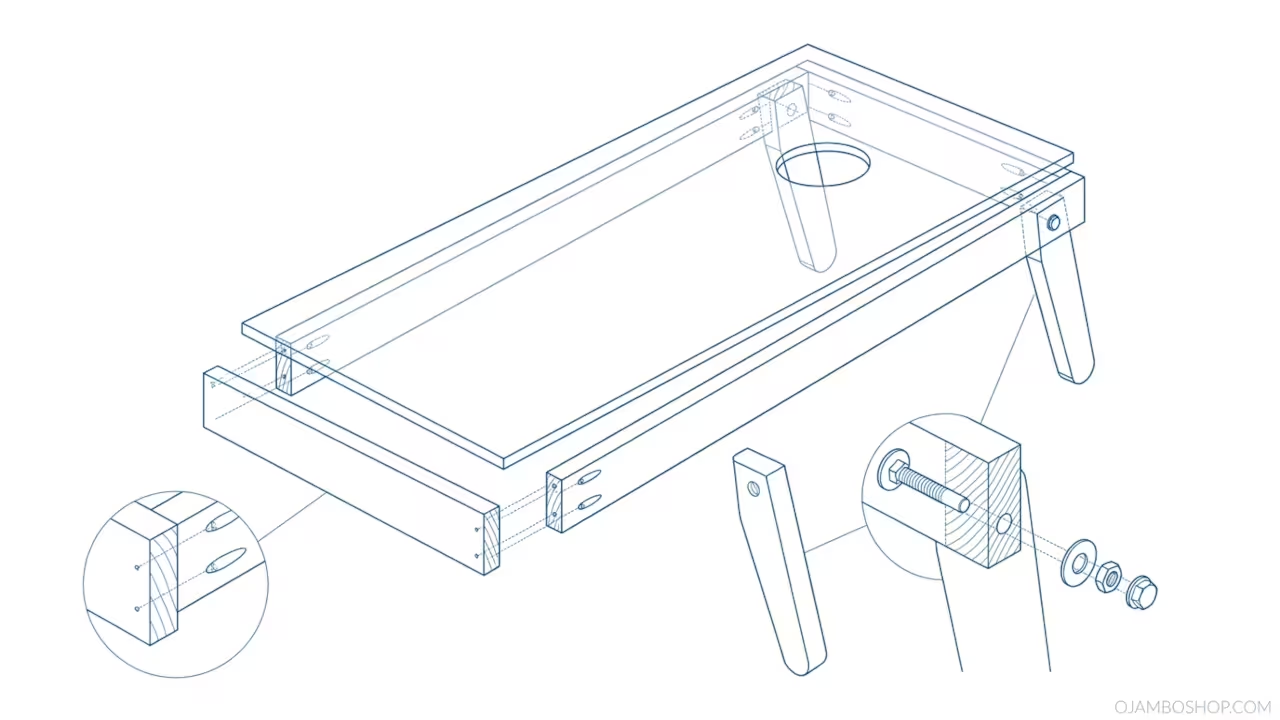
Step 6: Leg Installation and Height Adjustment
Place your boards upside down on a flat workbench and position the legs inside the corners of the frame. Insert the carriage bolts through the frame and the leg, securing them with a washer and a wing nut. Do not overtighten yet, as you need the legs to move freely for the next measurement.
Extend the legs and prop the rear of the board up on a box or sawhorse. Measure from the workbench surface to the top of the plywood at the rear of the board until it hits exactly 12 inches. Mark the point where the leg meets the ground and cut that angle so the leg sits flush against the floor.
Step 7: Surface Preparation and Sanding
The quality of a cornhole board is judged by its “slide,” which is determined by the smoothness of the finish. Start with 120-grit sandpaper on your orbital sander to level the wood filler and any minor transitions between the frame and the top. Gradually move to 150-grit and finally 220-grit for a glass-like feel.
Vacuum the boards thoroughly and wipe them down with a tack cloth to remove every trace of sawdust. Any debris left on the surface will create “pimples” in your final finish, which can deflect the path of a sliding bag. Pay special attention to the sides and the interior of the hole during this phase.
Step 8: Applying the Professional Finish
For a tournament-grade set, apply a high-quality exterior primer followed by a semi-gloss or high-gloss paint. If you prefer the natural wood look, use a water-based polyurethane which will not yellow over time. Apply at least three to five coats, sanding lightly with 320-grit paper between each layer to build a thick, protective shell.
Pro-Tip: Regarding structural integrity and longevity, always use stainless steel or galvanized fasteners if the boards will be stored in a garage or shed. Moisture can seep into standard steel screws, causing them to rust and expand, which eventually splits the wood fibers from the inside out. Using a marine-grade clear coat on the bottom of the frame will also prevent ground moisture from wicking up into the lumber.
Common Mistakes to Avoid
One frequent error is using 1/2 inch plywood for the top deck to save on weight. While this makes the boards easier to carry, it creates a significant “bounce” that ruins the competitive playability of the set. Stick to 3/4 inch material to ensure the bags “thud” and stay in place as intended by regulation standards.
Another mistake is failing to radius the tops of the legs. If you simply cut the legs at an angle and bolt them in, they will bind against the plywood when you try to fold them. The circular radius is essential for a professional, folding design that doesn’t require tools to set up at the park.
Finally, many builders forget to account for the thickness of the plywood when measuring the 12-inch rear height. The measurement must be taken from the ground to the very top of the playing surface, not just the top of the 2×4 frame. If your boards are too high or too low, they will not be legal for sanctioned tournament play.
Maintenance and Long-Term Care
To keep your Ultimate Cornhole Set in peak condition, you should inspect the hardware once a season. The wing nuts on the carriage bolts can loosen over time due to the vibrations of the bags hitting the deck. A quick tightening ensures the legs remain stable and do not collapse during a high-stakes game.
Always store your boards in a dry, climate-controlled environment when not in use. While we recommend exterior-grade finishes, prolonged exposure to UV rays and rain will eventually break down the seal and cause the plywood to delaminate. A simple set of canvas carrying bags can protect the finish from scratches during transport.
Safety is paramount during the build and the game. Ensure all corners are slightly rounded over with a sander to prevent splinters or bruises if someone bumps into the board. When playing, maintain a clear zone around the boards to prevent spectators from being hit by stray tosses, as a regulation resin-filled bag can cause injury at high speeds.