
Building a lakeside retreat requires a unique understanding of how land and water interact at the shoreline. A floating foundation lakeside cabin offers the perfect solution for sites with fluctuating water levels or sensitive riparian ecosystems. This project provides a stable, elevated living space that minimizes environmental impact while maximizing your connection to the water.
The architectural value of a floating foundation lies in its adaptability and resilience against soil erosion. By utilizing a heavy-duty pier and beam system, you create a structure that feels integrated into the landscape. This guide will walk you through the professional techniques required to ensure your cabin remains level and secure for decades of seasonal use.
Investing in a high-quality small living structure increases your property value significantly by adding functional square footage. Whether you intend to use this as a guest house, a rental unit, or a personal sanctuary, the structural integrity remains the most critical factor. We will focus on the technical details that separate a basic shed from a professional-grade lakeside residence.
Quick Specs
Dimensions: 16 feet by 20 feet (320 Square Feet)
Estimated Cost: $12,000 to $18,500 depending on finish materials
Difficulty Level: Advanced (Requires knowledge of framing and site leveling)
Estimated Build Time: 4 to 6 weeks for a two-person crew
Materials and Tools
The longevity of a lakeside cabin depends entirely on your choice of lumber and fasteners. You must use Ground Contact Pressure Treated (PT) lumber for the entire foundation and floor framing system. Standard interior-grade lumber will succumb to moisture-induced rot within a few seasons in a high-humidity environment near the water.
Lumber List: 6×6 Pressure Treated Posts for the primary piers; 2×10 Pressure Treated Joists for the floor diaphragm; 2×6 Kiln-Dried Spruce-Pine-Fir for wall framing; 2×8 Douglas Fir for the roof rafters; 3/4 inch Tongue and Groove CDX Plywood for subflooring; 1×6 Cedar Tongue and Groove for exterior siding.
Hardware List: Hot-Dipped Galvanized Framing Nails (3.5 inch and 2.5 inch); 5/8 inch Galvanized Through-Bolts with oversized washers; Hurricane ties and joist hangers (Stainless Steel recommended); Synthetic underlayment for the roofing system; High-performance silicone sealant for all exterior penetrations.
Tool Requirements: Sliding Compound Miter Saw and Circular Saw; Pneumatic Framing Nailer and Impact Driver; Laser Level or Transit Level for foundation accuracy; Heavy-duty Post Hole Digger or Power Auger; Speed Square, Chalk Line, and 30-foot Steel Tape Measure.
Hardware Comparison Table
| Hardware Type | Material Grade | Best Use Case | Longevity Rating |
|---|---|---|---|
| Electro-Galvanized | Zinc Coated | Interior Framing | Moderate |
| Hot-Dipped Galv | Thick Zinc | Exterior Structural | High |
| Stainless Steel | 304/316 Grade | Direct Coastal/Water | Extreme |
| Ceramic Coated | Polymer Layer | Decking/Siding | High |
Technical Layout
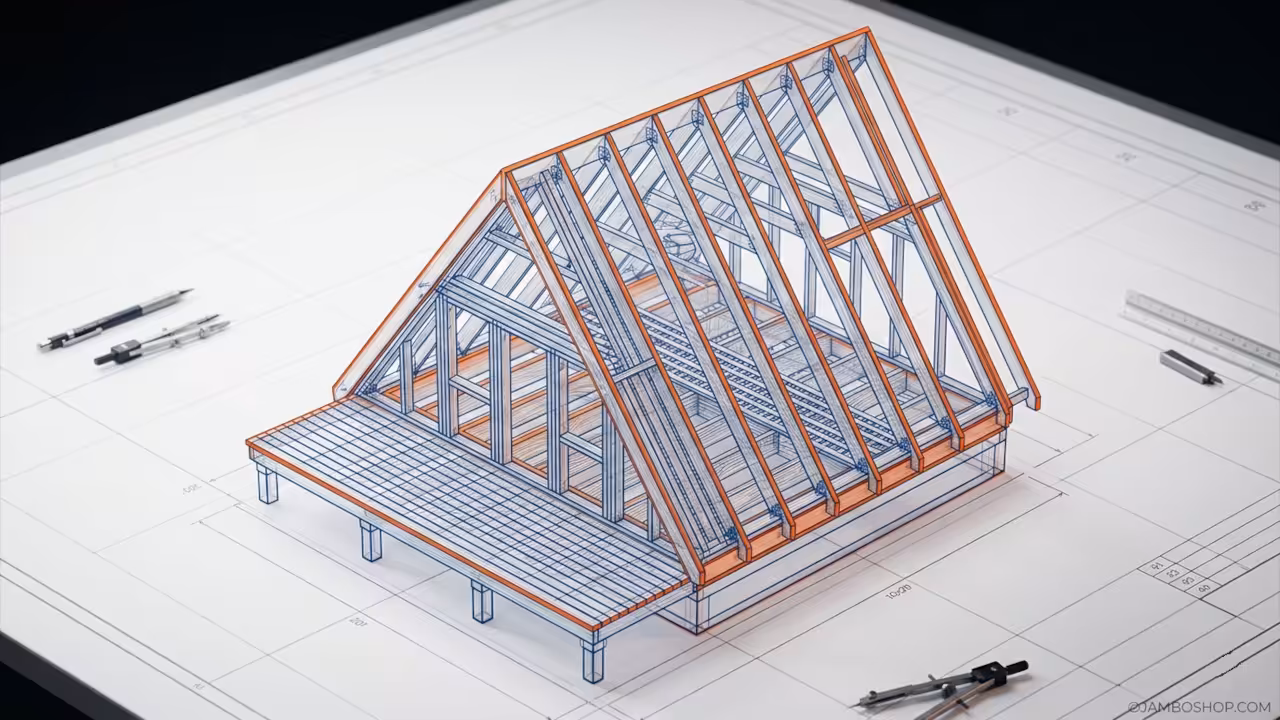
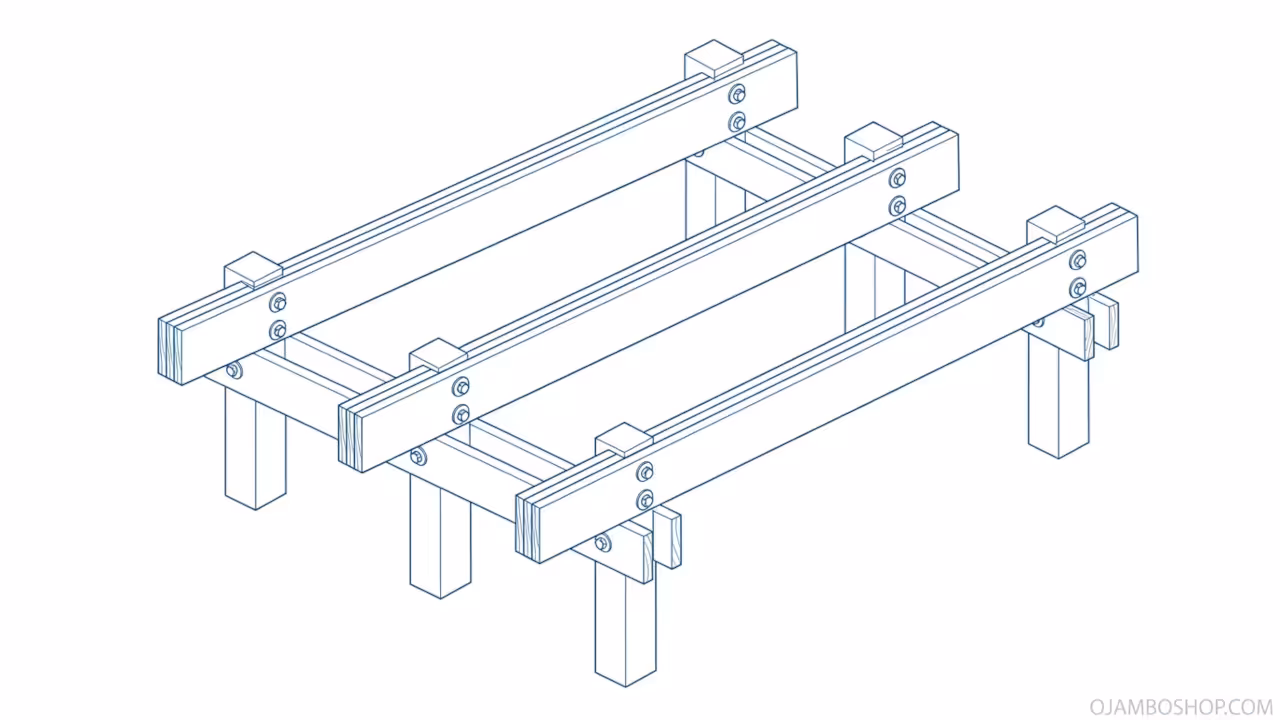
The foundation of the 16 by 20 lakeside cabin utilizes a triple-beam carrier system to distribute the dead and live loads effectively. We begin by establishing a grid of nine 6×6 pressure treated posts set in concrete footings below the frost line. These posts support three parallel 16-foot beams constructed from tripled 2×10 members, which are through-bolted to the posts for maximum shear strength.
The floor joists are then installed perpendicular to these beams on 16-inch centers, creating a rigid diaphragm that prevents racking. The wall framing follows a standard 16-inch on-center spacing, but with a double top plate to support the heavy snow loads common in lakeside environments. We utilize a 6/12 roof pitch, which provides an ideal balance between aesthetic appeal and efficient water shedding.
By using a birdsmouth cut on the 2×8 rafters, we ensure a full bearing surface on the top plate, transferring the roof load directly down through the studs to the foundation. This continuous load path is essential for a structure that may face high wind gusts coming off the open water. Every joint is reinforced with galvanized hardware to resist the corrosive effects of constant moisture exposure.
Step-by-Step Instructions
Phase 1: Site Preparation and Foundation Setting
The first phase is the most critical for the long-term success of the build. You must clear the area of all organic debris and establish a perfectly square perimeter using the 3-4-5 triangle method. Once the corners are marked, use a laser level to determine the height of your 6×6 posts, ensuring the tops are level across the entire 16 by 20 footprint.
Dig your footings to the local code-required depth and pour concrete, setting your post anchors while the mix is still wet to ensure a permanent bond. Precision at this stage prevents structural issues during the framing phase. Allow the concrete to set fully before applying any weight to the anchors.
Phase 2: Beam Installation and Floor Framing
After the concrete has cured for at least 48 hours, install your 6×6 posts and brace them temporarily so they remain plumb. Construct your three main carrier beams by laminating three 2×10 boards together with a staggered nailing pattern and construction adhesive. Lift these beams into place on top of the posts and secure them with heavy-duty galvanized post-to-beam connectors.
Lay out your 2×10 floor joists on 16-inch centers, ensuring you use joist hangers on the rim joists to prevent any downward deflection over time. Use a string line to check for crown alignment across the joists. This ensures a perfectly flat subfloor for the subsequent wall framing steps.
Phase 3: Subflooring and Bottom Plates
Before laying the subfloor, install a heavy-duty vapor barrier or insect screen to the underside of the joists. Apply a generous bead of subfloor adhesive to the top of every joist to prevent floor squeaks and increase the overall rigidity of the platform. Lay your 3/4 inch CDX plywood sheets in a staggered brick pattern, ensuring the edges fall directly on the center of the joists.
Fasten the plywood every 6 inches along the edges and every 12 inches in the field using 2.5-inch ring-shank nails or deck screws. Sweep the platform clean of sawdust and debris before marking your wall plate locations. A clean subfloor allows for accurate chalk lines when laying out the exterior wall boundaries.
Phase 4: Wall Framing and Sheathing
Build your walls flat on the finished subfloor, starting with the two 20-foot longitudinal walls. Ensure your window and door headers are sized correctly for the spans, using doubled 2×10 headers for any opening wider than 4 feet. Once the walls are framed, apply your 7/16 inch OSB or plywood sheathing while the wall is still square on the ground.
Raise the walls into position, brace them securely to the floor, and nail the corners together, ensuring everything is plumb and square before moving to the roof. Double top plates should overlap at the corners to tie the entire structure together. Check for squareness by measuring the diagonals of the standing structure.
Phase 5: Rafter Cutting and Roof Framing
The roof system defines the character of the lakeside cabin and protects the interior from the elements. Cut a master rafter with a 6/12 pitch and a 12-inch overhang to serve as a template for the remaining 2×8 members. Install a 2×10 ridge board at the peak, supported by temporary vertical posts until the rafters are all pinned in place.
Use hurricane ties at every rafter-to-wall connection to ensure the roof cannot be lifted by high winds. Sheath the roof with 5/8 inch plywood, starting from the eaves and working your way up to the ridge. Ensure all plywood joints are staggered and supported by rafters or H-clips.
Phase 6: Windows, Doors, and Exterior Envelope
With the shell complete, you must immediately dry-in the cabin to protect the interior framing from moisture. Install high-quality flashing tape around all window and door rough openings before sliding the units into place. Use a premium house wrap over the wall sheathing, overlapping the seams by at least 6 inches and securing it with cap staples.
Install your exterior doors and windows, ensuring they are level and shimmed properly to allow for smooth operation and a weather-tight seal against the elements. Caulking the exterior flanges of windows is essential in high-wind lakeside environments. This creates a secondary barrier against moisture infiltration.
Phase 7: Siding and Trim Details
For a lakeside aesthetic, cedar lap siding or board-and-batten provides excellent durability and natural beauty. Start your siding at the bottom of the wall, maintaining a 1/2 inch gap from any horizontal surfaces to prevent moisture wicking. Use stainless steel siding nails to prevent “bleeding” or black streaks that often occur with galvanized fasteners on cedar or redwood.
Install wide corner trim and window casings to provide a professional, finished look that also adds an extra layer of protection against driving rain. Miter the corners for a high-end finish or use corner boards for a traditional rustic appearance. Ensure all trim is back-primed if using natural wood products.
Phase 8: Interior Finishing and Insulation
Once the exterior is sealed, you can begin the mechanical rough-ins for any electrical or plumbing needs. Use mineral wool insulation in the walls and ceiling for superior moisture resistance and acoustic dampening compared to standard fiberglass. Install a tongue and groove pine or cedar interior finish to maintain the rustic cabin feel while providing a durable surface.
Finish the floors with a high-traffic polyurethane or a natural oil finish that can withstand the sand and moisture typically tracked into a lakeside home. Install baseboards and window casings to match the exterior theme. Once the final coat of finish is dry, your lakeside retreat is ready for occupancy.
Common Mistakes
One of the most frequent errors is failing to account for the unique soil conditions found near water. Builders often underestimate the required depth for footings, leading to frost heave or settling that can rack the entire cabin frame. Always check local building codes for the specific frost line in your region and consider using oversized footings if the soil is sandy or silty.
Another common mistake is neglecting the use of proper flashing around windows and roof valleys. In a lakeside environment, wind-driven rain can penetrate even the smallest gaps, leading to hidden rot inside the wall cavities. Taking the extra time to install Z-flashing and high-quality window tape will save you thousands of dollars in future repairs and structural remediation.
Finally, many DIY builders use standard interior fasteners for exterior applications to save on costs. This is a critical error, as the high humidity near a lake will cause standard steel nails to rust and fail within years. Always insist on hot-dipped galvanized or stainless steel fasteners for any component that is part of the exterior envelope or the foundation system.
Maintenance and Safety
Maintaining your lakeside cabin is a seasonal responsibility that ensures the longevity of your investment. Every spring, inspect the foundation posts for any signs of movement or wood decay, especially at the ground-to-air interface. Re-apply a high-quality UV-rated wood sealer to your siding every three to five years to prevent the sun and rain from degrading the wood fibers.
Pro-Tip: When constructing the floor system, use a “double-joist” technique under any area where you plan to have heavy furniture or a wood-burning stove. This involves sistering two 2×10 joists together to increase the load-bearing capacity and reduce floor vibration. Additionally, applying a coat of copper naphthenate to any end-cuts on your pressure-treated lumber will restore the chemical barrier that is lost during the cutting process.
Safety should always be your primary concern when working on a construction site, especially when working at heights or near water. Always wear a harness when sheathing the roof and ensure your ladders are placed on stable, level ground with proper outriggers. Use hearing protection and safety glasses whenever operating power saws or nail guns to prevent long-term injury.