
Building a floating deck for an above ground pool is one of the most transformative projects a homeowner can undertake. It bridges the gap between a basic utility tank and a cohesive outdoor living space that invites relaxation and entertainment.
A well-executed floating deck provides a level, stable platform for lounge chairs and pool access without the structural complexity of an attached house deck. By decoupling the structure from the pool wall, you eliminate the risk of liner damage and allow for natural seasonal ground movement.
This project enhances property value by creating a defined architectural footprint in the backyard. Beyond the aesthetic appeal, a dedicated deck surface keeps grass and debris out of your filtration system, significantly reducing weekly pool maintenance requirements.
Quick Specs
Dimensions: 12 feet by 16 feet (192 square feet total surface area).
Estimated Cost: $1,800 to $2,400 depending on lumber grade and local hardware prices.
Difficulty Level: Intermediate. This build requires precise leveling and basic knowledge of power tool safety and structural framing.
Estimated Build Time: 16 to 24 active work hours. This typically spans two full weekends for a two-person DIY team.
Materials and Tools
The foundation of a long-lasting deck lies in the quality of your lumber and the corrosion resistance of your fasteners. For this 12×16 footprint, you will need thirty-two 2×8 pressure-treated joists at 12-foot lengths to accommodate the internal framing and headers.
Your decking surface will require approximately forty-five 5/4×6-inch premium pressure-treated boards or composite equivalents. Do not forget to order sixteen 4×4 pressure-treated posts and twenty-four concrete deck blocks to provide a stable, non-penetrating foundation for the floating joist system.
Regarding hardware, you must use 3-inch 304-grade stainless steel or high-quality ceramic-coated deck screws to prevent wood rot at the puncture points. You will also need twenty-four 2×8 galvanized joist hangers and a five-pound box of 10d galvanized connector nails for the structural skeleton.
Essential tools for this build include a sliding compound miter saw for clean cross-cuts and a circular saw for trimming the deck board ends. You will also need a high-torque impact driver, a 4-foot carpenter level, a chalk line, and a laser level to ensure the entire surface is perfectly flat.
| Material Type | Standard Grade | Premium/Pro Grade | Best Use Case |
|---|---|---|---|
| Fasteners | Galvanized Steel | 304 Stainless Steel | Coastal or high-moisture areas |
| Joist Wood | ACQ Treated Pine | Ground Contact Rated | Frame longevity and rot resistance |
| Decking | Standard PT | Capped Composite | Low maintenance and splinter prevention |
| Support | Buried Post | Floating Deck Block | Temporary or non-permanent structures |
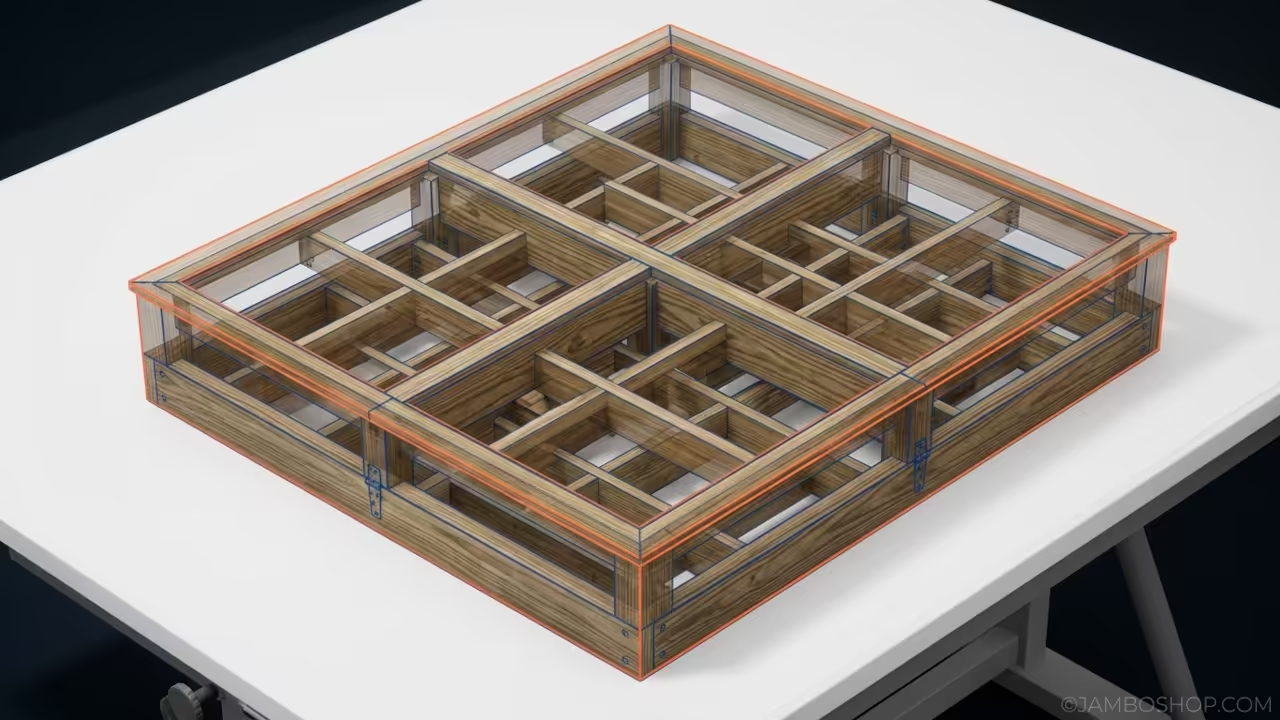
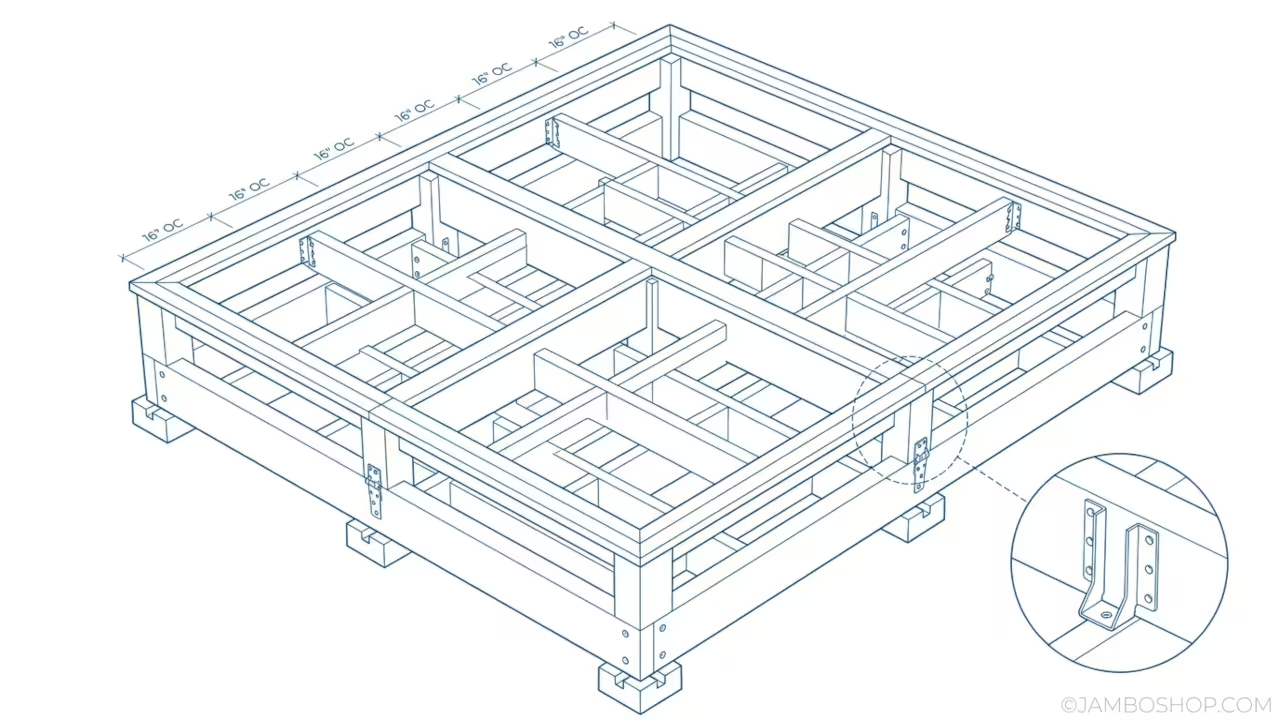
Technical Layout
The framing for a 12×16 floating deck relies on a series of independent box sills supported by adjustable deck blocks. For this specific footprint, we utilize a 16-inch on-center (OC) joist spacing to ensure the 5/4-inch decking boards do not flex or bounce under heavy foot traffic. The 16-foot headers act as the primary load-bearing members, while the 12-foot joists are suspended between them using heavy-duty galvanized hangers.
Because this is a floating structure, the weight is distributed across twenty-four points of contact with the ground. This prevents the deck from sinking into soft soil and allows the wood to breathe from underneath. We utilize a double-rim joist on the long 16-foot sides to provide extra rigidity and a solid surface for attaching any future railing systems or stairs. The layout ensures that the inner radius of the deck maintains a 1/2-inch gap from the pool wall to account for wood expansion and pool vibration.
Step-by-Step Instructions
Phase 1: Site Preparation and Leveling
Clear the 12×16 area of all grass, rocks, and debris before laying down a heavy-duty weed barrier. Spread two inches of leveling sand or pea gravel over the area to facilitate drainage and provide a stable base for the concrete deck blocks. Use a string line and stakes to mark the four corners of the deck, ensuring the perimeter is perfectly square by measuring the diagonals.
Phase 2: Setting the Concrete Support Blocks
Place the first four deck blocks at the corners and use a long straightedge and a laser level to ensure they are at the same elevation. Space the remaining twenty blocks in a grid pattern, with rows four feet apart and blocks four feet apart within each row. This grid ensures that no single span of the 2×8 joists exceeds the structural limits for a residential deck load.
Phase 3: Building the Outer Box Frame
Cut your two 16-foot rim joists and two 12-foot headers to length, ensuring all cuts are perfectly square. Assemble the outer frame on top of the blocks using 3-inch deck screws, checking for squareness again by measuring the diagonals until they match exactly. This frame acts as the template for every internal component, so take your time to ensure it is level across the entire 16-foot span.
Phase 4: Installing the Internal Joists
Mark your 16-inch on-center intervals along the inside of the 16-foot rim joists to indicate where the 12-foot joists will sit. Secure the galvanized joist hangers at each mark using a scrap piece of 2×8 as a spacer to ensure a tight fit for the actual joists. Slide the 12-foot joists into the hangers and secure them with galvanized connector nails, making sure the top of the joist is flush with the top of the rim.
Phase 5: Squaring and Bracing the Frame
Once all joists are installed, install solid blocking every four feet between the joists to prevent them from twisting or “rolling” over time. Check the level of the frame one final time, as the weight of the lumber may have caused the deck blocks to settle into the sand or gravel. If one corner is low, use a pry bar to lift the frame and slip a shingle or treated wood shim between the block and the joist.
Phase 6: Installing the Decking Boards
Start at the edge furthest from the pool and lay your first 16-foot deck board flush with the outer rim joist. Use 1/8-inch spacers between every board to allow for water drainage and natural expansion and contraction of the wood fibers. Secure the boards with two screws at every joist intersection, being careful to drive the screw heads just slightly below the surface of the wood.
Phase 7: Cutting the Pool Radius
If your pool is circular, you will need to scribe the radius onto the deck boards once they are roughly positioned near the pool edge. Use a simple compass made from a scrap piece of wood and a pencil to mark the curve, leaving a 1/2-inch gap from the pool coping. Use a jigsaw with a wood-cutting blade to carefully follow the line, then sand the edges smooth to prevent splinters for swimmers.
Phase 8: Installing the Fascia and Trim
Cut 1×10 cedar or pressure-treated boards to cover the exposed 2×8 frame around the entire perimeter of the deck. This fascia hides the joist hangers and the ends of the deck boards, providing a clean and professional finish to the project. Use stainless steel trim screws to attach the fascia, as these have smaller heads that disappear into the wood grain for a more polished look.
Phase 9: Final Sanding and Cleanup
Go over the entire deck surface with a random orbital sander and 80-grit sandpaper to remove any stamps from the lumber or rough spots from the installation. Sweep the deck thoroughly to remove all sawdust and debris before checking every screw to ensure none are protruding above the wood surface.
Common Mistakes
The most frequent error in floating deck construction is failing to provide adequate drainage under the structure. When water traps against the bottom of the joists, it creates a micro-climate that accelerates fungal growth and rot regardless of the wood treatment. Always ensure the ground is sloped slightly away from the pool and covered with gravel to prevent standing water from touching the framing.
Another common mistake is over-tightening the deck boards during installation without leaving a gap for expansion. Pressure-treated lumber is often sold “wet” and will shrink significantly as it dries in the sun, but it will also expand during heavy rain. If you do not use spacers, the boards may buckle or pull the screws out of the joists as they struggle to find room to move.
Finally, many DIYers neglect to treat the “end-cuts” of their pressure-treated lumber with a topical preservative. When you cut a factory-treated 2×8, you expose the untreated interior of the wood to the elements and boring insects. Pro-Tip: Always keep a small can of copper naphthenate or similar end-cut solution on hand to brush onto every fresh cut before assembly to double the life of your frame.
Maintenance and Safety
A floating deck requires an annual inspection to ensure the concrete blocks have not shifted or sunk into the soil. Use a bottle jack to lift any low spots and add shims as needed to maintain a perfectly level walking surface for your guests. You should also check the tightness of all fasteners, as the natural movement of the wood can occasionally back screws out of the joists.
To protect your investment, apply a high-quality oil-based stain or wood sealer approximately six months after the build is completed. This waiting period allows the factory moisture in the pressure-treated wood to evaporate so the sealer can penetrate deeply into the fibers. Re-apply this treatment every two to three years depending on the amount of direct sunlight and foot traffic the deck receives.
Safety is paramount when working around water, so ensure that the deck surface is kept clean of algae and mildew which can become incredibly slippery when wet. If the deck is more than 30 inches off the ground, local building codes may require a railing system to prevent accidental falls. Always wear safety glasses and hearing protection when operating saws, and ensure your work area is clear of trip hazards like power cords and scrap wood.