
The entryway serves as the handshake of your home, offering the first impression to every guest who crosses the threshold. A custom-built hall tree with an integrated bench and cubbies is more than just a piece of furniture; it is a high-utility organizational system. By consolidating coats, shoes, and accessories into a single vertical footprint, you reclaim floor space and eliminate the visual clutter that often plagues modern foyers.
Investing your time into this build adds significant perceived value to your property while solving daily logistical headaches. This specific design focuses on structural longevity, utilizing a reinforced base and a distributed load-bearing back panel to handle the rigors of a busy household. Whether you are managing school backpacks or heavy winter gear, this hall tree provides a dedicated zone for every essential item.
The beauty of this project lies in its adaptability to various architectural styles, from modern farmhouse to minimalist contemporary. By following this professional-grade blueprint, you will achieve a fit and finish that rivals high-end custom cabinetry at a fraction of the retail cost. We have engineered this guide to ensure that every cut and fastener serves a purpose, resulting in a rock-solid heirloom piece for your home.
Quick Specs
Overall Dimensions: 72 inches Height x 48 inches Width x 18 inches Depth
Estimated Cost: $250 – $400 (Depending on wood species selection)
Difficulty Level: Intermediate
Estimated Build Time: 12 to 16 hours (Excluding finish drying time)
Materials and Tools
| Material Category | Item Description | Recommended Quantity |
|---|---|---|
| Primary Lumber | 3/4 inch Cabinet Grade Plywood (4×8 sheets) | 2 Sheets |
| Trim and Detail | 1×2 Select Pine or Poplar Boards (8 foot lengths) | 5 Boards |
| Backing Material | 1/4 inch Beadboard or Plywood (4×8 sheet) | 1 Sheet |
| Fasteners | 1-1/4 inch Pocket Hole Screws | 100 Count |
| Fasteners | 2 inch Wood Screws | 50 Count |
| Hardware | Double-Prong Coat Hooks (Heavy Duty) | 5 Units |
| Adhesive | High-Strength Wood Glue | 16 Ounces |
The tool list for this project requires a standard woodworking kit to ensure precision and safety throughout the assembly. You will need a circular saw with a fine-finish blade or a table saw for the primary rip cuts. A pocket hole jig is essential for the hidden joinery that provides the hall tree with its sleek, professional appearance. A power drill, impact driver, and a dedicated orbital sander with various grit papers are necessary for the assembly and finishing phases.
In addition to the power tools, keep a set of 24-inch and 48-inch clamps nearby to hold components square while the glue sets. A speed square and a reliable tape measure are your best friends for maintaining the 90-degree integrity of the cubby sections. Finally, ensure you have a level to check the base installation, especially if your entryway floor has a slight pitch or uneven surface.
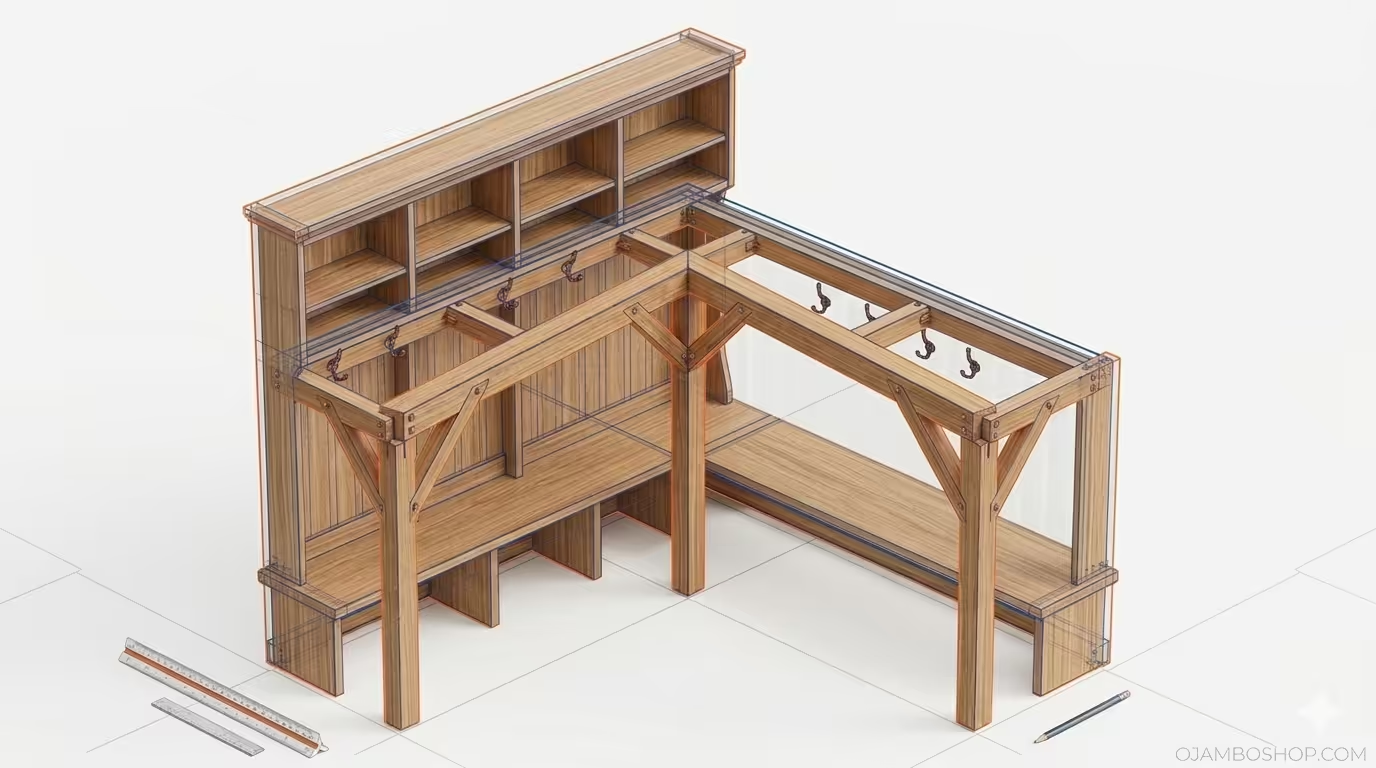
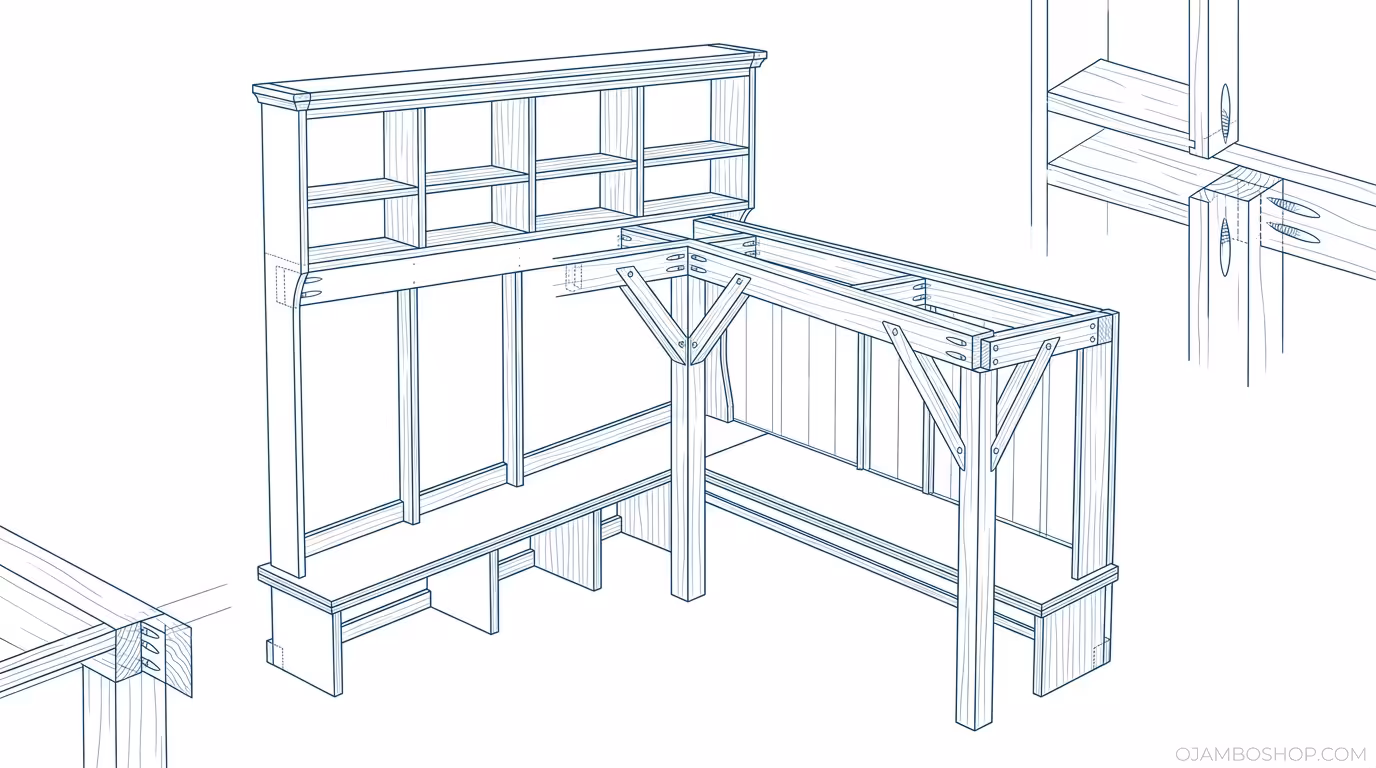
Technical Layout
The structural integrity of this hall tree relies on a tiered load-bearing philosophy that distributes weight from the top hooks down through the vertical partitions. The base bench serves as the primary foundation, constructed using a double-layered frame of 3/4-inch plywood to prevent sagging under the weight of seated adults. This lower carcass is reinforced with internal vertical dividers that align directly with the upper hutch partitions, creating a continuous vertical load path to the floor.
By utilizing pocket hole joinery on the interior faces of the cubbies, we maintain a clean exterior profile while achieving superior shear strength. The upper hutch is secured to the bench using a combination of heavy-duty wood glue and 2-inch screws driven through the underside of the bench top into the vertical stiles. This prevents the unit from racking or swaying during heavy use. To further enhance stability, the 1/4-inch backing material is not merely decorative; when glued and nailed into every shelf and divider, it acts as a diaphragm that squares the entire structure and prevents lateral movement.
Step-by-Step Instructions
Phase 1: Breaking Down the Sheet Goods
Begin by mapping out your cut list on the 4×8 sheets of plywood to maximize yield and minimize waste. Use a track saw or a circular saw with a straight-edge guide to rip the main 18-inch deep panels for the bench sides and top. Accuracy at this stage is critical because any deviation in width will cause misalignment when you attempt to install the trim later. Once the large panels are cut, move on to the hutch sections, which are typically shallower at 12 inches to keep the unit from feeling top-heavy.
Phase 2: Constructing the Bench Carcass
The bench is the heart of the project and requires a robust assembly method to ensure it remains stable for years. Drill pocket holes into the ends of the bottom panel and the internal vertical dividers that will form your shoe cubbies. Apply a consistent bead of wood glue to all mating surfaces before driving your 1-1/4 inch screws to create a permanent bond. Check the assembly for squareness by measuring the diagonals; if the measurements are equal, your base is perfectly aligned and ready for the top.
Phase 3: Attaching the Bench Top
The bench top is the most visible horizontal surface and must be sanded thoroughly before installation to remove any factory stamps or imperfections. Position the top over the base carcass, ensuring an even overhang on the front and sides if you prefer a traditional look, or flush for a modern style. Secure the top by driving screws from the inside of the cubbies upward, which hides the fasteners from view. Pro-Tip: Use a countersink bit if you must drive screws from the top, and fill the holes with a high-quality wood filler that matches your intended stain or paint.
Phase 4: Building the Upper Hutch
The upper hutch provides the vertical height and the locations for your coat hooks and upper storage cubbies. Similar to the bench construction, use pocket hole joinery to connect the side panels to the top and the internal shelves. It is helpful to dry-fit the hutch on top of the bench during this phase to ensure that the vertical lines of the upper cubbies align perfectly with the lower shoe dividers. This visual continuity is what separates a professional build from a basic amateur project.
Phase 5: Joining the Upper and Lower Units
Once the bench and hutch are independently assembled, they must be joined into a single cohesive structure. Apply glue to the bottom edges of the hutch panels and carefully lower the unit onto the bench top. Use 2-inch wood screws driven from the bottom side of the bench top into the vertical stiles of the hutch. This creates a rock-solid connection that prevents the hutch from tipping or sliding, effectively turning the two components into a monolithic piece of furniture.
Phase 6: Installing the Backing Material
The backing material provides the necessary lateral stability to keep the hall tree from wobbling or leaning over time. Lay the entire unit face down on a flat surface and apply a thin bead of glue along the back edges of all shelves and dividers. Align the 1/4-inch plywood or beadboard sheet with the outer edges and secure it using 1-inch brad nails spaced every six inches. This step “locks” the unit into a perfectly square configuration, ensuring that the doors or drawers you might add later will function correctly.
Phase 7: Adding Face Frames and Trim
Face frames are the secret to hiding the raw edges of the plywood and giving the project a high-end, custom-built appearance. Cut your 1×2 select boards to length, starting with the vertical stiles and then fitting the horizontal rails between them. Use a dedicated brad nailer and wood glue to attach the trim to the front edges of the plywood panels. Be sure to use a wood filler to hide the nail holes and any small gaps at the mitered or butt joints before you begin the final sanding process.
Phase 8: Sanding and Surface Preparation
A professional finish is only as good as the preparation work that precedes it. Start with a coarse 80-grit sandpaper to level any uneven joints or dried glue squeeze-out that occurred during assembly. Gradually move through 120-grit and finish with 220-grit for a surface that feels as smooth as glass to the touch. Use a tack cloth or a vacuum with a brush attachment to remove every trace of sawdust, as any lingering debris will create bumps in your paint or stain.
Phase 9: Finishing and Hardware Installation
Choose a finish that complements your home’s interior, whether it is a durable semi-gloss paint or a rich wood stain with a polyurethane topcoat. Apply the finish in thin, even coats, allowing for the recommended drying time between each layer to avoid runs or drips. Once the final coat is completely cured, measure and mark the locations for your heavy-duty coat hooks. Pre-drill the holes for the hardware screws to prevent the wood from splitting, especially when working near the edges of the hutch panels.
Phase 10: Final Installation and Wall Securing
Move the completed hall tree into its permanent location in your entryway and use a level to check for any floor irregularities. Even though the unit is heavy, it must be secured to the wall studs to prevent accidental tipping, especially in homes with children. Drive 3-inch cabinet screws through the upper horizontal support rail of the hutch directly into at least two wall studs. This final step ensures the safety and stability of the project, completing your professional entryway transformation.
Common Mistakes
The most frequent error in hall tree construction is failing to account for the thickness of the face frames when calculating internal cubby dimensions. If you do not plan for the 3/4-inch overhang of the trim, you may find that your storage baskets or shoes do not fit as intended. Always subtract the trim thickness from your clear opening measurements during the design phase to ensure a functional end result.
Another common pitfall is neglecting to use enough wood glue on the primary joints of the bench carcass. Mechanical fasteners like screws are excellent for holding pieces in place, but the glue provides the long-term chemical bond that prevents the wood from creaking or shifting. Ensure that you see a small amount of “squeeze-out” at every joint, which indicates that you have used a sufficient amount of adhesive for a permanent connection.
Finally, many builders skip the step of pre-drilling holes for the hardware or the structural screws. Plywood and hardwood trim are prone to splitting when a screw is driven near the end grain without a pilot hole. Taking thirty seconds to drill a small hole will save you the frustration of replacing a finished piece of trim or a structural side panel late in the build process.
Maintenance and Safety
To maintain the longevity of your hall tree, it is vital to apply a protective topcoat that can withstand moisture and abrasion. Entryways are high-traffic zones where wet coats and muddy shoes are common, so a water-resistant finish like polyurethane is highly recommended. Clean the surfaces regularly with a damp cloth and avoid harsh chemical cleaners that can break down the finish over time. Periodically check the coat hooks to ensure the screws remain tight and the hardware is secure.
Safety should always be your top priority in the workshop and during the final installation. Always wear eye protection and a dust mask when cutting plywood, as the adhesives used in sheet goods can produce irritating dust particles. When installing the unit, never rely solely on the weight of the piece to keep it upright; always anchor it to the wall studs. This prevents the unit from tipping forward if someone pulls on the upper hutch or if a child attempts to climb the cubby shelves.