
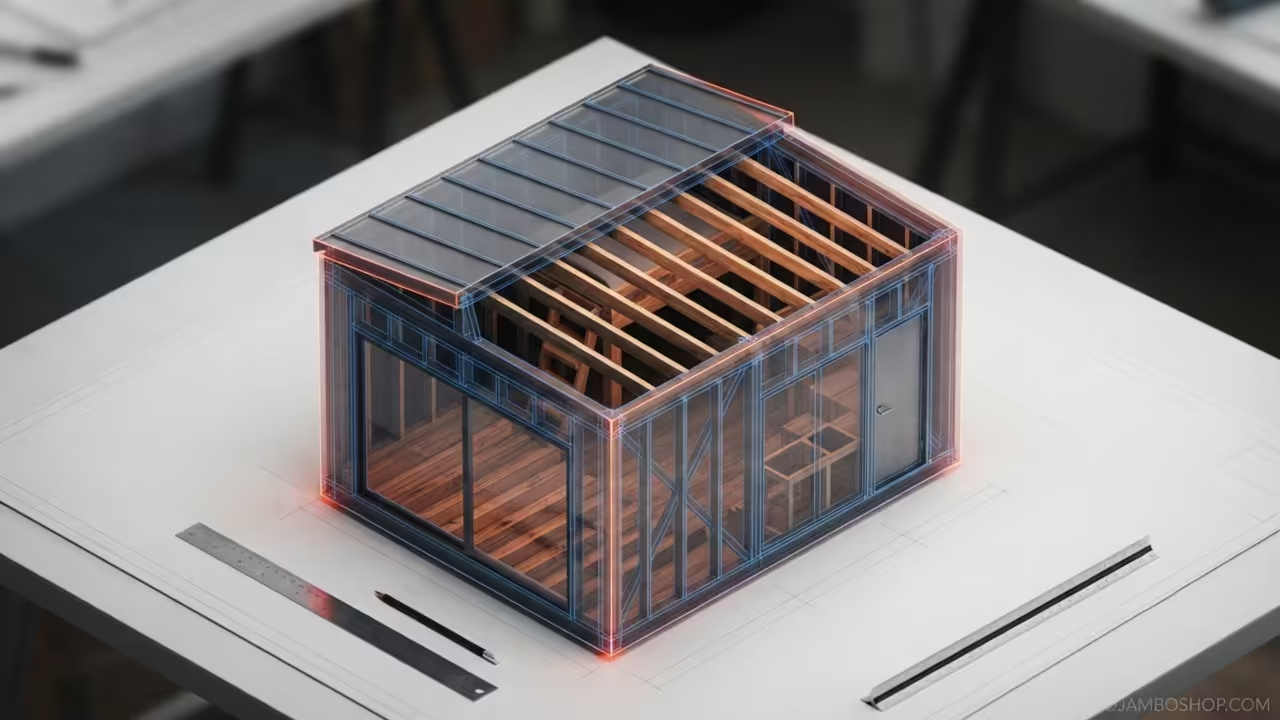
The shift toward sustainable and efficient housing has brought the shipping container home into the mainstream of modern architecture. These steel structures offer a unique blend of industrial durability and flexible design potential for any property owner.
Transforming a twenty foot container into a functional living space adds significant value to a property while reducing the overall carbon footprint. This micro home serves as an ideal guest house, remote office, or a full time minimalist residence for those seeking simplicity.
Quick Specs
Dimensions: 20 feet length by 8 feet width by 8.5 feet height.
Estimated Cost: 5000 to 15000 USD based on material choices.
Difficulty Level: Advanced.
Estimated Build Time: 12 to 20 weeks.
Materials and Tools
The primary structure requires a high cube twenty foot shipping container in good condition with no major structural rust. For internal framing, you will need 2×4 kiln dried studs, 2×6 floor joists for reinforced areas, and 3/4 inch tongue and groove plywood for the subfloor.
Insulation is critical in steel structures, requiring closed cell spray foam or rigid rockwool boards to prevent condensation. Hardware needs include 3 inch GRK screws, self tapping metal screws, steel L brackets, and industrial grade flashing for all window and door openings.
Electrical and plumbing components consist of 12/2 Romex wiring, a small 100 amp breaker panel, PEX piping for water lines, and PVC for waste drainage. For the exterior, you will need marine grade rust inhibiting primer and high gloss exterior enamel paint to protect the shell.
Essential tools include a plasma cutter or an angle grinder with diamond blades for steel modifications. You will also need a cordless impact driver, a laser level, a framing square, a circular saw, and a high powered vacuum for metal shavings.
Safety equipment is non negotiable and must include a full face welding shield, heavy duty leather gloves, N95 respirators for insulation, and steel toed boots. Ensure you have a fire extinguisher on hand at all times when cutting or welding the steel frame.
Technical Layout
The structural integrity of a shipping container relies on the corner posts and the top and bottom rails. When you remove sections of the steel skin for windows or doors, you disrupt the rigid box geometry of the unit.
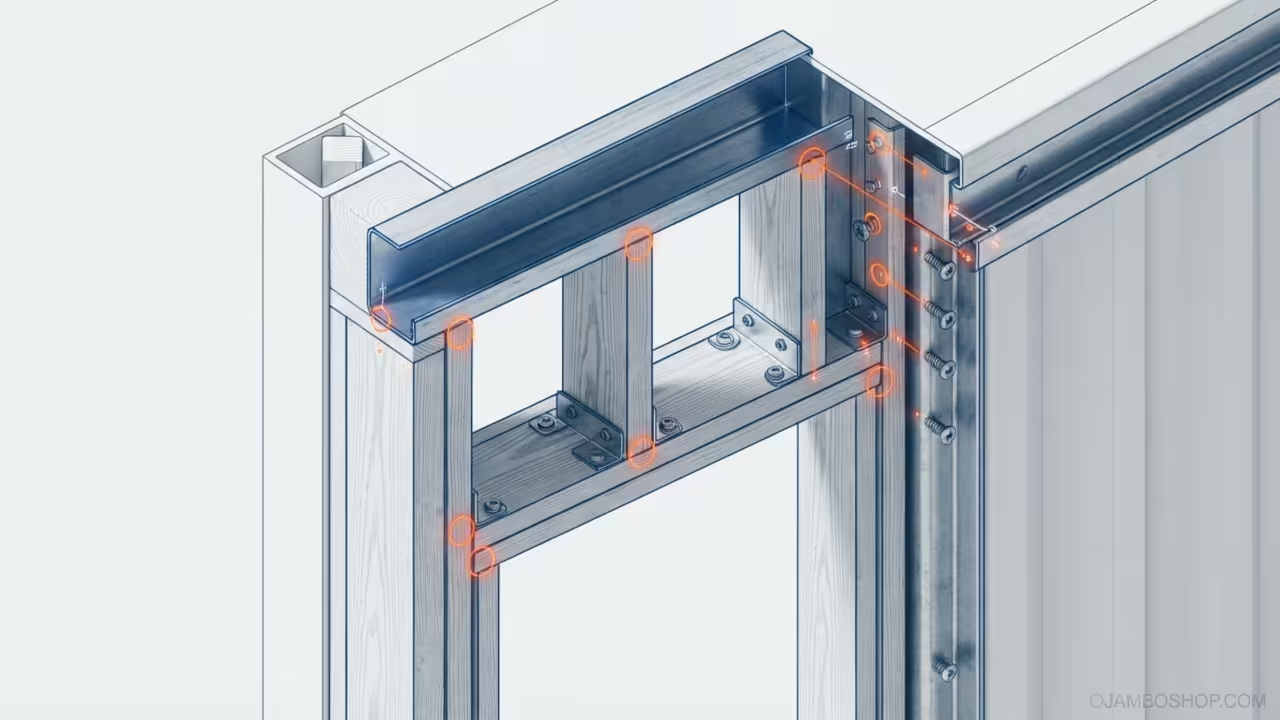
To compensate for this loss of strength, you must install C channel steel headers or heavy duty lumber framing around every opening. The internal wall framing should be decoupled from the steel skin using a thin foam gasket to prevent thermal bridging.
This layout ensures that the interior walls remain plumb while the container handles the primary wind and snow loads. Load bearing requirements are managed by keeping the main structural rails intact and transferring the weight of the interior partitions to the floor.
The flooring system uses a sleeper system of 2x4s laid perpendicular to the original container floor to create a cavity for plumbing. This creates a stable platform that allows for a floating floor installation without compromising the steel base.
Comparison of Insulation Materials
| Material | R Value per Inch | Moisture Resistance | Installation Ease | Cost |
|---|---|---|---|---|
| Spray Foam | 6.5 to 7.0 | Excellent | Moderate | High |
| Rockwool | 3.0 to 4.0 | High | Easy | Moderate |
| EPS Foam | 3.5 to 4.0 | Moderate | Easy | Low |
| Fiberglass | 2.5 to 3.5 | Low | Easy | Low |
Step by Step Instructions
Phase 1 Foundation
The first phase focuses on site preparation and the installation of the foundation. You must ensure the ground is level and compacted to prevent the container from twisting over time.
Concrete piers are the most effective choice as they allow air to circulate underneath the steel floor. Drill holes below the frost line and pour concrete footings with anchor bolts cast directly into the top.
Once the foundation is set, you can move the container into place using a tilt bed trailer or a crane. Align the corner castings of the container exactly with the anchor bolts on the piers.
Use a laser level to verify that the unit is perfectly square and level on all axes. Secure the container to the piers using heavy duty steel straps or welded brackets to prevent shifting during high winds.
Phase 2 Shell Modifications
The second phase involves modifying the steel shell to create openings for light and ventilation. Mark your window and door locations on the exterior walls using a chalk line and a framing square.
Use a plasma cutter or an angle grinder to carefully remove the steel sections according to your markers. Always leave a small margin for trimming and ensure all edges are ground smooth to remove burrs.
Immediately install steel headers or reinforced wood framing around the perimeter of every new opening. This prevents the roof from sagging once the structural skin is breached.
Use self tapping screws to secure the framing directly into the container ribs. Apply a coat of zinc rich primer to all cut edges to stop oxidation before it starts.
Phase 3 Interior Framing
Phase three is the installation of the interior wall framing and floor sleepers. Lay 2×4 sleepers across the original plywood floor, spacing them 16 inches on center.
These sleepers provide the necessary clearance for plumbing runs and create a level surface for your finish flooring. Use a framing square to ensure every sleeper is perfectly perpendicular to the side walls.
Construct the interior wall studs using standard 16 inch on center spacing. Instead of nailing directly into the steel, use specialized metal to wood fasteners or L brackets.
Leave a half inch gap between the studs and the steel walls to allow for the insulation layer. This separation is vital for managing the extreme temperature swings common in metal buildings.
Phase 4 Rough In Systems
The fourth phase covers the rough in of electrical and plumbing systems. Run your PEX water lines and PVC drain pipes through the floor sleeper cavity and up through the wall studs.
Install the electrical boxes and pull your Romex wiring through the studs before any insulation is added. Ensure all wiring is protected by plastic conduits where it passes through steel members to prevent chafing.
Install a small distribution panel in a convenient dry location such as a utility closet or near the entrance. Run dedicated circuits for high load appliances like the air conditioner or a microwave.
Test all connections with a multimeter to ensure there are no shorts in the line. This is the only time you will have full access to the wall cavities so double check your layout.
Phase 5 Insulation and Vapor Barrier
Phase five is the application of insulation and the vapor barrier. Closed cell spray foam is the gold standard for container homes because it acts as both insulation and a vapor barrier.
Spray the foam directly against the steel skin ensuring there are no gaps or voids. This eliminates the risk of interstitial condensation which can cause the steel to rust from the inside.
If you choose rockwool or EPS foam you must install a high quality 6 mil poly vapor barrier over the insulation. Staple the plastic sheeting to the studs and seal the seams with waterproof flashing tape.
This prevents warm moist interior air from hitting the cold steel skin and turning into liquid water. Proper moisture management is the difference between a healthy home and a moldy box.
Phase 6 Wall and Ceiling Finishes
The sixth phase is the installation of wall and ceiling finishes. Attach 1/2 inch drywall or birch plywood panels to the wall studs using fine thread screws.
Start from the corners and work toward the center to ensure a tight fit against the container walls. Use a drywall saw to create precise cutouts for your electrical outlets and light switches.
For the ceiling consider using tongue and groove cedar planks to add warmth and height to the space. Install the planks perpendicular to the length of the container to make the room feel wider.
Use a pneumatic nailer to secure the wood ensuring the fasteners are hidden in the grooves. Sand any rough edges and apply a clear matte sealant to protect the wood grain.
Phase 7 Flooring System
Phase seven involves the installation of the flooring system. Lay a moisture resistant underlayment over the 2×4 sleepers to provide a cushion and sound dampening.
Install your chosen flooring such as luxury vinyl plank or engineered hardwood starting from the far wall. These materials are ideal for micro homes because they are durable and handle temperature changes well.
Ensure you leave a small expansion gap around the perimeter of the room to allow the floor to breathe. Use a tapping block to ensure the planks are locked tightly together without gaps.
Install baseboards to cover the expansion gap and provide a clean transition to the walls. This completes the interior shell and prepares the home for fixtures.
Phase 8 Windows and Doors
Phase eight focuses on fitting the doors and windows into the modified openings. Install window frames with a slight slope toward the exterior to ensure water drains away from the structure.
Use high quality flashing tape around the entire perimeter of the frame to create a watertight seal. Secure the windows with stainless steel screws to prevent corrosion over time.
Install a pre hung exterior door that matches the height of your container opening. Use a wide trim kit to cover the gap between the door frame and the steel shell.
Apply a generous bead of industrial silicone sealant around all exterior joints. Test the operation of the doors and windows to ensure they slide and lock smoothly.
Phase 9 Interior Fixtures
Phase nine is the installation of interior fixtures and cabinetry. Build custom cabinetry to maximize every inch of the 160 square foot footprint.
Use vertical storage solutions such as floor to ceiling shelves and overhead bins. Install a compact kitchenette with a small sink and a two burner induction cooktop.
Fit a small wet bath with a fiberglass shower stall and a composting toilet to save on plumbing complexity. Use light colored paint for the cabinets to keep the space feeling open and airy.
Install a wall mounted folding table that can serve as both a workspace and a dining area. This phase turns the structural box into a livable home.
Phase 10 Exterior Finishing
The final phase is the exterior paint and weatherproofing. Clean the entire steel surface with a degreaser and a wire brush to remove all loose paint and rust.
Apply two coats of marine grade primer to all steel surfaces focusing on the corners and seams. This creates a chemical bond that prevents moisture from penetrating the metal.
Finish the exterior with two coats of high gloss enamel paint in a color that reflects heat such as white or light grey. Install a metal roof cap or an EPDM rubber membrane over the top of the container to prevent leaks.
This additional layer of protection ensures that rain and snow slide off the roof without pooling on the steel.
Common Mistakes
One of the most frequent errors is neglecting proper ventilation in a steel structure. Without a consistent flow of fresh air humidity builds up rapidly and leads to condensation on the walls.
Always install a high efficiency ERV or a powerful bathroom fan to exchange the interior air. Another common mistake is using the wrong type of fasteners when attaching wood to steel.
Standard nails will not penetrate the container skin and can cause structural damage if forced. Always use self tapping screws or specialized metal to wood fasteners for a secure hold.
Many builders also fail to properly level the foundation before placing the container. Even a slight tilt can cause the doors to stick and the interior walls to appear crooked.
Finally some builders overlook the importance of thermal bridging. Attaching wood studs directly to the steel skin allows heat to transfer rapidly through the metal.
Maintenance and Safety
Pro Tip: To ensure the longevity of your steel shell apply a clear zinc based cold galvanizing spray to all welded joints every two years. This prevents the oxidation process from starting at the most vulnerable points of the structure.
Regularly inspect the exterior paint for chips or scratches and touch them up immediately with matching enamel. Check the roof membrane for any signs of tearing or punctures after heavy storms.
Ensure that the area around the foundation piers remains clear of debris to allow for maximum airflow. When working with the steel shell always wear a high quality respirator to avoid inhaling metal dust.
Use heavy duty ear protection when operating the angle grinder or plasma cutter. Never weld or cut near flammable materials or without a dedicated fire extinguisher nearby.
Treat all interior wood surfaces with a non toxic low VOC sealant to maintain indoor air quality. Check your electrical connections annually to ensure that vibration from the container has not loosened any wires.
Maintain a strict moisture monitoring system inside the walls to catch leaks early.