
A well-organized backyard begins with a dedicated space for your essential tools. The 4×6 garden tool closet is a masterpiece of efficiency designed specifically for homeowners with limited square footage.
This lean-to structure provides ample vertical storage while maintaining a small footprint. It transforms a cluttered patio or side yard into a streamlined workstation that protects your investments from the elements.
Adding a permanent storage solution like this can significantly increase your property value. It demonstrates a commitment to maintenance and offers future buyers a ready-made solution for outdoor organization.
Quick Specs
The following specifications provide a baseline for your project planning and budgeting. Ensure your site is cleared and leveled before you begin the physical assembly process.
Dimensions: 4 feet deep by 6 feet wide by 8 feet high (front wall). Estimated Cost: 450 to 650 dollars depending on local lumber prices. Difficulty Level: Intermediate (requires basic knowledge of power tools). Estimated Build Time: 16 to 20 hours for a solo builder.
Materials and Tools
Success in carpentry starts with having the right materials on hand before you make the first cut. Using high-quality pressure-treated lumber for the base is non-negotiable for longevity.
Lumber List: 2×4 Pressure-Treated Boards (Base Frame), 2×4 Kiln-Dried Studs (Wall Framing), 2×6 Kiln-Dried Boards (Rafters), 4×4 Pressure-Treated Posts (Optional Foundation Skids), 19/32 inch T1-11 Siding Panels, 3/4 inch Tongue and Groove Plywood (Flooring).
Hardware and Finishing: 3 inch Exterior Wood Screws, 2 inch Brad Nails or Siding Nails, Heavy-Duty Door Hinges, Locking Hasp or T-Handle Latch, Aluminum Drip Edge, Asphalt Shingles or Corrugated Metal Roofing.
Required Tools: Miter Saw or Circular Saw, Impact Driver and Drill, Level (4-foot preferred), Framing Square, Tape Measure and Speed Square, Safety Glasses and Hearing Protection.
| Hardware Type | Material | Best Use Case | Longevity |
|---|---|---|---|
| Zinc Plated | Steel | Interior dry storage | Low |
| Galvanized | Steel | Exterior structural framing | High |
| Stainless Steel | Steel | Coastal or high-moisture areas | Exceptional |
| Ceramic Coated | Alloy | Pressure-treated wood contact | High |
Technical Layout
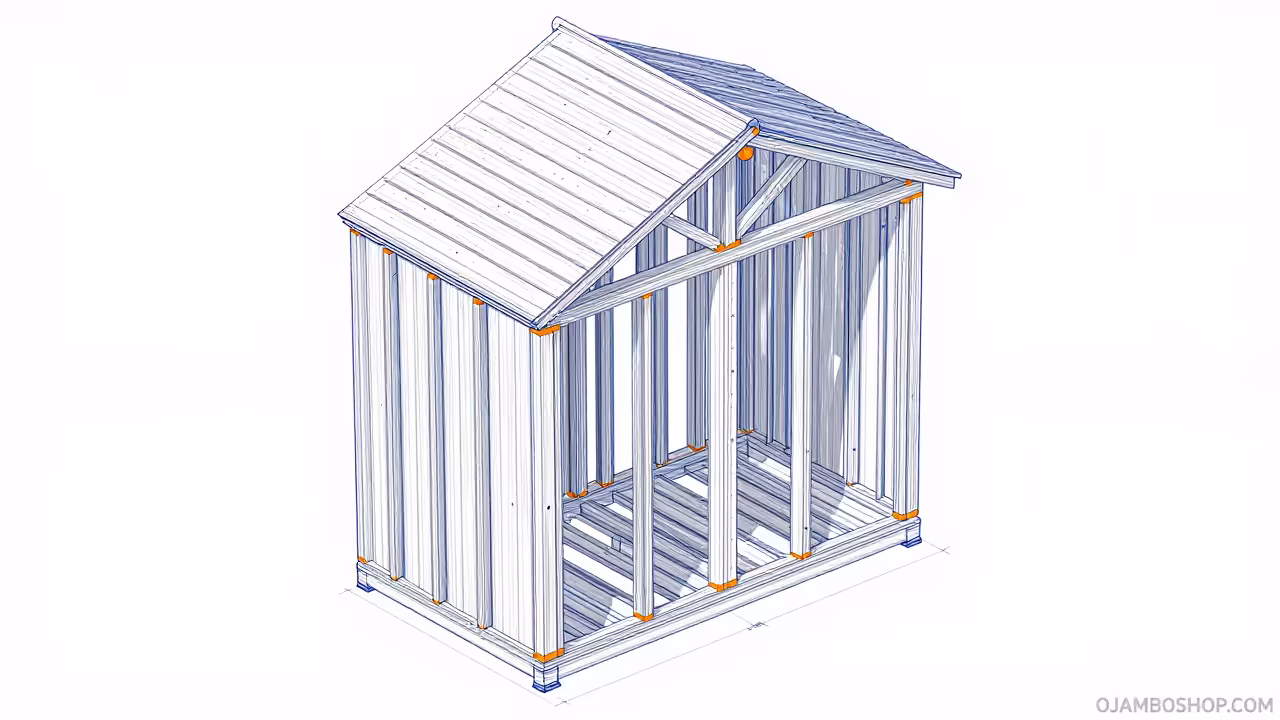
The structural integrity of this 4×6 lean-to relies on a standard 16-inch on-center framing pattern. This spacing ensures the 19/32-inch siding has enough support to prevent bowing over time while providing a solid nail-fin for interior shelving. The roof pitch is designed at a 3:12 ratio, meaning the roof drops 3 inches for every 12 inches of horizontal run. This angle is steep enough to shed rainwater and light snow without creating an unnecessarily tall profile that dominates the backyard landscape.
We utilize a single top plate for the side walls, but the front and back walls require double top plates to distribute the load of the rafters. The floor joists are the most critical component, as they must support the weight of heavy lawnmowers or bags of soil. By using pressure-treated 2x4s spaced 12 inches apart for the floor, we create a rigid platform that resists deflection. This over-engineering prevents the door frame from racking or becoming misaligned as the wood seasons and settles.

Step-by-Step Instructions
Phase 1: Foundation and Floor Frame
Begin by constructing a rectangular frame using your pressure-treated 2×4 boards. Cut two pieces to 72 inches and five pieces to 45 inches to create a total footprint of 48 by 72 inches. Secure the joists using two 3-inch exterior screws at each connection point. Place the frame on leveled concrete pavers or a gravel bed to ensure airflow underneath the wood. Attach the 3/4-inch plywood flooring to the top of the frame using 2-inch screws every 8 inches along the perimeter.
Phase 2: Back Wall Construction
The back wall of a lean-to is typically shorter than the front to create the roof slope. Cut your studs so the total wall height is 78 inches. Assemble the wall on the ground with a bottom plate and a double top plate for extra rigidity. Ensure the wall is perfectly square by measuring diagonally from corner to corner. Once the measurements match, nail the studs into the plates and lift the wall into position.
Phase 3: Front Wall Construction
The front wall will be 96 inches tall to provide the necessary 18-inch height difference for the roof pitch. You must account for the door opening during this phase, which should be roughly 36 inches wide. Frame a header above the door opening using two 2x4s with a 1/2-inch plywood spacer between them. This header will support the weight of the roof over the entryway. Secure the front wall to the floor frame using heavy-duty lag screws or structural wood screws.
Phase 4: Side Wall Raking
The side walls are the most complex because the top plates must be cut at an angle to match the roof slope. Use a speed square to mark a 14-degree angle on the tops of your side studs. Connect the front and back walls by installing these angled side studs directly into the floor and the corner studs of the existing walls. This creates a cohesive “box” that provides the primary lateral stability for the entire tool closet.
Phase 5: Rafter Installation
Cut your 2×6 rafters to a length of 60 inches to allow for a 6-inch overhang on both the front and back. Use a birdsmouth cut where the rafter meets the top plates to ensure a flat, secure seating surface. Space the rafters 16 inches apart and secure them with hurricane ties or long structural screws driven through the top. This phase is critical for wind resistance, so do not skimp on the fasteners at the rafter-to-wall junction.
Phase 6: Siding and Sheathing
Install the T1-11 siding panels starting from one corner and working your way around the structure. The panels should overlap the floor frame by at least 1 inch to prevent water from wicking into the floor joists. Use galvanized siding nails and space them 6 inches apart along the edges of the panels. If you are working alone, use a temporary “ledger” board screwed to the bottom of the frame to hold the heavy panels in place while you nail them.
Phase 7: Roofing and Drip Edge
Install the roof decking using 1/2-inch OSB or plywood, ensuring it is flush with the ends of the rafters. Attach the aluminum drip edge along the bottom and side edges of the roof to guide water away from the wood. Cover the decking with roofing felt or synthetic underlayment before applying your shingles. Start shingling from the bottom edge and work upward, overlapping each row according to the manufacturer’s specifications.
Phase 8: Door Assembly and Hanging
Build the door using the same T1-11 siding backed by a 2×4 “Z-frame” for structural support. The Z-frame prevents the door from sagging over time by transferring the weight back to the hinges. Hang the door using three heavy-duty strap hinges, ensuring there is a 1/8-inch gap around the perimeter to allow for wood expansion. Install a high-quality latch and handle to complete the entryway.
Pro-Tip for Structural Integrity
To maximize the life of your 4×6 tool closet, you must address the “end grain” of the lumber. The end grain acts like a series of straws that suck up moisture, leading to premature rot even in pressure-treated wood. Before assembly, apply a high-quality wood sealer or copper naphthenate to every cross-cut end of your lumber. This simple step can add a decade to the lifespan of the structure by creating a chemical barrier against fungal growth and water penetration.
Common Mistakes
One frequent error is failing to level the foundation properly before building the walls. Even a half-inch slope at the base will result in a roof that does not sit flush and doors that will not close. Always use a 4-foot level and check for flatness in multiple directions across the floor frame.
Another mistake is ignoring the importance of the “birdsmouth” cut in the rafters. Some builders try to simply toe-screw the rafters to the top plate at an angle. Without the flat notch of a birdsmouth cut, the roof weight creates a “spreading” force that can push the walls outward over time.
Finally, many DIYers forget to account for the thickness of the siding when calculating their door dimensions. Ensure you leave enough clearance for the trim and the door swing. If the fit is too tight, the door will bind the first time the humidity levels rise and the wood swells.
Maintenance and Safety
Always wear a dust mask when cutting pressure-treated lumber, as the chemicals used for preservation should not be inhaled. Use safety glasses at all times, especially when using a pneumatic nailer or circular saw. If you are building on a hot day, stay hydrated and keep your work area clear of tripping hazards like scrap wood.
For long-term maintenance, plan to restain or paint your tool closet every two to three years. Sunlight breaks down the lignin in the wood cells, which leads to graying and cracking. A UV-resistant finish will keep the siding supple and water-repellent. Inspect the roof for loose shingles or debris after every major storm to prevent leaks.
Check the hardware annually to ensure that screws haven’t backed out and hinges are operating smoothly. A drop of 3-in-1 oil on the hinge pins can prevent squeaking and rust. By following these simple steps, your 4×6 garden tool closet will remain a functional and attractive part of your backyard for many years to come.