
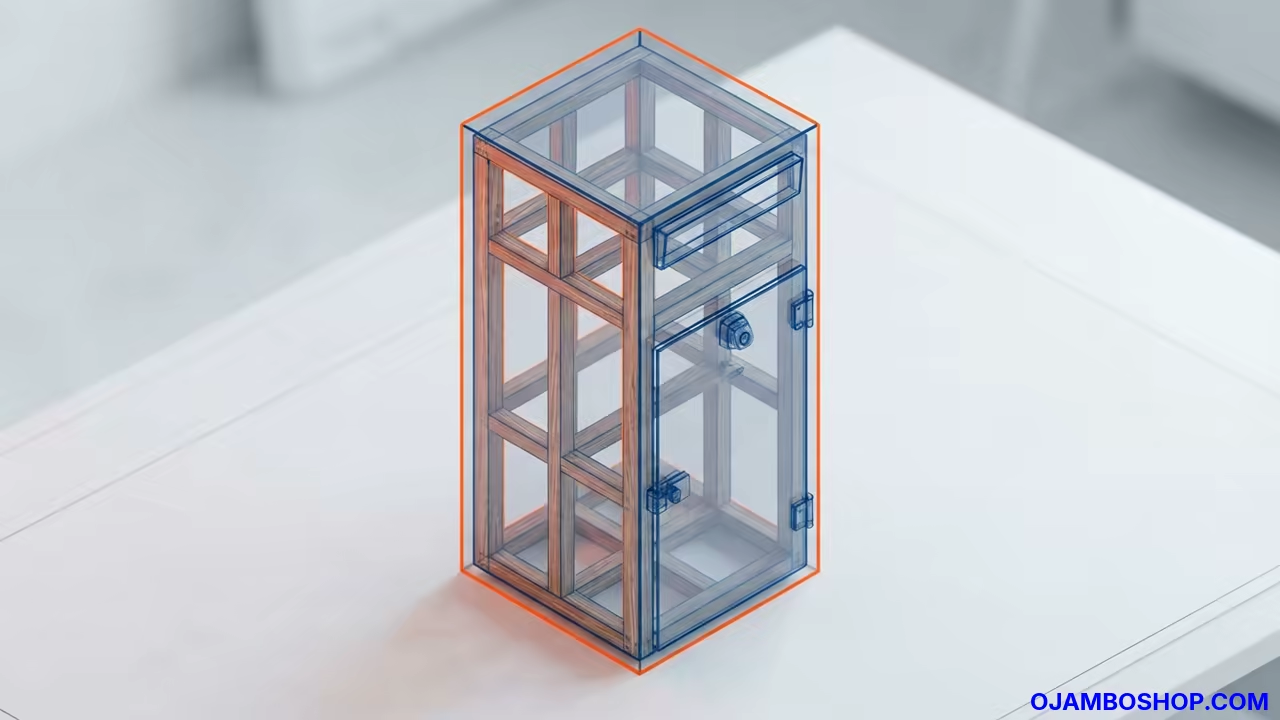
Secure Your Deliveries With A Professional Mailbox System
Homeowners today face the constant challenge of package theft and weather damage. A dedicated delivery box solves this issue by providing a secure spot for couriers.
This project blends utility with architectural style to enhance your property value. You will build a robust system that handles standard mail and large parcels.
Disclaimer: I may earn a commission from purchases made through these links at no extra cost to you.


Quick Specs
Dimensions are 24 inch width by 24 inch depth by 60 inch total height. Estimated cost ranges from 120 to 180 dollars depending on lumber choice.
The difficulty level is intermediate. Estimated build time is 8 to 12 hours over one weekend.
Materials and Tools
Lumber includes a 4×4 pressure treated cedar post and 1×6 cedar boards for siding. You will also need 2×2 cedar for internal framing.
Hardware requirements are 2.5 inch deck screws and 1.5 inch galvanized nails. You also need heavy duty hinges and a locking latch.
Required tools are a miter saw and a cordless drill. Use a speed square and tape measure and a Kreg jig for pocket holes.
Consumables include Titebond III Ultimate Wood Glue and exterior grade paint or sealant. Use pro grade paint brushes for the finish.
| Parameter | Description | Value |
|---|---|---|
| Pine | Longevity | High |
| Pine | Cost | Low |
| Pine | Recommendation | Budget builds |
| Cedar | Longevity | Very High |
| Cedar | Cost | Medium |
| Cedar | Recommendation | Premium aesthetics |
| Composite | Longevity | Maximum |
| Composite | Cost | High |
| Composite | Recommendation | Low maintenance |
Technical Layout
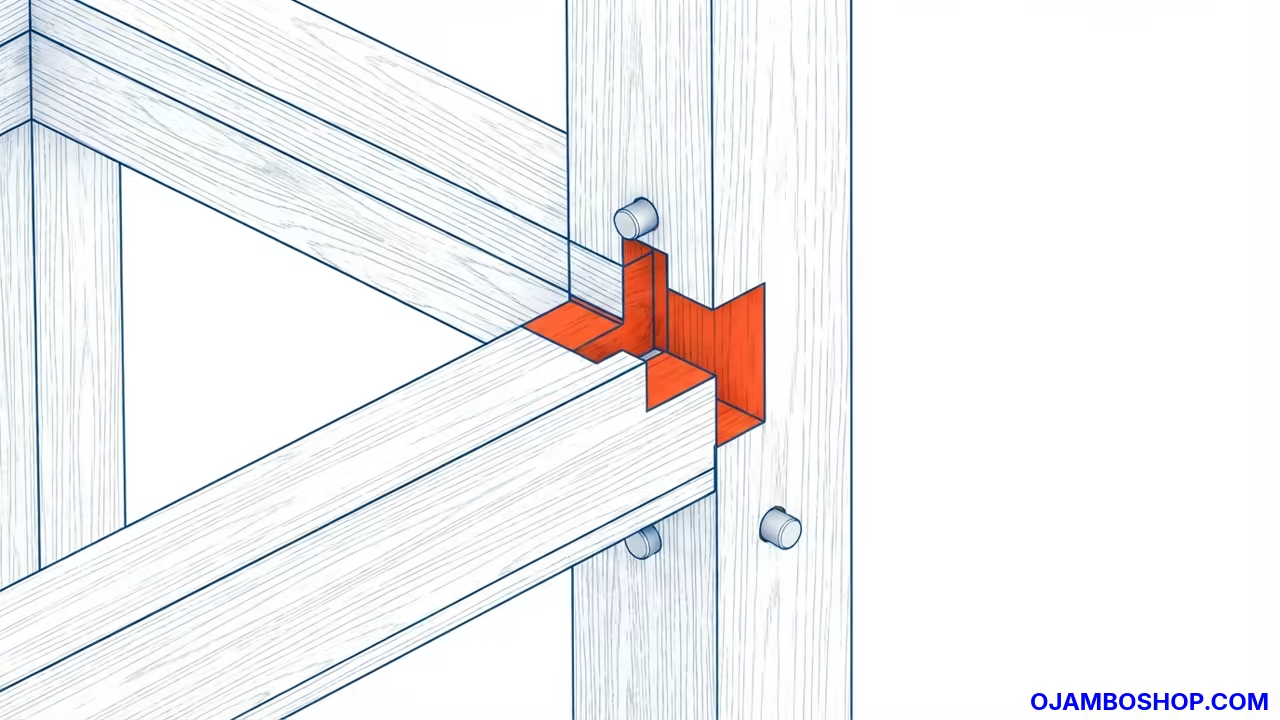
The structural heart of this system relies on a reinforced L frame configuration. This design ensures that the heavy weight of a full package box does not cause the post to lean over time.
The main vertical 4×4 post serves as the primary load bearing member. It is anchored deep into the ground with concrete to resist wind loads and physical impact.
Horizontal support arms extend from the post using lap joints for maximum shear strength. These arms transfer the weight of the mailbox and package box directly into the vertical core.
Internal framing for the package box uses a grid of 2×2 supports. This prevents the cedar siding from warping under the pressure of heavy deliveries.
Pro Tip for structural longevity is to apply a moisture barrier or rubber flashing to the bottom of the package box. This prevents water from wicking up into the end grain of the wood during heavy rain.
Step by Step Instructions
Phase 1 Site Preparation and Post Setting
Measure your driveway approach to ensure the post meets local postal regulations. Dig a hole approximately 24 inches deep and fill the bottom with three inches of crushed stone.
Place the 4×4 cedar post in the center and level it using a bubble level. Pour quick set concrete into the hole and vibrate it to remove air pockets.
Phase 2 Constructing the Main Support Arms
Cut two horizontal support beams from your cedar stock to the required width. Use a miter saw to create precise 90 degree cuts on both ends of the beams.
Attach these arms to the vertical post using a combination of pocket screws and wood glue. Ensure the arms are perfectly square to the post using a speed square.
Phase 3 Building the Package Box Frame
Assemble the base of the package box using 2×2 cedar supports and 1×6 floorboards. Use Titebond III glue on every joint to ensure the box remains watertight.
Install the vertical corner posts for the box frame. Secure these posts with 2.5 inch deck screws driven through the base plate.
Phase 4 Adding Siding and Walls
Cut the 1×6 cedar boards to fit the exterior dimensions of the package box. Attach the boards using galvanized nails to prevent rust streaks on the wood.
Leave a small gap of one eighth inch between boards to allow for natural wood expansion. This technique prevents the siding from buckling during humid summer months.
Phase 5 Fabricating the Lid and Locking Mechanism
Cut a lid piece slightly larger than the box opening to create a natural drip edge. Attach heavy duty stainless steel hinges to the rear of the box frame.
Install a secure locking latch on the front of the lid. This allows the homeowner to secure the box while the courier can still drop items inside.
Phase 6 Mailbox Integration
Attach the standard US mailbox to the upper support arm. Use the manufacturer provided mounting holes and secure them with galvanized bolts.
Ensure the mailbox is positioned at the correct height and angle for the postal carrier. Double check that the box does not obstruct the flow of traffic.
Phase 7 Sanding and Surface Prep
Use a random orbit sander to remove any rough edges or splinters from the cedar. Start with 80 grit sandpaper and finish with 120 grit for a smooth touch.
Wipe down the entire structure with a tack cloth to remove all sawdust. This ensures that the finish adheres properly to the wood fibers.
Phase 8 Finishing and Weatherproofing
Apply a high quality exterior sealant or paint using pro grade paint brushes. Work in long strokes to avoid leaving lap marks on the flat surfaces.
Allow the first coat to dry completely before applying a second layer. This double coating provides essential UV protection for the cedar wood.
Common Mistakes
Failing to set the post deep enough in concrete often leads to the structure leaning after a few months. Always ensure the post is anchored below the local frost line.
Using interior grade screws will result in rapid corrosion and structural failure. Only use galvanized or stainless steel fasteners for all exterior connections.
Overlooking the drip edge on the lid allows water to seep into the box joints. Always ensure the lid extends past the walls to shed water effectively.
Maintenance and Safety
Wear safety glasses and a dust mask when cutting pressure treated lumber. The chemicals in the wood can be irritating to the lungs and eyes.
Inspect the structural joints every six months for signs of loosening or rot. Tighten screws and touch up the sealant to maintain the wood integrity.
Apply a fresh coat of UV protectant every two years to prevent the cedar from turning gray. This keeps the wood vibrant and resists fungal growth.