
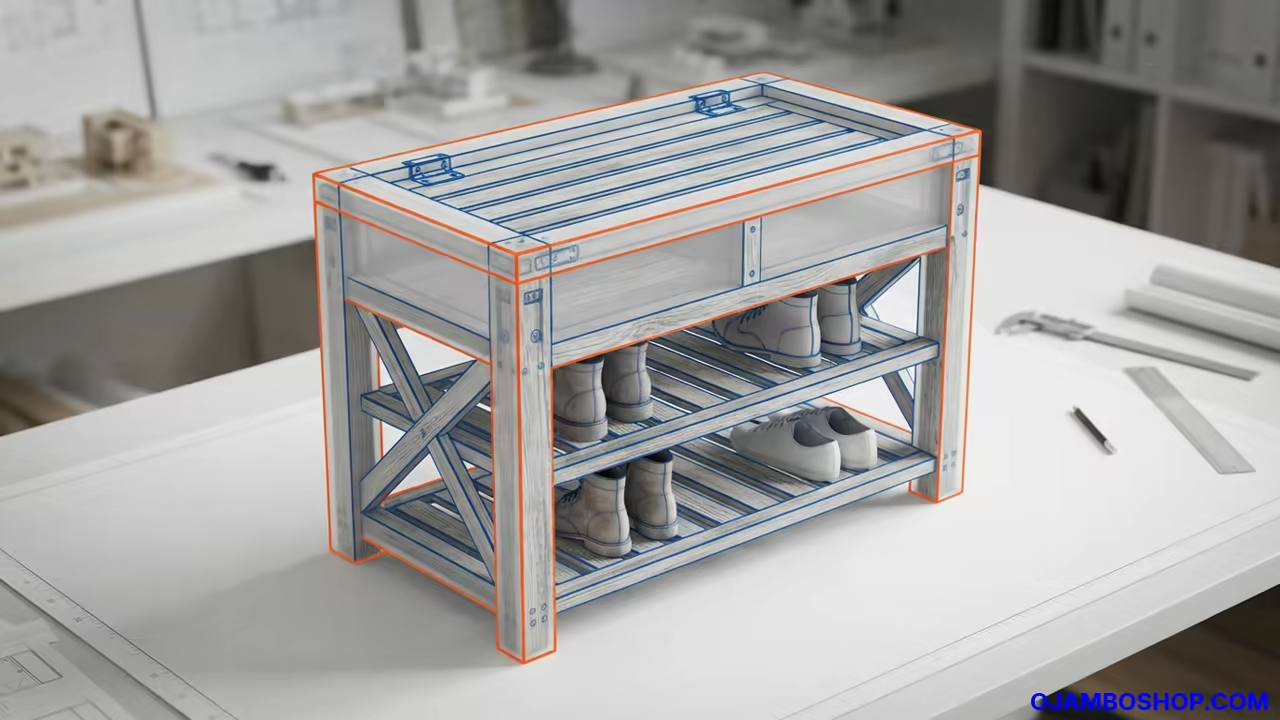
The entrance of a home serves as the first impression for every guest who steps through the door. A well crafted rustic entryway bench provides a functional transition zone that blends utility with timeless aesthetic appeal.
Adding a dedicated seating area with integrated shoe storage immediately reduces clutter and improves the flow of a household. This project increases the perceived value of a property by introducing custom woodworking that complements a farmhouse or industrial interior.
A rustic design allows for natural wood characteristics to shine while providing a sturdy platform for daily use. This specific build focuses on maximizing the narrow footprint of a hallway without sacrificing structural load capacity.
Quick Specs
The final dimensions for this build are 42 inches in length, 15 inches in width, and 18 inches in height. These measurements provide an ideal seating height for adults while maintaining a slim profile for tight spaces.
The estimated cost for materials ranges between 70 and 110 dollars depending on the wood species selected. Most builders can complete this project in approximately 6 to 8 hours of active labor time.
The difficulty level is categorized as intermediate due to the requirement for precise pocket hole joinery. Builders should have basic experience with power tools before attempting this specific architectural layout.
Materials and Tools
To begin this project you will need several lengths of kiln dried pine or cedar lumber. Purchase three 8 foot 2×4 boards for the primary framing and two 8 foot 1×12 boards for the seating surface and shelving.
For hardware you will require a box of 2.5 inch pocket hole screws and 1.25 inch trim screws. High quality wood glue is essential for ensuring the long term stability of the load bearing joints.
You will also need a variety of sandpaper grits ranging from 80 to 220 for a professional finish. A semi gloss polyurethane or a rustic wood stain will protect the wood from moisture and foot traffic.
The tool list includes a compound miter saw for precise cross cuts and a power drill with driver bits. A Kreg jig or similar pocket hole system is mandatory for the hidden structural connections.
Additionally a speed square and a 48 inch level are required to ensure the bench remains perfectly square. A random orbital sander will significantly reduce the time spent preparing the wood for its final coating.
| Parameter | Description | Value |
|---|---|---|
| Primary Lumber | Standard Option | Construction Pine |
| Primary Lumber | Premium Option | Select Cedar |
| Fasteners | Standard Option | Galvanized Screws |
| Fasteners | Premium Option | Stainless Steel |
| Finish | Standard Option | Water based Stain |
| Finish | Premium Option | Oil based Varnish |
| Glue | Standard Option | Standard PVA |
| Glue | Premium Option | Waterproof D3 Glue |
Technical Layout
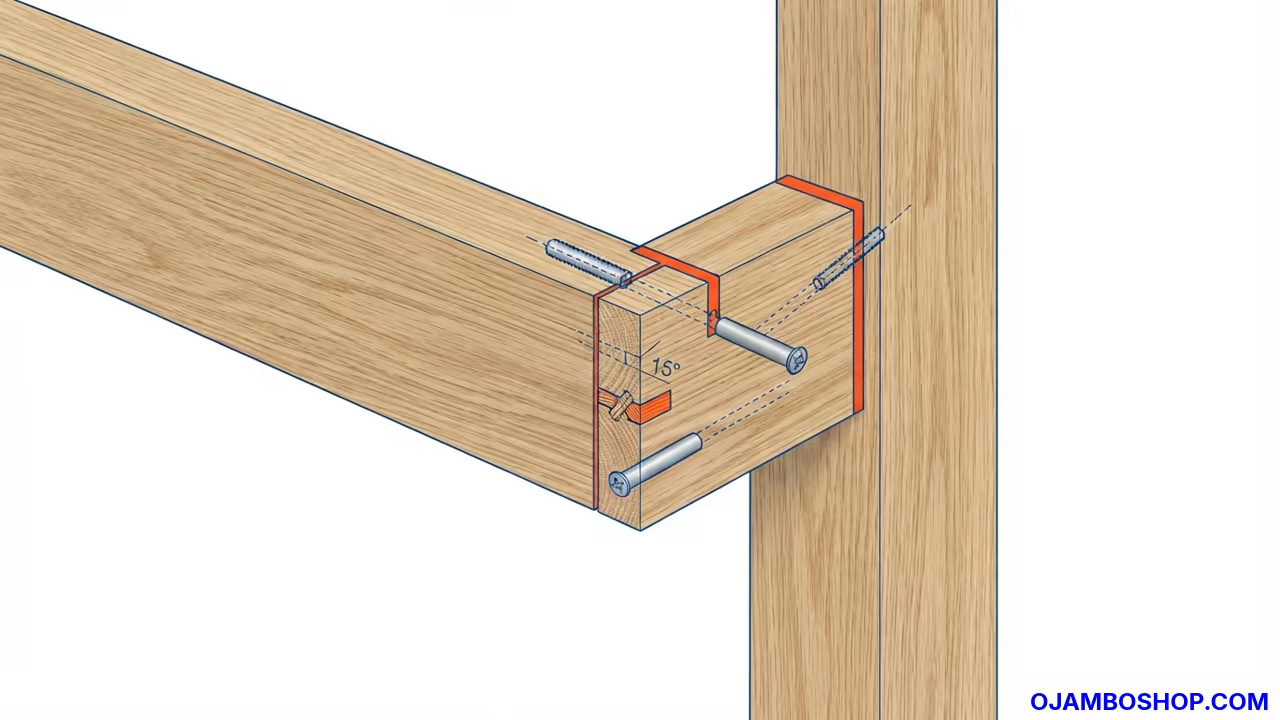
The structural integrity of this bench relies on a reinforced apron system that distributes weight across the vertical supports. The base frame utilizes a box construction method where the 2×4 members are locked together using deep pocket holes.
This configuration prevents the bench from racking or swaying when a person sits down abruptly on the edge. The vertical supports are positioned to act as pillars that transfer the load directly from the top slab to the floor.
By recessing the shoe shelf slightly within the frame we create a protective lip that keeps shoes contained. The interaction between the horizontal rails and the vertical legs creates a rigid geometry that resists twisting.
The top surface is oversized by a half inch on each side to create a professional overhang. This detail not only improves the visual balance but also prevents the seat from feeling cramped. Every connection point is reinforced with a combination of mechanical fasteners and chemical bonding agents for maximum longevity.
Step by Step Instructions
Phase 1 begins with the selection and milling of the lumber to ensure all boards are straight. Use your miter saw to cut the 2x4s into four 15 inch legs and four 38 inch horizontal rails. Ensure every cut is a perfect 90 degree angle to avoid gaps in the final assembly.
Phase 2 focuses on the construction of the two end frames that support the weight. Drill pocket holes into the ends of two 12 inch cross supports and attach them to the 15 inch legs. Use wood glue on every joint before driving the screws to create a permanent bond.
Phase 3 involves connecting the two end frames using the 38 inch long side rails. Position the rails so they are flush with the top of the legs and secure them with pocket screws. This creates the main rectangular skeleton of the bench and defines the overall length.
Phase 4 is the installation of the lower shoe shelf which provides the primary storage utility. Cut the 1×12 board to 41 inches and slide it between the side rails approximately 4 inches from the floor. Secure the shelf using trim screws driven from the bottom of the rails upward.
Phase 5 requires the addition of center supports to prevent the shoe shelf from sagging over time. Cut two 12 inch 2×4 blocks and install them equidistantly between the end frames. These blocks provide critical vertical support for the heaviest items placed on the lower tier.
Phase 6 is the assembly of the top seating surface using the remaining 1×12 material. Lay the top boards across the frame and ensure a consistent 0.25 inch overhang on all four sides. Use pocket holes from underneath the apron to keep the top surface free of visible screw heads.
Phase 7 focuses on the refinement of the wood through a systematic sanding process. Start with 80 grit sandpaper to remove factory stamps and rough patches on the edges. Transition to 120 and then 220 grit to achieve a smooth touch that is safe for skin.
Phase 8 is the application of the protective finish and aesthetic staining. Apply the stain in the direction of the wood grain using a lint free rag for an even tone. Allow the stain to dry completely before applying two thin coats of polyurethane for water resistance.
Common Mistakes
One frequent error is failing to square the frame during the initial assembly phase. If the base is even a quarter inch out of alignment the top slab will not sit flush. Always measure the diagonals of the rectangle to ensure they are identical before tightening screws.
Another common mistake is over tightening the pocket screws into soft pine wood. This often leads to stripped screw holes which compromises the entire structural integrity of the bench. Use a torque limiter or stop driving the screw once the head is flush with the wood.
Many builders forget to sand the interior corners of the shoe storage area. Rough edges in these zones can snag clothing or scratch the bottoms of expensive footwear. Take the extra time to round over every internal corner with a sanding block.
Maintenance and Safety
Professional wood treatment is necessary to protect the bench from moisture tracked in from outside. Reapply a fresh coat of wax or polyurethane every two years to maintain the water barrier. This prevents the wood from warping or developing unsightly water rings.
Always wear a N95 dust mask and safety glasses when operating the miter saw or orbital sander. Fine sawdust from treated pine can be an irritant to the respiratory system over long periods. Work in a well ventilated area or use a vacuum attachment on your tools.
Check the tightness of the fasteners every six months especially in homes with high humidity. Wood expands and contracts with the seasons which can occasionally loosen the mechanical bonds. A quick tighten of the screws ensures the bench remains safe for all users.
Pro Tip for Structural Integrity: Use 3 inch stainless steel screws for the primary load bearing joints if you plan to place the bench in a damp mudroom. Stainless steel prevents the internal corrosion that often happens when moisture seeps into the wood grain around the screw shank.
Disclaimer: I may earn a commission from purchases made through these links at no extra cost to you.


