
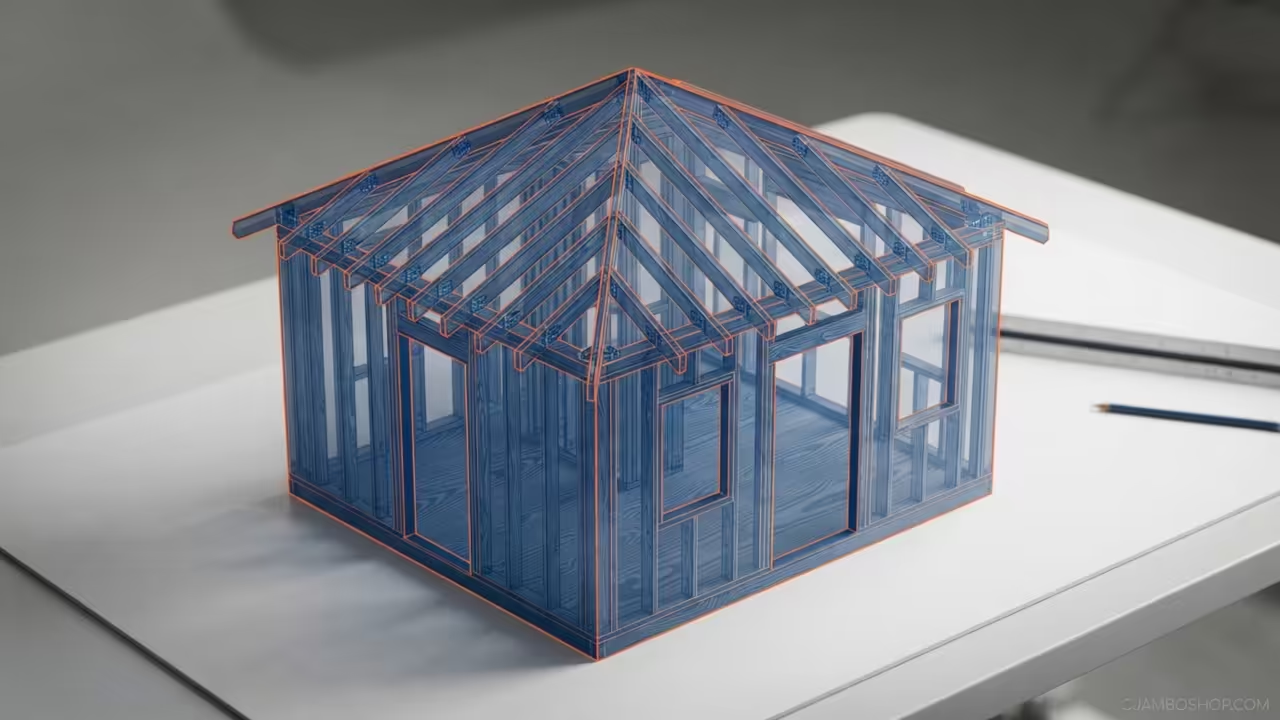
Creating a dedicated space for gardening transforms a chaotic hobby into a professional operation. A detached potting shed provides the necessary organization to manage seeds and soil without tracking dirt into the main house.
This structure serves as a hub for seasonal planning and tool storage in a compact footprint. It adds immediate functional value to any backyard while increasing the overall utility of the outdoor living area.
Quick Specs
Dimensions 6 feet by 6 feet square footprint. Estimated Cost 600 to 900 dollars depending on lumber grades.
Difficulty Level Intermediate skill required for framing and roofing. Estimated Build Time Three to four weekends for a solo builder.
Materials and Tools
The foundation requires four pressure treated 4×4 skids and 2×4 floor joists. You will need 5/8 inch exterior grade plywood for the subfloor to ensure a rigid base.
Wall framing consists of standard 2×4 kiln dried studs and double top plates. For the exterior T11 spruce siding provides a classic look and structural sheathing in one product.
The roof system uses 2×4 rafters and a 2×6 ridge board for maximum stability. Finish the top with drip edges and architectural asphalt shingles for long term weather protection.
Hardware requirements include 3 inch deck screws and 1.5 inch galvanized nails. Heavy duty 6 inch door hinges and a locking latch are essential for securing your tools.
Essential tools include a miter saw and a circular saw for precise cuts. You will also need a framing square and a four foot level to ensure everything is plumb.
A cordless drill with a variety of driver bits is mandatory for assembly. Include a pneumatic brad nailer for trim work and a heavy duty stapler for house wrap.
Technical Layout
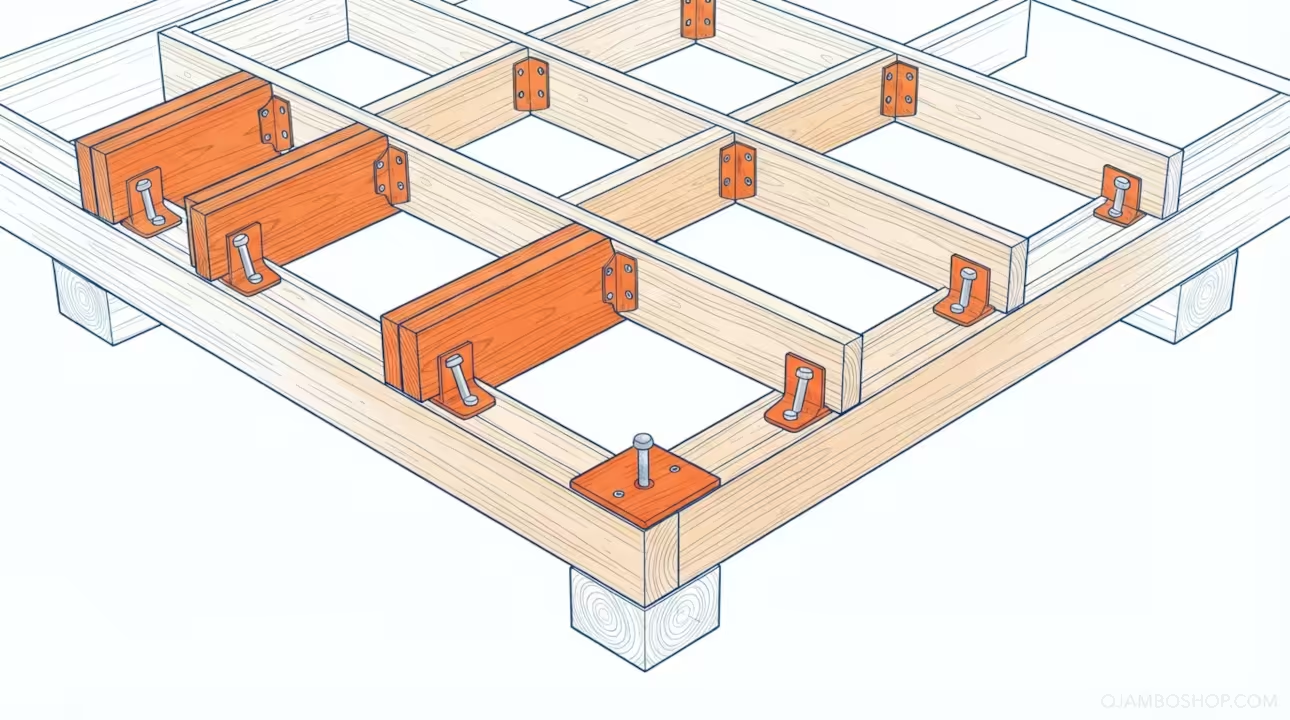
The structural integrity of this shed relies on a floating foundation design using pressure treated skids. These 4×4 members distribute the weight of the structure across a leveled gravel pad to prevent settling.
The floor joists are spaced 16 inches on center to support the weight of heavy potting benches and soil bags. Each joist is secured with galvanized joist hangers to create a rigid rectangular diaphragm.
This prevents the floor from racking or sagging under the concentrated load of gardening equipment. The 5/8 inch plywood decking is glued and screwed to the joists to eliminate future floor squeaks.
The wall framing follows a standard 16 inch on center stud pattern for vertical load distribution. A double top plate allows the roof rafters to tie into the walls without compromising the structural header.
This configuration ensures that the roof load is transferred evenly down to the foundation skids.
Step by Step Instructions
Phase 1 begins with site preparation to ensure a lifetime of stability. Clear a 7 by 7 foot area of all grass and organic debris.
Fill the area with four inches of compacted crushed stone to provide drainage. Use a long straightedge and a level to ensure the pad is perfectly flat.
Phase 2 focuses on the foundation skid assembly. Lay the four pressure treated 4×4 skids parallel to each other across the gravel pad.
Space them evenly at 16 inch intervals to support the floor joists. Secure the skids using heavy duty ground anchors if you live in a high wind area.
Phase 3 involves the floor joist and decking installation. Build the outer perimeter box using 2×4 pressure treated lumber.
Install the interior joists every 16 inches using a framing square for accuracy. Lay the plywood decking across the top and secure it with 2 inch deck screws.
Phase 4 is the construction of the wall frames. Build four separate wall sections on the flat shed floor to ensure they are square.
Use a double top plate and studs spaced 16 inches apart for strength. Include a rough opening for the door and a small window for natural light.
Phase 5 involves raising the walls into position. Lift the rear wall first and plumb it using a level against the floor.
Nail the wall to the floor joists and then connect the side walls using three inch screws. Ensure the entire box is square by measuring the diagonals of the structure.
Phase 6 is the roof rafter installation. Cut the rafters with a birdsmouth notch to sit flush on the wall plates.
Install the ridge board first and then attach the rafters in pairs. Use hurricane ties to secure each rafter to the top plate for extreme weather resistance.
Phase 7 covers the sheathing and siding process. Attach the T11 siding panels to the wall studs using galvanized nails.
Ensure the panels overlap the floor frame slightly to shed water away from the base. Install the roof sheathing using 1/2 inch exterior grade plywood.
Phase 8 is the door and window installation. Build a custom door using the leftover T11 siding and 2×4 framing members.
Hang the door using heavy duty hinges and install a simple locking handle. Set the window frame into the rough opening and seal it with exterior caulk.
Phase 9 involves the roofing and trim work. Install the drip edge around the perimeter of the roof to protect the fascia.
Lay down roofing felt and then apply the asphalt shingles from the bottom up. Add 1×4 trim boards to the corners and around the door for a finished look.
Phase 10 is the finishing and painting stage. Fill all nail holes with exterior wood filler and sand the surfaces smooth.
Apply a high quality primer to all raw wood surfaces to prevent rot. Finish the shed with two coats of exterior latex paint in a weather resistant color.
Material Comparison
| Parameter | Description | Value |
|---|---|---|
| Foundation | Concrete Blocks | Crushed Stone Pad |
| Siding | T11 Spruce | Cedar Planks |
| Roofing | 3 Tab Shingles | Architectural Shingles |
| Fasteners | Common Nails | Stainless Screws |
| Parameter | Description | Value |
Common Mistakes
Many builders fail to properly level the foundation which leads to doors that will not close. Always use a transit level or a long spirit level before laying the skids.
Using standard interior screws for exterior framing causes the wood to split and the fasteners to rust. Always use hot dipped galvanized or stainless steel screws for any outdoor project.
Skipping the moisture barrier between the roof sheathing and the shingles leads to premature rot. Install a high quality underlayment to protect the plywood from condensation and leaks.
Underestimating the weight of the potting soil can cause the floor to sag over time. Ensure your joists are spaced no more than 16 inches apart to handle heavy loads.
Maintenance and Safety
Wear safety goggles and ear protection whenever you operate the miter saw or circular saw. Keep your work area clear of debris to prevent tripping hazards during the build process.
Use a sturdy ladder when installing the roof and never work alone on the rafters. Treat all exposed wood with a UV resistant sealant every two years to prevent cracking.
Check the roof shingles annually for wind damage or curling edges to avoid interior leaks. Clear fallen leaves from around the base of the shed to prevent moisture buildup against the siding.
Apply a waterproof sealant to the bottom edges of the siding panels to stop wicking. Use a silicone based caulk around the window and door trim to keep drafts out.
Ensure the shed remains ventilated to prevent mold growth during the humid summer months. Pro tip for longevity Install a vinyl drip cap over the door header and window tops to redirect water.
This simple addition prevents the end grain of the wood from absorbing moisture and rotting.