
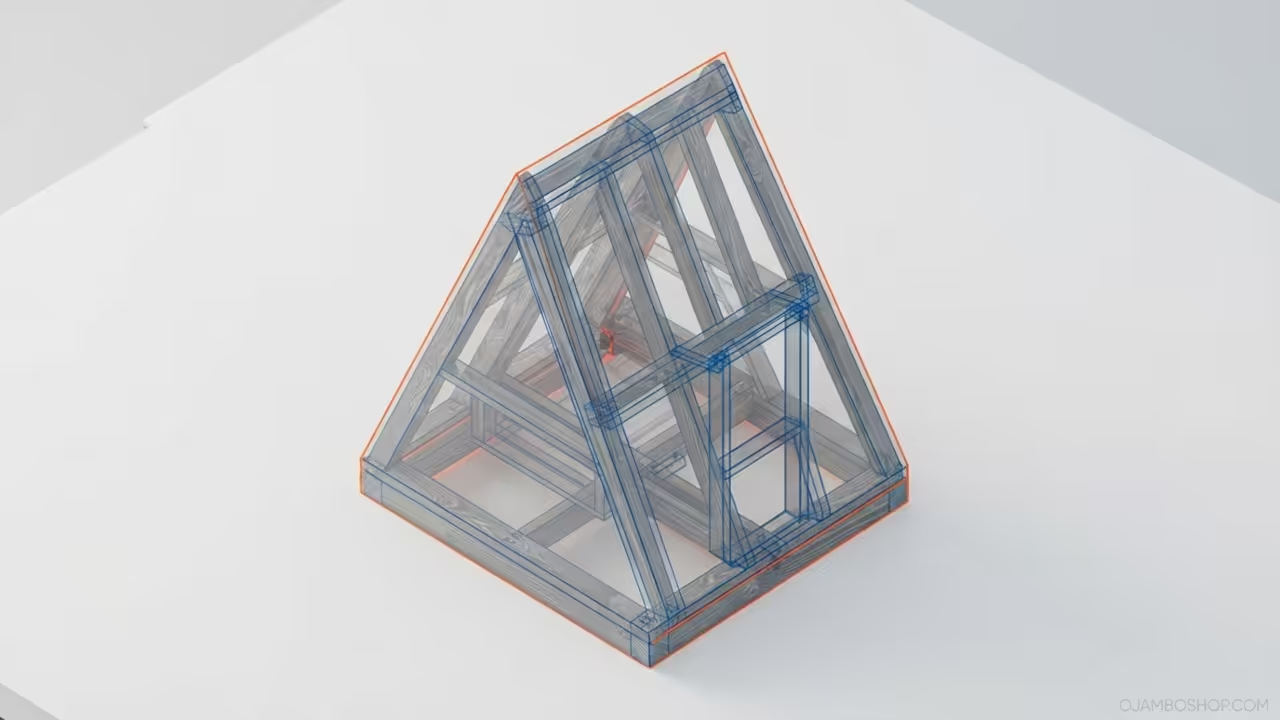
A vertical hydroponic A-frame tower structure transforms a small footprint into a high-yield organic garden. This efficient design maximizes growing space by utilizing verticality rather than horizontal ground area.
Homeowners can produce a continuous harvest of leafy greens and herbs throughout the growing season. This system provides a controlled environment that reduces water consumption and eliminates soil-borne pests.
Integrating this structure into a backyard setting adds both utility and aesthetic value to a landscape. It serves as a functional centerpiece for modern sustainable living enthusiasts.
Quick Specs
- Dimensions: 6ft Height x 4ft Width x 3ft Depth
- Estimated Cost: $250 – $400
- Difficulty Level: Intermediate
- Estimated Build Time: 6 – 8 Hours
Materials & Tools
Lumber requirements include two 4-foot 4×4 pressure treated skids, twelve 6-foot 2×4 cedar boards, and eight 8-foot 1×2 cedar strips. These materials provide the necessary structural foundation and mounting surfaces for the hydroponic components.
Hardware needs consist of one box of 3-inch stainless steel deck screws, one box of 1.5-inch stainless steel wood screws, two 5-foot 3-inch diameter PVC pipes, forty hydroponic net pots, one submersible water pump, and one 20 gallon plastic reservoir tub.
Essential tools for this project are a miter saw, drill and impact driver, level, tape measure, speed square, and a jigsaw. Having these tools ready will ensure a smooth construction process.
| Parameter | Description | Value |
|---|---|---|
| Stainless Steel | Highly durable and corrosion resistant | High |
| Galvanized Steel | Moderate durability for non-critical use | Medium |
| Zinc Plated | Low resistance to moisture | Low |
| Pressure Treated | Excellent for ground contact | Very High |
| Parameter | Description | Value |
Technical Layout
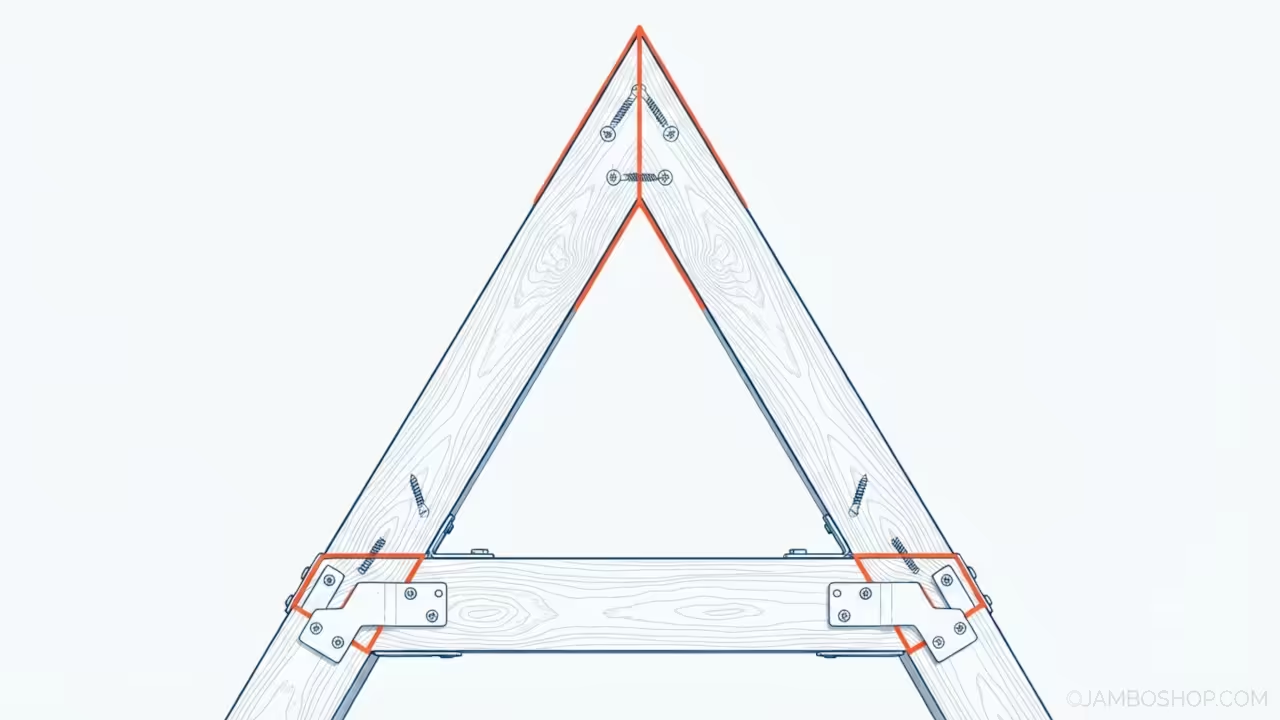
The structural integrity of the A-frame relies on the precise geometry of the triangular side frames. Each side consists of two 6-foot 2×4 cedar beams meeting at a 60-degree peak angle.
These beams are joined at the apex using a heavy-duty miter cut to ensure maximum surface contact for fasteners. This connection point is critical for the overall stability of the vertical load.
The base of the frame is stabilized by a 4-foot long 4×4 pressure-treated skid that prevents the structure from sinking into soft garden soil. A horizontal 2×4 cross-brace is installed at the 3-foot height mark to prevent lateral swaying.
This bracing creates a rigid geometric triangle that supports the weight of the water-filled PVC towers and the saturated growing media. The load-bearing capacity is distributed through the 4×4 skids and the angled 2×4 rafters.
This ensures that the concentrated weight of the water reservoir and the vertical PVC columns remains centered over the footprint. Proper weight distribution prevents the structure from tipping or leaning over time.
Step-by-Step Instructions
Phase 1: Base Foundation
Begin by leveling the ground where the structure will reside to prevent uneven weight distribution. Lay the two 4-foot 4×4 pressure-treated skids parallel to each other with 3 feet of space between them.
Secure these skids to the ground using heavy-duty garden stakes to prevent shifting during high winds. A level foundation is the most important step for long term stability.
Phase 2: Framing the A-Frames
Cut four 6-foot 2×4 cedar boards to serve as the main rafters for the two A-frame sides. Lay two boards on a flat surface and join them at the top to form a 60-degree angle.
Use a speed square to verify the angle is consistent before driving 3-inch stainless steel screws through the joint. Accuracy in this phase ensures the towers will hang straight.
Phase 3: Connecting the Side Frames
Stand the two completed A-frame triangles upright between the 4×4 skids. Connect the two triangles using 2×4 cross-braces placed at the bottom, middle, and top of the structure.
Ensure all cross-braces are level and that the entire assembly is plumb using a long carpenter level. This step locks the triangular geometry into a single rigid unit.
Phase 4: Installing the Support Rails
Attach 1×2 cedar strips horizontally across the interior of the A-frame at 12-inch vertical intervals. These strips act as the mounting points for the hydroponic towers and provide additional lateral stability.
Space these strips evenly to allow for consistent plant height and light exposure. This creates a structured grid for the vertical growth components.
Phase 5: Preparing the Hydroponic Towers
Drill 2-inch diameter holes into the 3-inch PVC pipes at a 45-degree angle along the length of the pipe. These holes should be spaced 8 inches apart to allow for adequate root spread and airflow.
Sand the edges of the holes to remove any burrs that could damage plant stems. Smooth edges prevent tearing of the growing media or the plant itself.
Phase 6: Mounting the Towers
Secure the PVC towers to the 1×2 cedar support rails using heavy-duty UV-resistant zip ties or stainless steel mounting brackets. Ensure the towers are vertical and that the bottom of each pipe sits securely within the reservoir area.
The weight of the water will require the towers to be firmly anchored to the frame. Check that each tower is independently stable before proceeding.
Phase 7: Plumbing and Reservoir Setup
Place the 20-gallon plastic reservoir at the base of the structure between the 4×4 skids. Position the submersible water pump inside the reservoir and connect it to the PVC tower system using flexible irrigation tubing.
Run the tubing up the interior of the main tower to create a continuous water cycle. This ensures nutrients are delivered to every growing level.
Phase 8: Final Assembly and Testing
Insert the net pots into the pre-drilled holes in the PVC pipes and fill them with growing media such as clay pebbles. Fill the reservoir with water and nutrient solution, then turn on the pump to check for leaks.
Observe the water flow through the towers to ensure every level receives consistent hydration. Adjust the flow rate if any sections are receiving too much or too little water.
Common Mistakes
- Ignoring the importance of leveling the base skids often leads to a leaning structure that can eventually collapse under the weight of the water.
- Using standard interior screws instead of stainless steel or coated deck screws will result in rapid corrosion due to the constant moisture exposure.
- Failing to secure the A-frame to the ground can allow the structure to tip over during heavy winds or if the weight distribution becomes uneven.
Maintenance & Safety
Always wear safety glasses and hearing protection when operating the miter saw or drill during the construction phase. Protecting your eyes and ears is vital during loud woodworking tasks.
Apply a food-safe, non-toxic wood sealant to all cedar components to extend the life of the structure and prevent rot. This is particularly important for parts exposed to splashing water.
Check the water pump and reservoir levels weekly to ensure the hydroponic system remains fully operational and the plants do not dry out. Regular monitoring prevents plant loss.
Pro-Tip: To prevent the cedar from warping over time, always pre-drill your pilot holes slightly smaller than the screw diameter to minimize wood splitting and tension.