
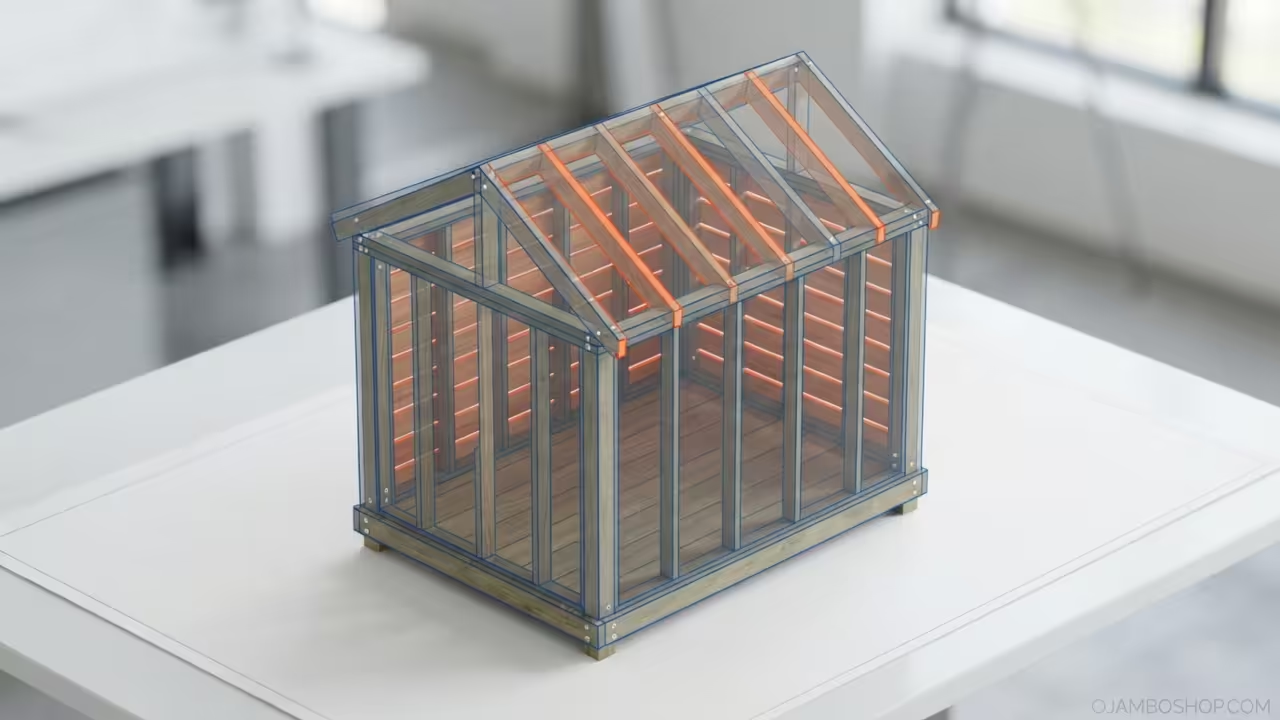
A cluttered backyard detracts from curb appeal and creates an inviting environment for pests. The Modern Slat-Wall Garbage and Recycling Enclosure solves this problem by combining aesthetic appeal with functional storage. This structure provides a dedicated home for your waste bins while maintaining a clean, streamlined look that complements any outdoor space.
The design utilizes vertical slat walls to create visual interest and allow for airflow, preventing moisture buildup and odors. The open slat construction also makes it easy to see which bins are full at a glance. Building this enclosure is a straightforward weekend project that delivers immediate visual improvement to your property.
Quick Specs
Dimensions: 72 inches wide x 36 inches deep x 54 inches tall. Estimated Cost: $150 to $200.
Difficulty Level: Intermediate. Estimated Build Time: 6 to 8 hours.
Materials and Tools
Lumber Requirements
- Two by four pressure-treated studs, eight feet long, quantity of 14
- Two by two cedar or redwood slats, eight feet long, quantity of 30
- Two by six pressure-treated boards, eight feet long, quantity of 4
- Four by four pressure-treated posts, two feet long, quantity of 4
- One-half inch exterior grade plywood, quantity of 1 sheet
Hardware and Fasteners
- Three-inch exterior deck screws, quantity of 200
- Two and a half inch wood screws, quantity of 100
- One-quarter inch by two inch concrete anchors, quantity of 8
- Two-inch galvanized hinges, quantity of 2
- One-inch magnetic catch or sliding bolt latch, quantity of 1
- Exterior wood stain or sealant, quantity of 1 quart
Required Tools
- Circular saw or miter saw
- Power drill with driver bits
- Speed square
- Level, four foot
- Tape measure, twenty five foot
- Chalk line
- Safety glasses and work gloves
Technical Layout
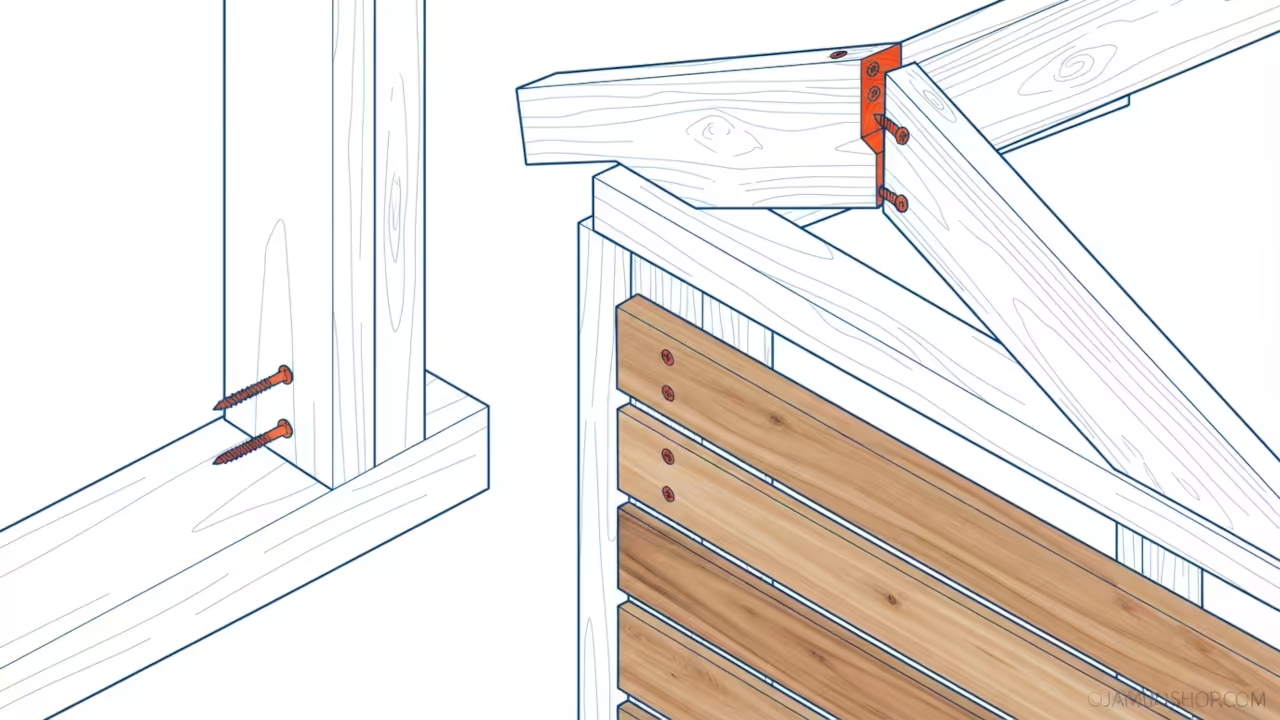
The structural framework relies on a rigid rectangular base with vertical corner posts that extend upward to support the roof assembly. Four pressure-treated two by six boards form the perimeter of the base, creating a solid platform that distributes weight evenly across the ground surface. The corner posts attach to the base using through-bolts and washers, providing exceptional resistance against lateral forces from wind or accidental impact.
Vertical two by four studs frame both side walls and the back wall, spaced at sixteen inches on center to accommodate the slat panel attachment. The front of the enclosure remains open, allowing easy access to the bins without requiring doors or hardware. The roof consists of a simple gable design with two by four rafters that rest on the top plates of the side walls. This configuration sheds water efficiently while maintaining a low profile that does not obstruct sightlines in the yard.
The slat panels attach to the exterior face of the wall framing using two and a half inch screws driven through the slats into the underlying studs. Each slat sits flush against its neighbor with a consistent three-eighths inch gap between them, creating the signature modern aesthetic while permitting adequate ventilation. The entire structure sits on concrete anchor bolts that secure the base to a prepared gravel or concrete pad, preventing shifting during heavy use or adverse weather conditions.
Step-by-Step Instructions
Phase One: Site Preparation and Base Assembly
Clear a level area measuring at least eight feet by four feet near your bin storage location. Lay out the four two by six boards in a rectangle measuring seventy-two inches by thirty-six inches. Pre-drill pilot holes through the overlapping corners and secure with three-inch exterior screws. Attach the four two foot posts to the interior corners of the base using through-bolts and washers for maximum holding power.
Phase Two: Back Wall Construction
Assemble the back wall on a flat surface using two by four studs spaced sixteen inches on center between top and bottom plates. The wall measures seventy-two inches wide by forty-eight inches tall. Pre-drill and screw all joints using three-inch exterior screws. Lift the completed wall into position and temporarily brace it at a ninety-degree angle to the base.
Phase Three: Side Wall Construction
Build both side walls identically, each measuring thirty-six inches wide by forty-eight inches tall with sixteen inch on center stud spacing. Attach each side wall to the base and back wall using three-inch screws driven through the base into the bottom plates. Check for square by measuring diagonals across the assembled corner. Both diagonal measurements must match exactly before proceeding.
Phase Four: Roof Framing
Cut four two by four rafters to a length of twenty-two inches, with birdsmouth notches at the bottom end to sit flush on the top plates. Install two rafters on each side wall, positioning them to meet at the center ridge. Secure each rafter with two three-inch screws at the birdsmouth and two screws at the ridge connection. The resulting roof pitch of approximately thirty degrees provides effective water drainage.
Phase Five: Slant Wall Panel Installation
Measure and cut the two by two slats to a length of forty-eight inches for the back wall and thirty-six inches for the side walls. Begin installing slats on the back wall by positioning the first slat flush with the left edge. Secure each slat with two screws driven into the underlying studs. Use spacers to maintain consistent three-eighths inch gaps between each slat. Repeat the process for both side walls.
Phase Six: Roof Sheathing and Overhang
Cut half-inch exterior plywood to fit between the rafters on both sides of the roof. Secure the sheathing with two and a half inch screws spaced twelve inches apart. Extend the roof sheathing two inches beyond the front edge of the side walls to create a protective overhang that shields the bins from direct rainfall.
Phase Seven: Base Anchoring and Ground Preparation
Position the completed enclosure on a level gravel pad or concrete slab. Mark the bolt hole locations through the base boards and drill into the ground surface. Insert concrete anchors and secure the base with washers and nuts. Apply a perimeter of landscape fabric and decorative gravel around the base to improve drainage and appearance.
Phase Eight: Finishing and Protection
Sand all exposed wood surfaces with eighty-grit sandpaper to remove splinters and rough edges. Apply two coats of exterior-grade wood stain or sealant, allowing full drying time between coats as specified by the manufacturer. Inspect all fastener heads to ensure they are countersunk and flush with the wood surface. Install a magnetic catch or sliding bolt on the front frame if you add an optional gate panel later.
Common Mistakes
Builders often skip the square check during frame assembly, resulting in walls that do not align properly and slat panels that appear uneven. Always measure both diagonals across every corner joint before driving permanent fasteners.
Another frequent error involves using indoor-grade lumber for exterior construction. Pressure-treated wood is essential for all structural members that contact the ground or face weather exposure. Cedar or redwood is acceptable for decorative slats but not for load-bearing components.
Improper gap spacing between slats creates an inconsistent appearance and can trap moisture against the wall surface. Use a dedicated spacer block cut to three-eighths inch thickness to maintain uniform gaps throughout the entire panel installation.
Maintenance and Safety
Inspect the enclosure annually for signs of wood rot, particularly at the base where moisture accumulation is most likely. Replace any compromised boards immediately to maintain structural integrity. Reapply exterior sealant every two years to protect against UV degradation and water penetration.
Wear safety glasses and work gloves during all cutting and fastening operations. Keep the work area clear of tripping hazards and ensure your saw blade guard is functioning properly before making any cuts. Use a stable work surface when assembling wall panels to prevent accidental collapse.
Pro-Tip: Use hot-dipped galvanized or stainless steel fasteners throughout the entire build. Standard zinc-plated screws will corrode within two to three years when exposed to outdoor conditions, leading to loose joints and potential structural failure. The additional cost of corrosion-resistant hardware is minimal compared to the expense of repairing premature deterioration.
Hardware Comparison
| Fastener Type | Corrosion Resistance | Best Application | Cost Level |
|---|---|---|---|
| Galvanized Deck Screws | Moderate | Interior framing joints | Low |
| Hot-Dipped Galvanized Screws | High | Exterior structural connections | Medium |
| Stainless Steel Screws | Excellent | Ground contact and high moisture areas | High |
| Concrete Anchors | High | Base attachment to concrete or gravel | Medium |