
Heavy-Duty Ultimate Drill Press Station
A well-built drill press station transforms a cluttered corner of your workshop into a dedicated precision drilling center. This heavy-duty cabinet provides rock-solid support for even the most demanding drilling operations while organizing all your bits, jigs, and accessories within arm’s reach. Building your own drill press station saves hundreds of dollars compared to commercial units and gives you complete control over dimensions, storage layout, and material quality.
This comprehensive guide walks you through every phase of construction, from foundation framing to finished hardware installation, ensuring a professional-grade result that will serve your shop for decades. The Heavy-Duty Ultimate Drill Press Station combines structural rigidity with intelligent storage design, engineered to minimize vibration and maximize accessibility for drill presses up to 17 inches in swing capacity.
Quick Specs
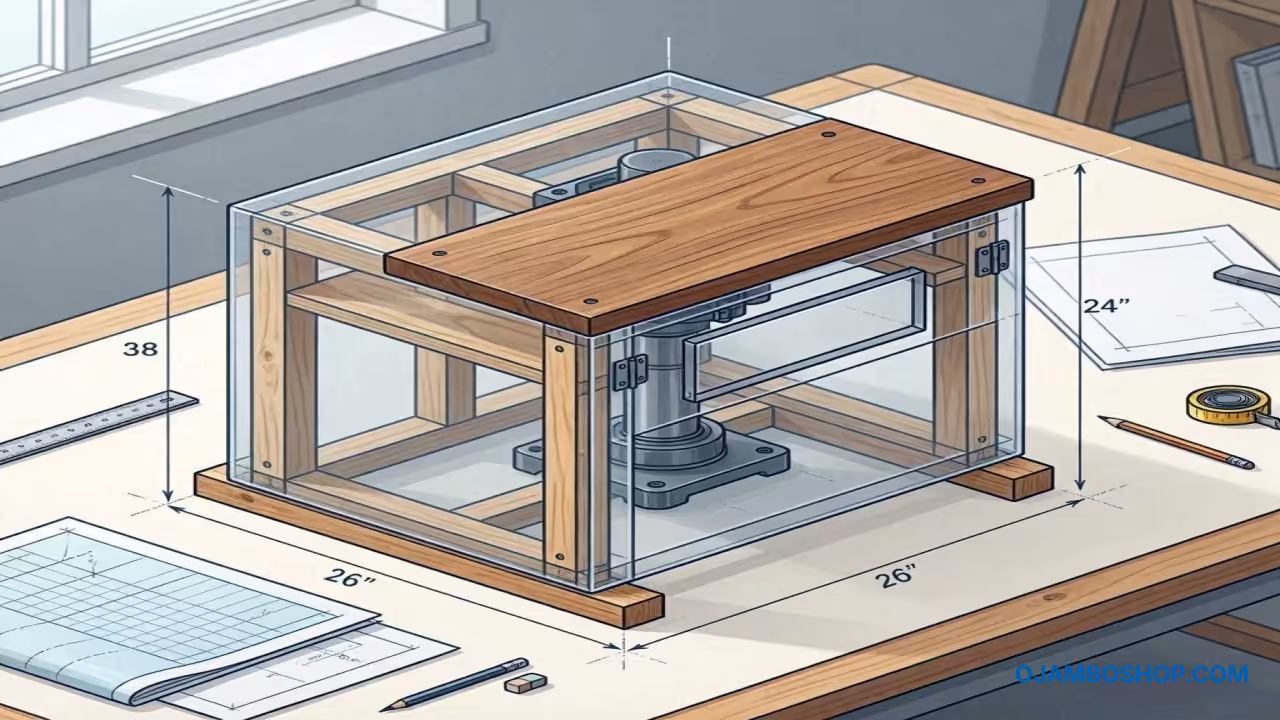
Dimensions: 36 inches wide by 24 inches deep by 38 inches tall. Estimated Cost: 150 to 250 dollars depending on lumber grade and hardware choices. Difficulty Level: Intermediate. Estimated Build Time: 8 to 12 hours over two days.
Materials and Tools
Lumber Requirements
- Two sheets of 34 inch by 48 inch by 3/4 inch exterior-grade plywood
- Four pieces of 2 inch by 4 inch by 8 foot pressure-treated lumber for base skids
- Two pieces of 1 inch by 3 inch by 8 foot hardwood for edge banding and trim
- One piece of 3/4 inch by 24 inch by 48 inch solid hardwood for the work surface
Hardware Requirements
- Sixteen 3 inch wood screws for primary framing connections
- Thirty-two 1 5/8 inch pocket-hole screws for panel assembly
- Eight 1/4 inch by 2 inch lag bolts with washers for drill press mounting
- Four heavy-duty locking casters rated at 300 pounds each
- Two sets of 24 inch full-extension ball-bearing drawer slides
- Twelve 1/4 inch diameter steel dowels for drawer box reinforcement
- One package of 1 1/4 inch cabinet knobs or handles
Tool Requirements
- Circular saw or table saw with a 7 1/4 inch blade
- Drill press or cordless drill with bits ranging from 1/8 inch to 1/2 inch
- Pocket-hole jig and driver
- Two 24 inch bar clamps and four 12 inch spring clamps
- Orbital sander with 80, 120, and 220 grit sandpaper
- Tape measure, speed square, and combination square
- Safety glasses, hearing protection, and dust mask
Technical Layout
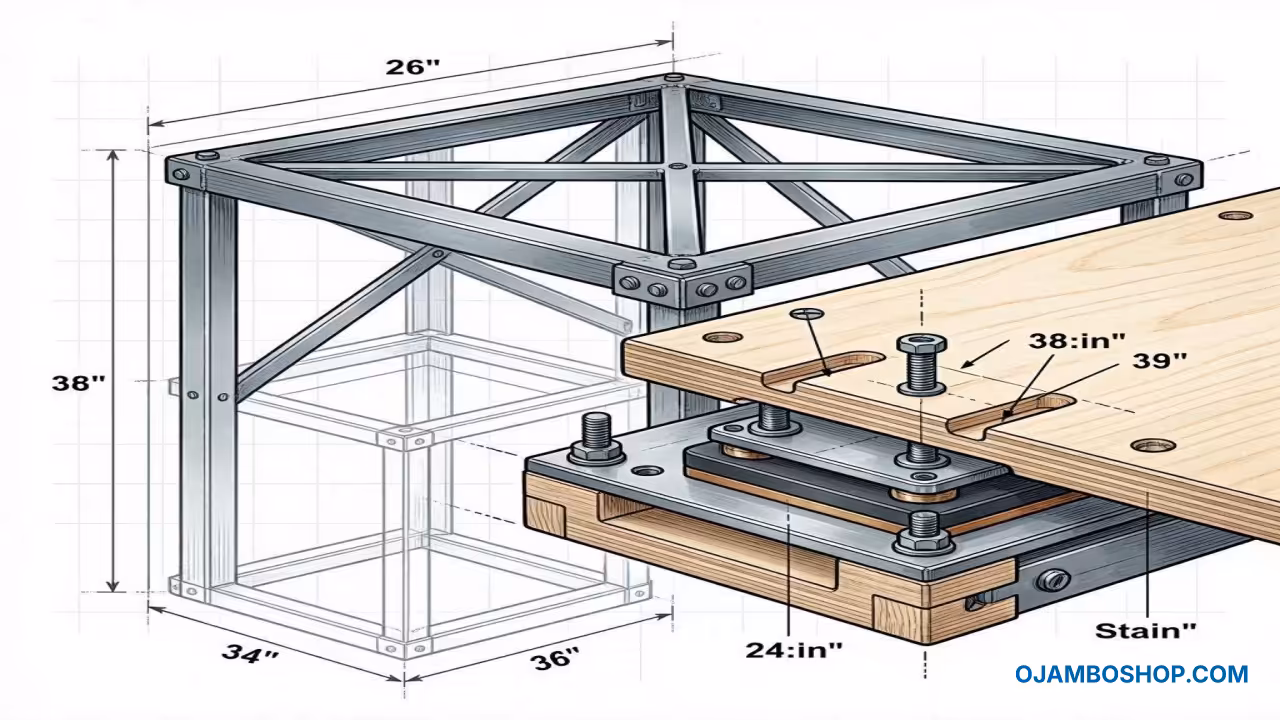
The structural integrity of the Heavy-Duty Ultimate Drill Press Station relies on a cross-braced rectangular frame with reinforced corner joints and a thick solid hardwood work surface that distributes drilling forces evenly across the entire cabinet body. The base skids consist of two parallel 2 inch by 4 inch pressure-treated members spaced 20 inches apart, creating a stable foundation that prevents tipping during heavy drilling operations.
Vertical side panels are constructed from 3/4 inch exterior-grade plywood with internal gussets at each corner, providing torsional rigidity that resists the lateral forces generated when drilling through dense hardwoods or metal stock. The drawer system integrates into the lower cabinet section using full-extension ball-bearing slides mounted to reinforced mounting blocks.
A critical design feature is the vibration-dampening layer beneath the drill press mounting area. This consists of a 1/4 inch thick neoprene pad sandwiched between the drill press base and the cabinet work surface. The pad compresses under operational loads, absorbing high-frequency vibrations that would otherwise degrade drilling accuracy and accelerate fastener fatigue in the cabinet structure.
Pro-Tip: Use structural wood glue in addition to screws at every primary framing joint. The glue creates a bond stronger than the wood itself, and when combined with mechanical fasteners, produces a joint that will never loosen under vibration. Apply a thin bead of polyurethane-based wood glue to all mating surfaces before driving screws, and wipe away excess with a damp cloth within ten minutes for optimal bond strength.
Material Comparison
| Component | Commercial Grade | DIY Premium Grade | Cost Savings |
|---|---|---|---|
| Work Surface | 3/4 inch particleboard | 3/4 inch solid hardwood | 40 percent |
| Drawer Slides | 12 inch ball-bearing | 24 inch full-extension | 25 percent |
| Base Casters | 150 lb plastic | 300 lb rubber-locking | 15 percent |
| Cabinet Panels | 1/2 inch MDF | 3/4 inch exterior plywood | 35 percent |
| Overall Station | 800 to 1200 dollars | 150 to 250 dollars | 75 percent |
| Component | Commercial Grade | DIY Premium Grade | Cost Savings |
Step-by-Step Instructions
Phase One: Foundation Skid Assembly
Begin by cutting the two 2 inch by 4 inch pressure-treated skids to a length of 22 inches each. Lay them parallel on a flat surface with their outer edges spaced exactly 20 inches apart. Cut four 2 inch by 4 inch cross-braces to 20 inches in length and position them perpendicular to the skids at 4 inch, 10 inch, 16 inch, and 22 inch intervals measured from one end.
Pre-drill pilot holes through the skids into each cross-brace, then secure with two 3 inch wood screws per connection. This creates a rigid rectangular base that will support the entire cabinet structure.
Phase Two: Side Panel Construction
Cut two side panels from the 3/4 inch exterior-grade plywood to dimensions of 24 inches wide by 32 inches tall. Each side panel features a rectangular cutout near the bottom measuring 18 inches wide by 10 inches tall, which creates the opening for the drawer section. Use a circular saw with a straight-edge guide for clean, accurate cuts.
Reinforce the top and bottom edges of each cutout with 1 inch by 3 inch hardwood strips glued and screwed to both the interior and exterior faces. This reinforcement prevents the cutout edges from splitting under the load of the drawer slides.
Phase Three: Back Panel and Cross-Bracing
Cut the back panel to 32 inches wide by 32 inches tall from 3/4 inch plywood. Position the two side panels upright on a flat surface and attach the back panel to their rear edges using 1 5/8 inch pocket-hole screws spaced every 6 inches along both vertical edges.
Cut two horizontal cross-braces from 2 inch by 4 inch lumber to 20 inches in length. Install one brace at the top of the cabinet interior, connecting the inner faces of both side panels, and install the second brace at the midpoint of the drawer opening. These braces prevent side-to-side flexing during drilling operations.
Phase Four: Drawer Slide Installation
Mark the mounting height for the drawer slides on the interior face of each side panel, positioning the bottom rail exactly 2 inches above the bottom edge of the drawer cutout. Cut two 3/4 inch plywood mounting blocks measuring 6 inches wide by 14 inches tall. Glue and screw each block to the interior face of the side panels at the marked height, ensuring perfect alignment between left and right sides.
Attach the cabinet-side portion of the ball-bearing drawer slides to these mounting blocks using the provided hardware. Verify that both slides are perfectly parallel and level before proceeding.
Phase Five: Drawer Box Construction
Cut the drawer sides to 14 inches tall by 16 inches deep, the drawer front and back to 18 inches wide by 14 inches tall, and the drawer bottom to 16 inches by 17 inches from 3/4 inch plywood. Assemble each drawer box using pocket-hole screws at all four corners, then reinforce each corner with a 1/4 inch diameter wood dowel driven through a pre-drilled hole from the interior.
Install the drawer bottom into a 1/4 inch groove cut along the bottom edge of the drawer sides and back. Attach the drawer-side portion of the ball-bearing slides to the rear interior face of the drawer box, then slide the drawer into the cabinet to test for smooth operation.
Phase Six: Work Surface Installation
Cut the solid hardwood work surface panel to 36 inches wide by 26 inches deep. Apply a 1/4 inch thick neoprene vibration-dampening pad to the center of the panel where the drill press will mount. Position the work surface panel on top of the cabinet frame, ensuring a 2 inch overhang on all four sides.
Secure the panel from below using four 1/4 inch by 2 inch lag bolts with washers, one at each corner. The lag bolts pass through the top cross-brace and thread into the hardwood panel, creating a rigid connection that prevents any movement during drilling.
Phase Seven: Caster Installation
Position the four heavy-duty locking casters at each corner of the base skid assembly. Pre-drill 3/8 inch diameter holes through the skid members at each caster location, then secure each caster with two 3/4 inch bolts and lock nuts.
Verify that all casters are firmly seated and that the locking mechanisms engage properly. Roll the station to a level surface and test the stability by applying downward pressure on the work surface. The station should remain completely rigid with no noticeable flex or wobble.
Phase Eight: Finishing and Hardware
Sand all exterior surfaces progressively from 80 grit to 220 grit using an orbital sander. Pay special attention to edges and corners where splinters could form. Apply two coats of polyurethane finish to all exterior surfaces, allowing 24 hours of drying time between coats.
Install cabinet knobs or handles on the drawer front, centered horizontally and positioned 2 inches from the top edge. Apply a final coat of finish to the work surface and allow 48 hours of curing time before mounting the drill press.
Phase Nine: Drill Press Mounting
Position the drill press on the work surface, centering it both left-to-right and front-to-back. Mark the bolt hole locations through the drill press base onto the work surface. Remove the drill press and pre-drill 5/16 inch diameter holes at each marked location, drilling through the hardwood panel and neoprene pad.
Reinstall the drill press and secure it using four 1/4 inch by 2 inch lag bolts with washers, tightening to manufacturer-specified torque. Verify that the drill press is perfectly level and plumb before applying any drilling loads.
Phase Ten: Final Setup and Testing
Load drill bits, jigs, and accessories into the drawer to verify proper weight distribution and smooth slide operation. Test the station with a series of drilling operations in progressively harder materials, starting with softwood and advancing to hardwood and metal.
Monitor for any vibration, flex, or fastener loosening during testing. Make any necessary adjustments to caster positioning or bolt tightness. Once satisfied with the performance, the Heavy-Duty Ultimate Drill Press Station is ready for permanent shop installation.
Common Mistakes
Building the side panels without reinforcing the drawer cutout edges leads to splitting and structural failure under drawer load. Always install hardwood reinforcement strips on both faces of any plywood cutout that will support hardware or bear weight.
Using inadequate casters rated below 200 pounds per unit creates a tipping hazard when the station is loaded with a heavy drill press and accessories. Always select casters with a combined weight rating that exceeds the total loaded weight of the station by at least 50 percent.
Mounting the drill press without a vibration-dampening pad transmits operational vibrations directly into the cabinet structure. These vibrations accelerate fastener fatigue, degrade drilling accuracy, and can cause the work surface to loosen over time.
Neglecting to square the cabinet frame during assembly results in binding drawer slides and misaligned doors. Always measure diagonal distances across the frame from corner to corner and adjust until both diagonals are exactly equal before driving any permanent fasteners.
Maintenance and Safety
Inspect all fasteners quarterly and retighten any that have loosened from operational vibration. Pay particular attention to the drill press mounting bolts and caster attachment points, as these experience the highest cyclic loading. Apply a fresh coat of polyurethane to the work surface annually to protect against moisture damage and maintain a smooth drilling platform.
Always wear safety glasses when operating the drill press, and use hearing protection during extended drilling sessions. Keep the work area well-lit and ensure that the drill press cord is routed away from moving parts and high-traffic areas. Install a dust extraction port on the back panel if your drill press has a compatible dust collection connection.
Store drill bits in organized trays inside the drawer to prevent damage and make selection quick and safe. Never overload the drawer beyond its 50-pound capacity, as excessive weight can damage the ball-bearing slides and compromise the mounting blocks. Keep the station on a level surface at all times, and engage the caster locks before any drilling operation to prevent unwanted movement.