
Introduction
Living small does not mean living poorly. This 250 square foot static basecamp brings the freedom of van life into a permanent, code-compliant structure you can actually call home. Imagine waking up to natural light flooding through large windows, brewing coffee on a compact kitchen counter, and stepping outside to a private deck without ever leaving your property.
This structure delivers the minimalist lifestyle without the constant road wear, mechanical failures, or legal parking restrictions that plague traditional van living. The design prioritizes vertical space, multi-functional furniture, and clever storage solutions that make 250 square feet feel twice as large.
Quick Specs
Dimensions: 20 feet wide by 12.5 feet deep by 14 feet tall at the ridge, providing 250 square feet of floor area. Estimated Cost ranges from $18,000 to $25,000 depending on finish level and local material pricing.
Difficulty Level is Intermediate to Advanced, requiring framing experience, roof assembly skills, and basic plumbing or electrical knowledge. Estimated Build Time is 8 to 12 weeks for a solo builder with full-time availability, while a two-person team can complete this in 5 to 7 weeks.
Materials and Tools
Lumber
- 2x4x8 pressure-treated studs: 45 pieces for wall framing
- 2x6x16 pressure-treated rim joists: 6 pieces for floor and foundation
- 2x4x10 rafters: 20 pieces for roof framing
- 4x4x8 pressure-treated posts: 4 pieces for porch supports
- 3/4 inch exterior-grade plywood sheets: 18 sheets for sheathing and subfloor
- 1/2 inch CDX plywood sheets: 12 sheets for roof decking
- 1×4 pine trim boards: 60 linear feet for interior finishing
- 1×6 cedar boards: 80 linear feet for exterior siding
- 5/4×6 cedar decking: 40 linear feet for front porch
Hardware and Fasteners
- 3-inch exterior wood screws: 400 count box
- 2.5-inch deck screws: 200 count box
- 1/2-inch anchor bolts: 12 pieces for foundation connection
- 16d common nails: 2 boxes for framing
- Hurricane ties: 16 pieces for rafter-to-plate connections
- Joist hangers: 10 pieces for floor joist support
- Heavy-duty hinges: 6 pairs for doors and cabinet access
- Cam-lock hardware: 4 sets for removable interior panels
Insulation and Weatherproofing
- R-13 fiberglass batts: 4 packs for wall cavities
- R-30 fiberglass rolls: 2 rolls for ceiling and attic space
- House wrap (Tyvek or equivalent): 1 roll covering 400 sq ft
- 15-pound asphalt building paper: 1 roll for roof underlayment
- 3-inch foam board insulation: 8 sheets for floor substructure
- Exterior-grade silicone caulk: 4 tubes
- Wood preservative stain: 2 gallons
Tools Required
- Circular saw or miter saw for precise cutting
- 20V cordless drill/driver with clutch
- Speed square and 25-foot tape measure
- Level (4-foot torpedo and 2-foot box beam)
- Hammer and rubber mallet
- Chalk line and framing square
- Staple gun for house wrap and insulation
- Ladder (8-foot extension minimum)
- Safety glasses, hearing protection, and work gloves
Technical Layout
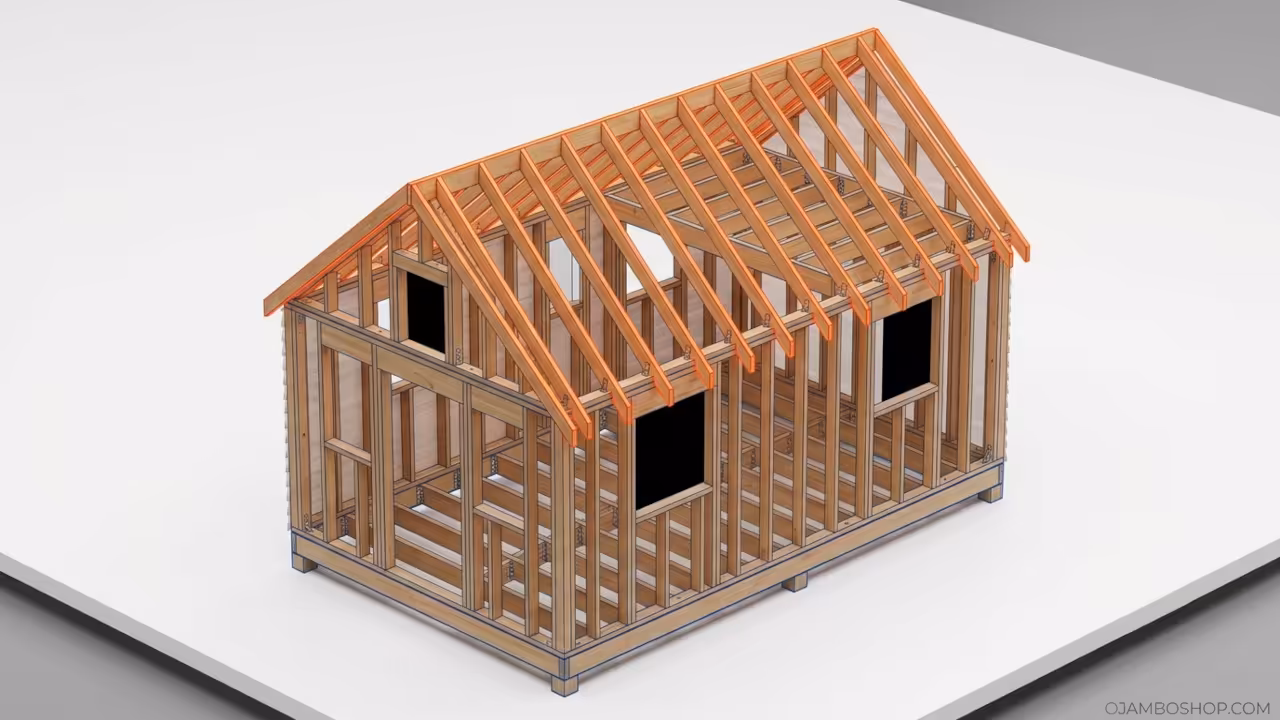
The structural framework of the Van-Life Static Basecamp relies on a post-and-beam hybrid system that distributes load efficiently while maximizing interior openness. The foundation consists of two parallel 4×4 pressure-treated skids, each 12 feet long, embedded 12 inches below grade and connected by three 2×6 cross-braces spaced at 4-foot intervals.
Vertical walls rise from the skids using 2×4 studs spaced at 16 inches on center, with double top plates running the full 20-foot width. The front wall features a 6-foot-wide rough opening for the entry door and a 4-foot-by-4-foot window opening, while the rear wall contains two 3-foot-by-3-foot windows for cross-ventilation.
The roof system uses a gable configuration with a 6-on-12 pitch, meaning the ridge rises 6 inches for every 12 inches of horizontal run. This creates a peak height of 14 feet from the ground, providing ample headroom in the main living area while allowing the loft space to sit comfortably above the rear bathroom zone.
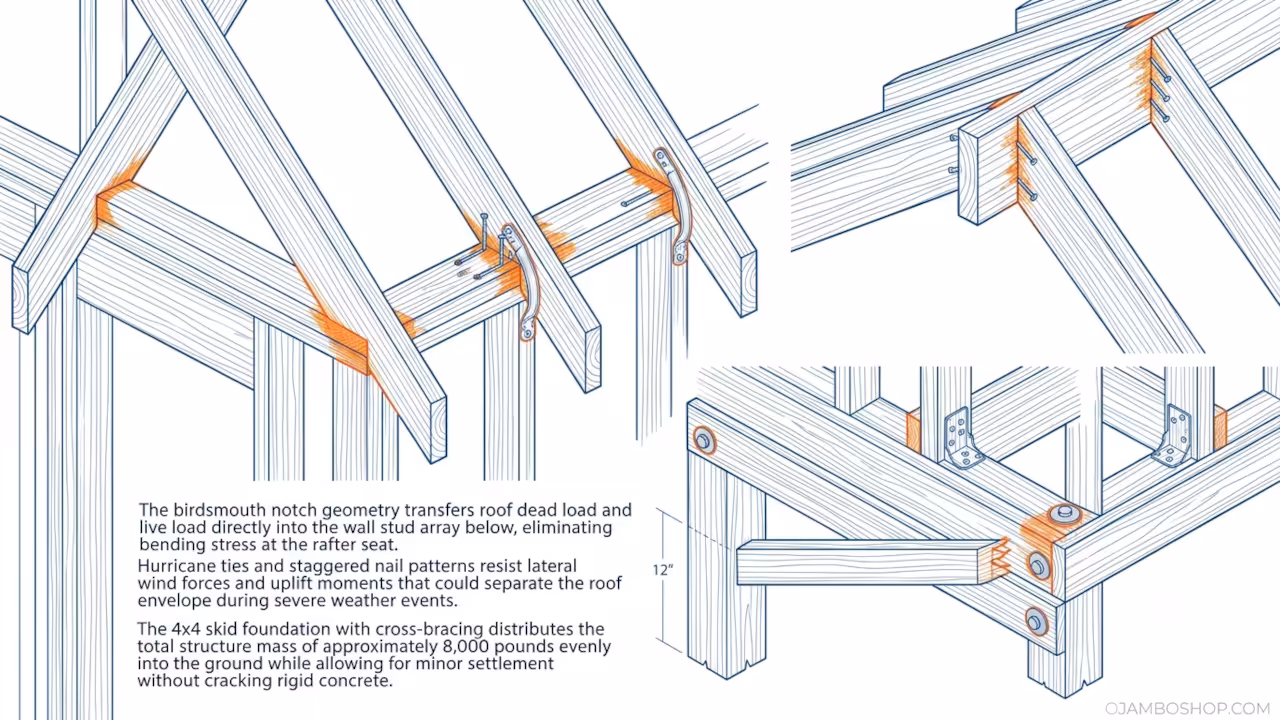
Rafters are 2x4s cut with birdsmouth notches that hook onto the top plate, transferring roof load directly into the wall studs below. The ridge board runs the full 12.5-foot depth, tying opposing rafters together and maintaining structural rigidity during high-wind events.
Pro-Tip: Use 16d galvanized nails in a staggered pattern when nailing rafters to the ridge board. This prevents splitting the lumber and creates a stronger connection than screws alone. Additionally, install metal hurricane ties at every rafter-to-plate intersection to resist uplift forces during severe weather.
Step-by-Step Instructions
Phase 1: Site Preparation and Skid Foundation
Clear a 24-foot by 16-foot area of vegetation, rocks, and debris. Use a rotary laser level to establish a perfectly level grade, then dig two parallel trenches 12 inches deep and 14 inches wide, spaced 12 feet apart center-to-center. Compact the trench bottoms with a plate compactor or hand tamper.
Lay the 4×4 pressure-treated skids into the trenches, verify level in both directions, and backfill with crushed stone for drainage. Install three 2×6 cross-braces perpendicular to the skids, fastening with 1/2-inch carriage bolts and washers. Anchor each skid end with 1/2-inch anchor bolts driven into concrete piers set below the frost line.
Phase 2: Floor System Assembly
Install 2×6 floor joists at 16 inches on center across the skids, securing each with joist hangers fastened to the skid tops with 10d nails. Leave the front 4 feet open for the porch extension. Nail 3/4-inch exterior plywood subfloor sheets perpendicular to the joists, staggering seams and leaving 1/8-inch gaps between panels for expansion.
Screw down with 2.5-inch deck screws at 6-inch intervals along edges and 10-inch intervals in the field. Install 3-inch foam board insulation between joists, then cover with 15-pound building paper stapled to the subfloor underside.
Phase 3: Wall Framing and Erection
Lay out wall frames flat on the subfloor, starting with the two 20-foot side walls. Cut 2×4 studs to 8 feet for standard height, spacing them at 16 inches on center between bottom and top plates. Frame rough openings for windows and doors using king studs, jack studs, and headers sized to span the opening width.
Pre-assemble each wall section, square it using diagonal measurements, and brace temporarily with 2×4 scraps. Lift walls into position, plumb each stud with a level, and nail to the subfloor through the bottom plate. Connect walls at corners with overlapping plates and toenailing.
Phase 4: Roof Framing and Ridge Installation
Calculate rafter length using the Pythagorean theorem: for a 10-foot run and 5-foot rise, the rafter measures approximately 11 feet 2 inches. Cut birdsmouth notches 1.5 inches deep and 3.5 inches wide into the bottom of each rafter to seat on the top plate. Install the 2×4 ridge board at the calculated peak height, supported by temporary king posts during assembly.
Raise rafters one at a time, nailing to the ridge with 16d nails and to the top plate with three 16d toenails per rafter. Install hurricane ties at each connection point. Add 2×4 ceiling joists at the bottom plate level to tie opposing walls together and prevent spreading.
Phase 5: Sheathing and Weatherproofing
Cover all exterior walls with 1/2-inch CDX plywood or 7/16-inch OSB sheathing, nailing at 6-inch intervals along edges and 12-inch intervals in the field. Wrap the entire structure in house wrap, overlapping seams by 6 inches and taping with manufacturer-approved seam tape.
Flash all window and door openings with self-adhering membrane flashing, extending 4 inches up the sides and 6 inches across the top. Install roof decking using 1/2-inch CDX plywood, nailing at 6-inch intervals. Apply 15-pound asphalt underlayment over the decking, starting at the eave and rolling upward with 4-inch overlaps.
Phase 6: Exterior Siding and Roofing
Install 1×6 cedar siding starting from the bottom course, leaving 1/8-inch gaps between boards for drainage and expansion. Nail each board with 2.5-inch galvanized nails at each stud location. Add 1×4 trim around all window and door openings, caulking the back side before nailing.
Install asphalt architectural shingles on the roof, starting with a drip edge at the eaves and ridge. Follow manufacturer spacing guidelines for nail placement and exposure. Add metal flashing at the ridge and valley intersections for waterproofing.
Phase 7: Interior Framing and Insulation
Frame the interior bathroom partition using 2×4 studs at 16 inches on center, creating a 5-foot by 4-foot enclosure in the rear corner. Install a 2×6 header above the bathroom door opening. Build the loft platform using 2×6 joists spanning the 12.5-foot width, supported by 4×4 posts at each corner and a central jack post.
Nail 3/4-inch plywood decking to the loft joists. Install R-13 fiberglass batts in all exterior wall cavities and R-30 rolls in the ceiling space. Add a vapor barrier facing the interior on all insulation.
Phase 8: Interior Finishing and Fixtures
Hang 1/2-inch drywall on interior walls, screwing at 12-inch intervals along studs. Tape, mud, and sand seams smooth. Paint walls with low-VOC interior paint in a light neutral tone to maximize perceived space.
Install shiplap or beadboard paneling in the bathroom for moisture resistance. Mount floating shelves, fold-down table hardware, and hidden storage compartments using cam-lock systems for easy disassembly. Install LED strip lighting under the loft deck and along baseboards for ambient illumination. Add a compact composting toilet, sink with greywater tank, and propane or electric cooktop in the kitchen zone.
Common Mistakes
Failing to properly level the skid foundation is the most critical error. Even a 1/4-inch deviation across the 20-foot width will cause doors to bind, windows to leak, and floors to slope noticeably. Always use a rotary laser level and verify measurements before pouring concrete piers or setting anchor bolts.
Another frequent mistake is under-insulating the floor assembly. The ground acts as a massive heat sink, and without 3-inch foam board insulation beneath the subfloor, the interior will feel cold and drafty even with well-insulated walls. Builders often skip this step to save money, but it drastically increases heating costs and reduces comfort.
Poor roof flashing installation leads to water intrusion that can rot the structure from the inside out. Install self-adhering membrane flashing behind all siding and roofing materials at every penetration, including windows, doors, and vent pipes. Do not rely on caulk alone, as it deteriorates within 3 to 5 years under UV exposure.
Many builders forget to plan for electrical and plumbing rough-ins before closing up walls. Running conduit and pipes through finished drywall is expensive, messy, and often violates building codes. Complete all rough-in work during Phase 7 before hanging drywall or installing interior paneling.
Maintenance and Safety
Inspect the foundation skids annually for rot, insect damage, or settlement. Replace any compromised 4×4 posts immediately, as structural failure at the foundation level can collapse the entire building. Apply a fresh coat of wood preservative stain to all exterior cedar siding every 3 to 5 years to maintain moisture resistance and UV protection.
Clean roof gutters and downspouts twice yearly to prevent water backup under the siding or foundation. Check all window and door flashing seals annually, recaulking any cracked or separated joints with exterior-grade silicone. Inspect the roof shingles for curling, cracking, or missing pieces after severe weather events.
Wear safety glasses, hearing protection, and a dust mask when cutting lumber, driving fasteners, or sanding drywall. Use a stable ladder with a spotter when working on the roof or loft platform. Keep a first-aid kit and fire extinguisher accessible on site at all times.
For winter climates, insulate all plumbing lines with foam pipe wraps and install heat tape behind walls containing water supply lines. Use a dehumidifier set to 45 percent relative humidity to prevent condensation buildup inside wall cavities, which can lead to mold growth within 48 hours of moisture intrusion.