
The octagonal tea house represents the pinnacle of backyard architectural elegance and functional design. This structure serves as a dedicated space for meditation, social gatherings, or quiet reflection away from the main residence.
Adding an Eastern-style pavilion increases your property value by creating a distinct focal point in the landscape. It blends the structural complexity of a gazebo with the enclosed comfort of a small outdoor room.
Building an eight-sided structure requires precision and a solid understanding of geometry and joinery. This guide provides the technical foundation needed to execute this project with professional-grade results and long-term durability.
Quick Specs
Overall Dimensions: 12 Feet Diameter (Point to Point)
Estimated Cost: 3,500 to 5,200 USD depending on lumber grade
Difficulty Level: Advanced DIY / Intermediate Professional
Estimated Build Time: 4 to 6 Full Days (2-person crew recommended)
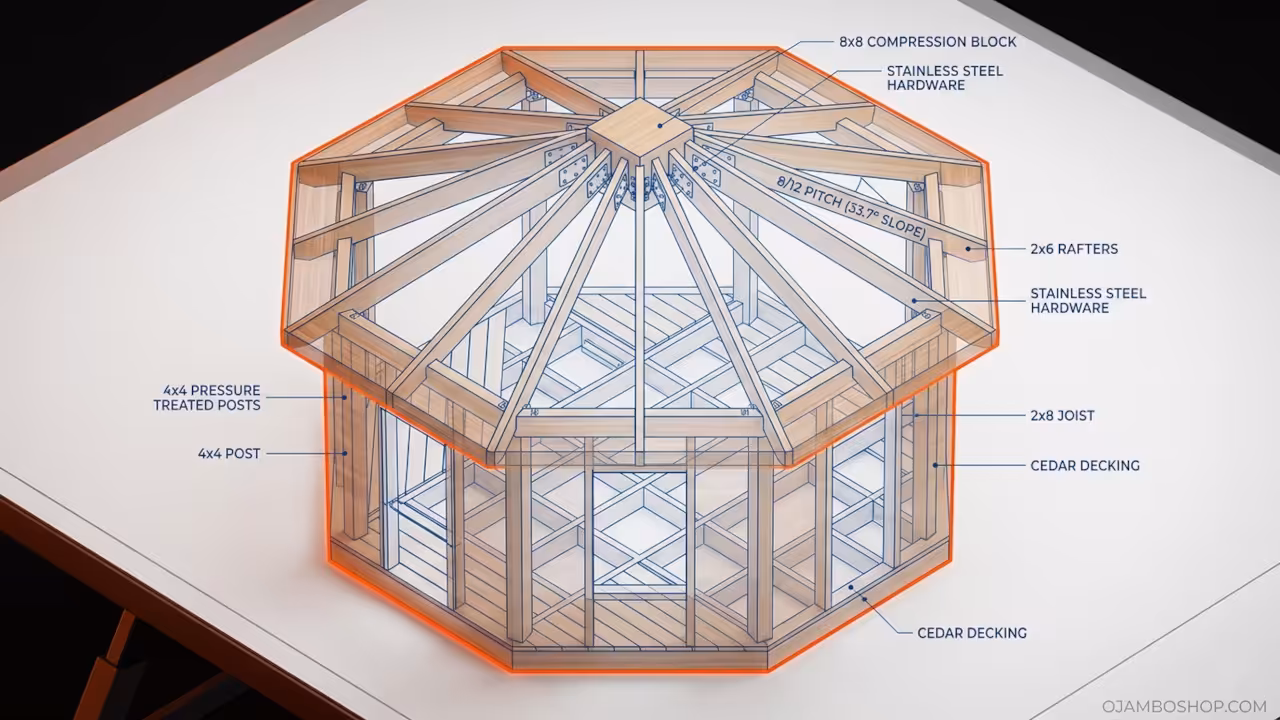
Roof Pitch: 8/12 Slope
Materials and Tools
The foundation requires sixteen 80-pound bags of high-strength concrete mix and eight adjustable 4×4 post bases. You will also need thirty-two pieces of 1/2-inch by 10-inch anchor bolts for securing the base to the footings.
For the primary framing, procure twenty-four 4x4x10 pressure-treated posts and sixteen 2x8x12 pressure-treated joists. The decking and interior finish should utilize cedar or redwood for natural rot resistance and aesthetic appeal.
Hardware requirements include 5-pound boxes of 3-inch stainless steel deck screws and 2-inch galvanized finish nails. You will also need specialized hurricane ties and rafter clips to ensure the roof remains stable during high wind events.
The tool list includes a high-torque miter saw capable of 22.5-degree cuts and a circular saw with a framing blade. A pneumatic framing nailer, a 4-foot level, a chalk line, and a laser level will ensure the structure is perfectly plumb.
Technical Layout
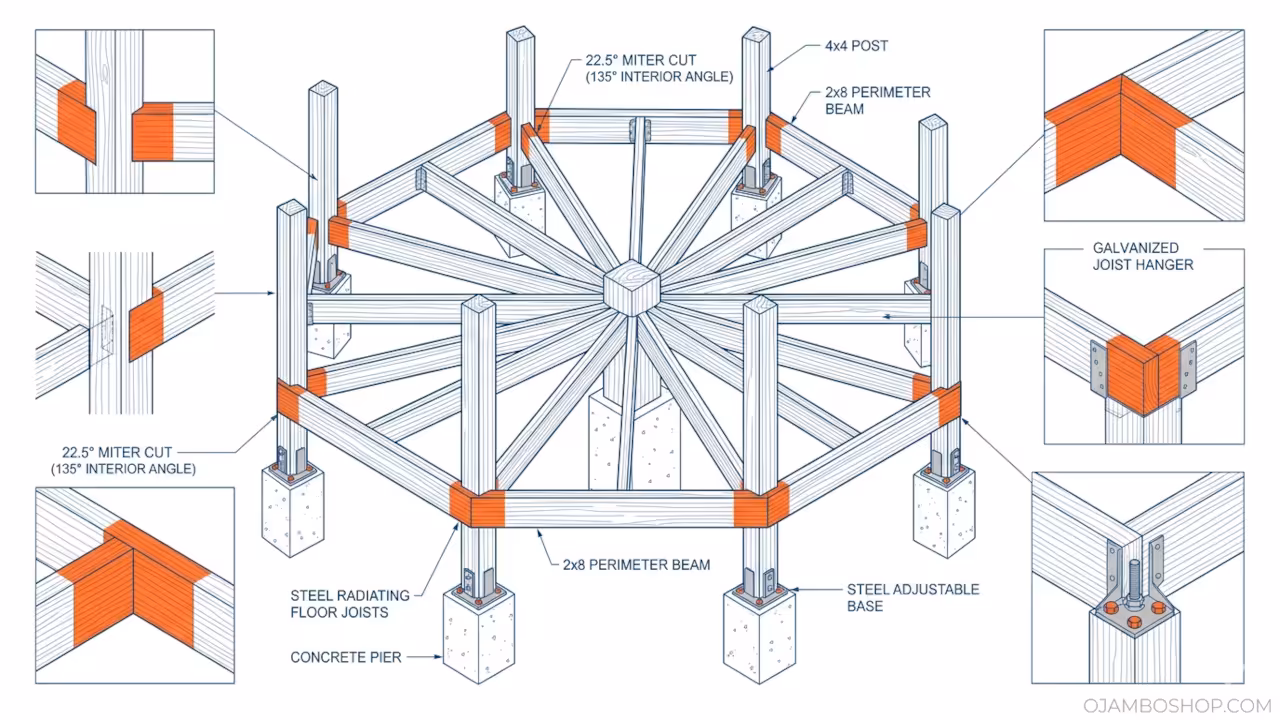
The structural integrity of an octagonal tea house relies entirely on the precision of the base geometry and the central compression ring. Unlike a square structure where loads are distributed across four corners, an octagon distributes weight across eight points. This creates a circular load path that is exceptionally stable but requires all eight sides to be exactly equal in length. Each perimeter beam must be cut at a 22.5-degree angle to create the 135-degree interior angles required for a perfect octagon.
The floor joists should radiate from a central hub or follow a girder system that supports the 4×4 posts at each vertex. For the roof, a central compression block is the most critical component. This block acts as the mechanical “keystone” where all eight common rafters meet. Without this block, the roof would rely on complex compound miter joints that are prone to splaying under snow loads. By using a solid 6×6 or 8×8 wooden block for the peak, you create a surface area large enough to securely fasten every rafter head.
Step-by-Step Instructions
Phase 1: Site Preparation and Foundation Layout
Start by clearing a 16-foot circular area and leveling the ground completely. Use the 3-4-5 triangulation method to find your center point, then use a string line to mark the eight vertices of the octagon exactly 6 feet from the center. Dig holes at each vertex to a depth of 24 inches or below your local frost line.
Phase 2: Pouring Footings and Setting Anchors
Fill each hole with concrete and use a cardboard tube form for a clean finish above the grade. While the concrete is wet, set your adjustable post bases using a string line to ensure they are perfectly aligned with one another. Allow the concrete to cure for at least 48 hours before you attempt to bolt the posts into place.
Phase 3: Vertical Post Installation and Plumb Alignment
Cut eight 4×4 posts to a height of 8 feet, ensuring the ends are perfectly square. Bolt them into the bases and use temporary 2×4 bracing to hold them in a perfectly vertical position. Check every post with a 4-foot level on two adjacent sides to guarantee they do not lean toward the center or outward.
Phase 4: Perimeter Beam and Floor Joist Framing
Install 2×8 pressure-treated beams between the posts to create the octagonal outer rim. Cut each beam end at 22.5 degrees so they meet flush in the center of each post face. Install the interior floor joists 16 inches on center, spanning from the outer rim to a central double-girder for maximum floor stiffness.
Phase 5: Subflooring and Decking Installation
Lay your cedar or composite decking boards across the joists, starting from the outer edge and working toward the center. Leave a 1/8-inch gap between boards to allow for drainage and wood expansion. Trim the overhanging edges with a circular saw to match the octagonal perimeter perfectly once all boards are fastened.
Phase 6: Header Beam and Wall Support
Install 4×4 header beams across the top of the posts to tie the vertical structure together. These headers should be fastened using 6-inch structural screws driven through the top of the beam into the post. This creates a rigid “ring” that prevents the posts from spreading when the weight of the roof is applied.
Phase 7: The Rafter and Compression Block System
Cut your central compression block from an 8×8 post, creating eight flat faces. Cut eight primary rafters with a 33.7-degree plumb cut at the top and a birdsmouth notch where they meet the headers. Secure the rafters to the compression block first on the ground, then lift the assembly into place with a helper or a temporary center support pole.
Phase 8: Roof Sheathing and Shingle Application
Cover the rafters with 5/8-inch exterior grade plywood, cutting each triangular segment to fit the center of the rafters. Install a drip edge around the entire perimeter and apply a layer of synthetic underlayment. Lay your shingles or cedar shakes starting from the bottom, finishing each of the eight hips with a matching cap shingle.
Phase 9: Door and Window Trim
If your tea house design includes screened sections or windows, install the 2×4 framing for these openings now. Use cedar trim to hide the gaps between the framing and the main posts for a professional look. Ensure all sills are sloped slightly outward to prevent water from pooling against the wood.
Phase 10: Final Sanding and Protective Coating
Sand all visible surfaces with 80-grit then 120-grit sandpaper to remove any manufacturer stamps or splinters. Apply a high-quality UV-resistant wood sealer or semi-transparent stain to protect the cedar from graying. Pay extra attention to the end grain of the posts and the bottom of the door frame where moisture sits longest.
Hardware and Material Comparison
| Item | Standard Option | Professional/Coastal Option | Purpose |
|---|---|---|---|
| Post Bases | Galvanized Steel | 316 Stainless Steel | Prevents ground-contact rot |
| Fasteners | Polycoated | Stainless Steel Screws | Resists wood tannin corrosion |
| Roof Decking | 1/2-inch OSB | 5/8-inch CDX Plywood | Provides better moisture resistance |
| Wood Sealer | Water-based Acrylic | Oil-based Penetrating Stain | Depth of protection and longevity |
Common Mistakes
The most frequent error in octagonal construction is failing to verify the diagonal measurements of the base. Even a 1/4-inch deviation at the foundation will result in a roof that does not align at the peak. Always measure from post one to post five, then post two to post six, ensuring all four major diameters are identical.
Another mistake is using standard exterior nails for cedar or redwood components. These woods contain natural acids that react with galvanized coatings, causing ugly black streaks known as “bleeding.” Always invest in 304 or 316-grade stainless steel fasteners to maintain the visual integrity of the Eastern-style woodwork.
Builders often forget to account for the weight of the roof when choosing the post-to-beam connection. Relying solely on toe-nailing will lead to structural failure over time as the wood dries and shrinks. Use structural timber screws or hidden steel plates to ensure the roof is mechanically locked to the vertical supports.
Maintenance and Safety
Maintaining your tea house requires a seasonal inspection of the roof hips and the foundation points. Check for any signs of wood-boring insects or carpenter bees, which are particularly attracted to the soft fibers of cedar. Apply a fresh coat of oil-based sealer every 24 to 36 months to keep the wood supple and water-repellent.
Pro-Tip: For maximum structural longevity, install a 1/4-inch EPDM rubber shim between the concrete pier and the wooden post base. This creates a capillary break that prevents moisture from wicking up into the end grain of the post. This simple step can add ten years to the life of your structure by preventing internal heartwood rot.
Always wear wrap-around safety glasses when using a miter saw, especially when performing the 22.5-degree compound cuts. Ensure you have a stable ladder or scaffolding when installing the compression ring, as this is the most dangerous phase of the build. Never work alone during the roof framing process, as the weight of the rafters requires a second person to steady the central block.