
The evolution of modern residential landscaping has shifted toward maximizing utility within increasingly smaller footprints. A tiered vertical garden planter offers the perfect intersection of architectural elegance and agricultural efficiency for the contemporary homeowner.
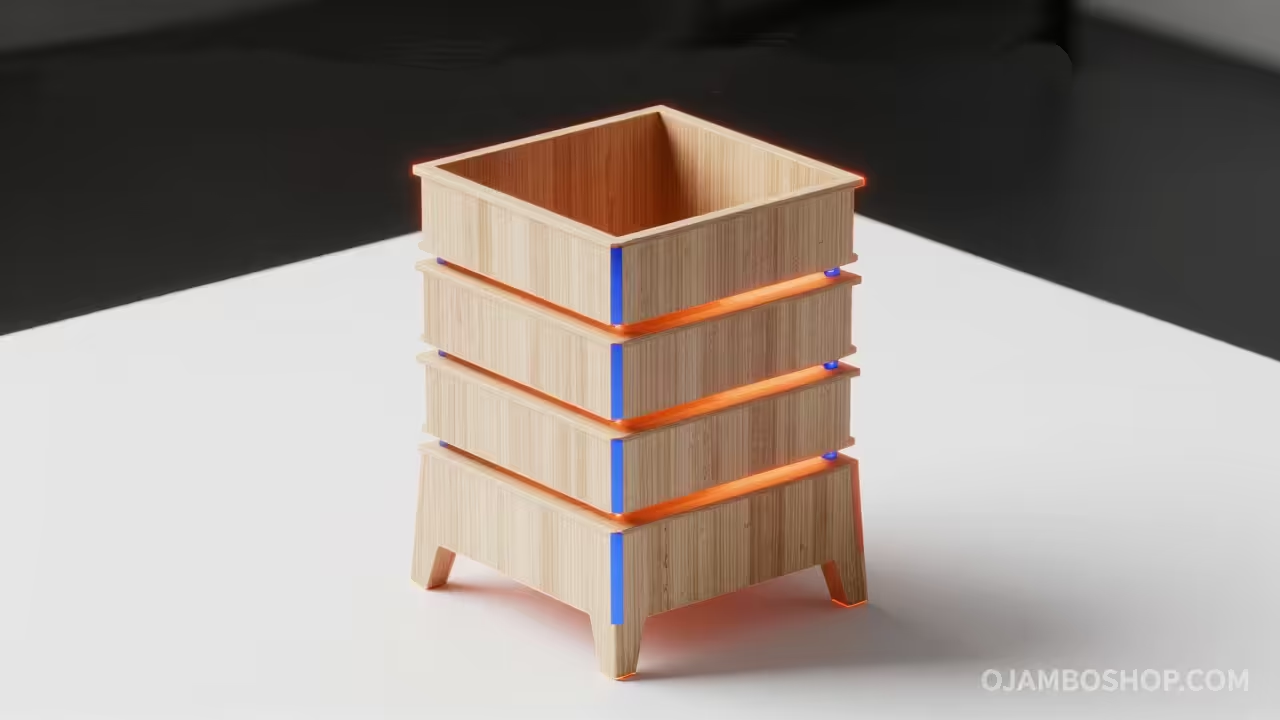
By elevating the growing surface, you effectively quadruple your planting area without sacrificing precious patio or balcony floor space. This project is specifically engineered to provide a robust, self-supporting structure that thrives in varied climate conditions while remaining aesthetically pleasing.
As a master carpenter, I have designed this particular unit to prioritize structural rigidity and soil weight distribution. We will focus on creating a stable A-frame foundation that ensures your greens remain healthy and your investment remains standing for years to come.
Quick Specs
Overall Dimensions: 48 inches Wide x 60 inches High x 32 inches Deep
Estimated Cost: 120 to 180 Dollars depending on lumber species
Difficulty Level: Intermediate
Estimated Build Time: 6 to 8 Hours
Materials and Tools
Lumber List:
Six 2×4 x 8-foot pressure-treated or cedar boards for the main A-frame and support legs.
Five 1×8 x 8-foot cedar or redwood boards for the planter boxes and end caps.
Two 2×2 x 8-foot balusters for interior box cleats and structural bracing.
Hardware List:
One 5-pound box of 2.5-inch exterior-grade structural wood screws with ceramic coating.
One 1-pound box of 1.25-inch stainless steel trim screws for the planter box assemblies.
One roll of 6-mil polyethylene plastic liner or heavy-duty landscape fabric for moisture barriers.
One bottle of waterproof Titebond III wood glue for all critical joinery intersections.
Required Tools:
Miter saw or circular saw with a high-tooth count finishing blade.
Cordless drill and impact driver set with appropriate driver bits.
Speed square and a 4-foot level for ensuring perfect vertical and horizontal alignment.
Pneumatic brad nailer with 1.5-inch galvanized nails for temporary tacking and trim work.
Measuring tape and a carpenter pencil for high-precision layout markings.
Technical Layout
The structural integrity of a vertical planter relies entirely on the geometry of the side supports and the transfer of live loads. Because wet soil is exceptionally heavy, weighing approximately 100 pounds per cubic foot, the A-frame must be pitched at a specific 15-degree angle. This angle creates a wide enough center of gravity to prevent tipping while allowing each subsequent tier to receive unobstructed overhead sunlight.
We utilize a notched housing strategy where the horizontal planter supports are inset into the primary 2×4 legs to prevent fastener shear. By transferring the weight of the boxes directly onto the wood grain of the legs rather than relying solely on the tensile strength of the screws, we increase the load capacity by nearly 300 percent. The base of the unit features a horizontal spreader bar that locks the two A-frames together, creating a rigid chassis that resists racking and lateral movement during high wind events or soil shifting.
| Hardware Type | Coating/Material | Best Use Case | Longevity Rating |
|---|---|---|---|
| Zinc Plated | Yellow Zinc | Interior framing only | Low |
| Galvanized | Hot-Dipped | Exterior rough framing | Medium |
| Ceramic Coated | Green/Tan Polymer | Decking and planters | High |
| Stainless Steel | 304 or 316 Grade | Coastal or cedar builds | Maximum |
Step-by-Step Instructions
Phase 1: Cutting the A-Frame Legs
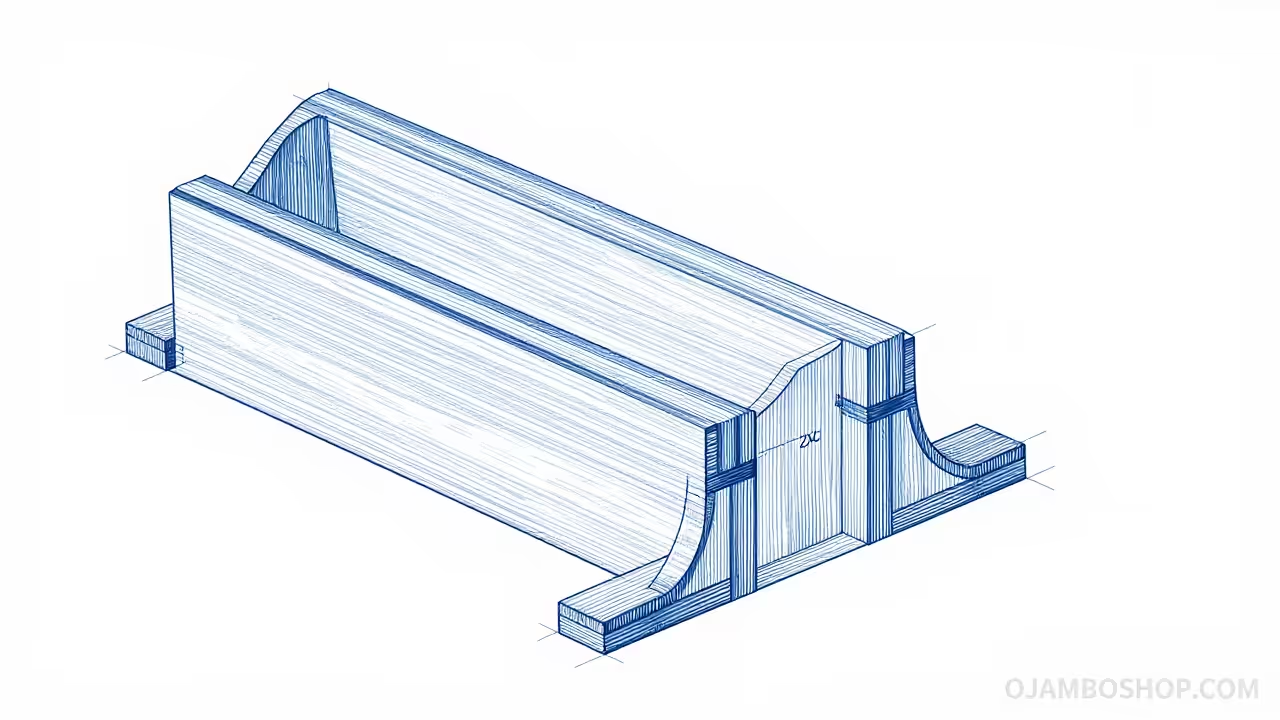
Begin by cutting four 2×4 boards to 62 inches in length with a 15-degree miter cut on both ends. Ensure these cuts are parallel so the legs sit flush on the ground while the top remains level. Lay two legs on your workbench to form a V-shape and verify that the total height reaches your 60-inch target. These legs form the primary skeleton of the garden and must be identical to ensure the finished planter does not wobble.
Phase 2: Preparing the Horizontal Support Cleats
Cut ten 2×2 cleats to 8 inches in length, which will serve as the mounting points for each of the five planter tiers. These cleats must be installed at 12-inch intervals starting from 10 inches above the ground. Use your speed square to ensure each cleat is perfectly perpendicular to the vertical axis of the unit. Apply a bead of waterproof wood glue to the back of each cleat before securing them with two 2.5-inch structural screws.
Phase 3: Assembling the Side Frames
Join the tops of the A-frame legs using a 2×4 header block cut at 3.5 inches wide. This block acts as the keystone for the structure and provides a flat surface for the top tier to rest against. Drive three screws through the outside of the legs and into the header block for a secure connection. Repeat this entire process for the second side frame so you have two identical mirrored assemblies ready for the horizontal boxes.
Phase 4: Fabricating the Planter Boxes
Cut your 1×8 cedar boards into five 48-inch lengths for the box fronts and five 48-inch lengths for the box backs. You will also need ten 1×8 end caps cut to 7.25 inches to match the internal width of the box. Assemble the boxes using a simple butt joint reinforced with wood glue and 1.25-inch stainless steel screws. Pre-drill every hole to prevent the cedar from splitting, especially near the end grain of the boards.
Phase 5: Installing the Bottom Panels
Measure the internal dimensions of your assembled box frames and cut the 1×8 bottom panels to fit snugly inside. It is vital to drill 0.5-inch drainage holes every 6 inches along the center of these bottom panels. Without proper drainage, the wood will rot prematurely and the plant roots will drown in stagnant water. Secure the bottom panels by driving screws through the side walls and into the edges of the floor boards.
Phase 6: Mounting the Tiers to the Frame
Position the first side frame upright and have an assistant hold it while you align the bottom planter box with the lowest cleats. Drive 2.5-inch screws through the inside of the planter box and into the 2×2 cleats and the 2×4 legs. Work your way from the bottom to the top, installing each subsequent box with a 2-inch setback from the tier below it. This staggered arrangement ensures that water runoff from the top box does not wash away the soil in the boxes underneath.
Phase 7: Structural Bracing and Stability
Once all five boxes are mounted, install a 2×4 spreader bar across the back of the legs at the base. This bar should be 48 inches long to match the width of the boxes and will prevent the legs from splaying outward under pressure. Check the entire unit for level and plumb, making minor adjustments by shimming the legs if your workspace was not perfectly flat. Tighten all fasteners one final time to ensure the unit is rigid and does not sway when pushed.
Phase 8: Installing the Moisture Barrier
Cut the polyethylene liner or landscape fabric into strips that are wide enough to cover the interior of each planter box. Staple the material to the top inside edges of the boxes, ensuring there is enough slack for the weight of the soil to press the liner against the wood. Use a utility knife to poke holes through the liner that align with the drainage holes you drilled in the wooden bottom panels. This step is the single most important factor in extending the life of your wooden planter.
Phase 9: Sanding and Surface Preparation
Use a random orbital sander with 80-grit sandpaper to remove any stamps, splinters, or rough edges from the exterior surfaces. Graduate to 120-grit sandpaper for a smoother finish that will accept stain or sealant more effectively. Pay close attention to the corners of the planter boxes where users are likely to brush against the wood while gardening. Wipe the entire structure down with a tack cloth or a damp rag to remove all sawdust before moving to the finishing stage.
Phase 10: Applying the Protective Finish
Select a food-safe exterior stain or a clear UV-protective sealant to preserve the natural color of the wood. Apply the finish using a high-quality brush, working with the grain of the wood and ensuring all end grain is heavily saturated. Allow the first coat to dry for at least four hours before applying a second coat for maximum weather resistance. Let the entire unit cure for 48 hours in a dry environment before adding soil or plants.
Common Mistakes
The most frequent error I see is the use of standard interior-grade screws which will corrode and snap within a single season. Always insist on stainless steel or high-quality ceramic-coated fasteners that are rated for pressure-treated lumber and constant moisture exposure.
Many builders forget to account for the weight of wet soil and fail to pre-drill their pilot holes in the cedar boxes. This leads to immediate splitting of the wood grain which compromises the structural integrity and creates pathways for rot to enter the boards.
Another common oversight is skipping the moisture barrier or using a plastic that does not allow for proper drainage at the bottom. Stagnant water trapped between the liner and the wood will accelerate decay and can lead to fungal growth that harms your vegetables or flowers.
Maintenance and Safety
Pro-Tip: For maximum longevity, apply a bead of exterior-grade silicone caulk to the top edge of the 2×2 cleats before mounting the boxes. This creates a secondary gasket that prevents water from seeping into the joint between the cleat and the leg, which is the most common failure point for tiered structures.
Always wear a high-quality dust mask and safety glasses when cutting pressure-treated lumber, as the chemical treatments can be harmful if inhaled. Keep your workspace clean and ensure your miter saw is properly secured to a bench to prevent kickback during angled cuts.
Inspect your planter every spring for loose screws or signs of wood soft-spots that may indicate the need for a fresh coat of sealant. If you live in a climate with harsh winters, consider emptying the soil and moving the unit into a shed or covering it with a waterproof tarp to prevent ice expansion damage.
Consistent maintenance will ensure that your tiered vertical garden remains a centerpiece of your property for a decade or more. This build provides the perfect foundation for a sustainable home garden while demonstrating the precision and quality of professional carpentry.