
The shift toward intentional living has transformed the way families perceive the traditional home. A dual loft tiny house built on a 28ft trailer offers a unique blend of mobility and permanent structural integrity. This project represents more than just a shelter; it is a sophisticated engineering feat that maximizes vertical space without sacrificing the comforts of a standard residential build.
By utilizing a dual loft configuration, you effectively double the usable sleeping area while maintaining a spacious central living zone. This design is particularly valuable for families or those seeking a dedicated home office away from the primary suite. Investing your time into a high quality build significantly increases property value and provides a sustainable alternative to high interest mortgages.
Constructing your own home allows for total control over material quality and insulation standards. This guide provides the technical foundation needed to transition from a raw trailer chassis to a fully dried in, weather resistant structure. We will focus on the critical balance between weight distribution and structural rigidity to ensure your home is safe for both highway travel and long term stationary use.
Quick Specs
Dimensions: 28ft Length x 8.5ft Width x 13.5ft Height
Estimated Cost: $35,000 to $55,000 depending on finishes
Difficulty Level: Advanced DIY / Professional Lead
Estimated Build Time: 600 to 800 Man-Hours
Materials and Tools
Building a mobile structure requires a specific selection of lightweight yet durable lumber and fasteners. We recommend using Kiln Dried Douglas Fir for all structural framing members due to its superior strength to weight ratio. For the exterior envelope, a combination of CDX plywood and a high quality synthetic house wrap is essential for moisture management.
| Material Category | Item Specification | Quantity Estimate |
|---|---|---|
| Framing Lumber | 2×4 x 92-5/8 Pre-cut Studs | 140 Pieces |
| Loft Joists | 2×6 x 8ft Select Structural | 18 Pieces |
| Subflooring | 3/4 inch Tongue and Groove OSB | 12 Sheets |
| Sheathing | 7/16 inch OSB or CDX Plywood | 45 Sheets |
| Roofing | 26-Gauge Standing Seam Metal | 320 Sq Ft |
| Insulation | Closed Cell Spray Foam or Rockwool | 1,100 Sq Ft |
| Fasteners | 3-inch R4 GRK Structural Screws | 2,000 Count |
The tool list for this project extends beyond basic hand tools to include specialized pneumatic and leveling equipment. You will require a 12-inch sliding compound miter saw for accurate crosscuts and a heavy duty framing nailer. A rotary laser level is highly recommended for ensuring the trailer is perfectly level before the first plate is laid.
| Tool Type | Specific Model/Requirement | Primary Use |
|---|---|---|
| Power Saw | 12-inch Miter Saw | Precise Angle Cuts |
| Pneumatic | 3-1/4 inch Framing Nailer | Wall Assembly |
| Leveling | 48-inch Digital Level | Plumb and Level Checks |
| Drilling | 18V Impact Driver | Structural Screwing |
| Safety | Fall Protection Harness | Roof Installation |
Technical Layout
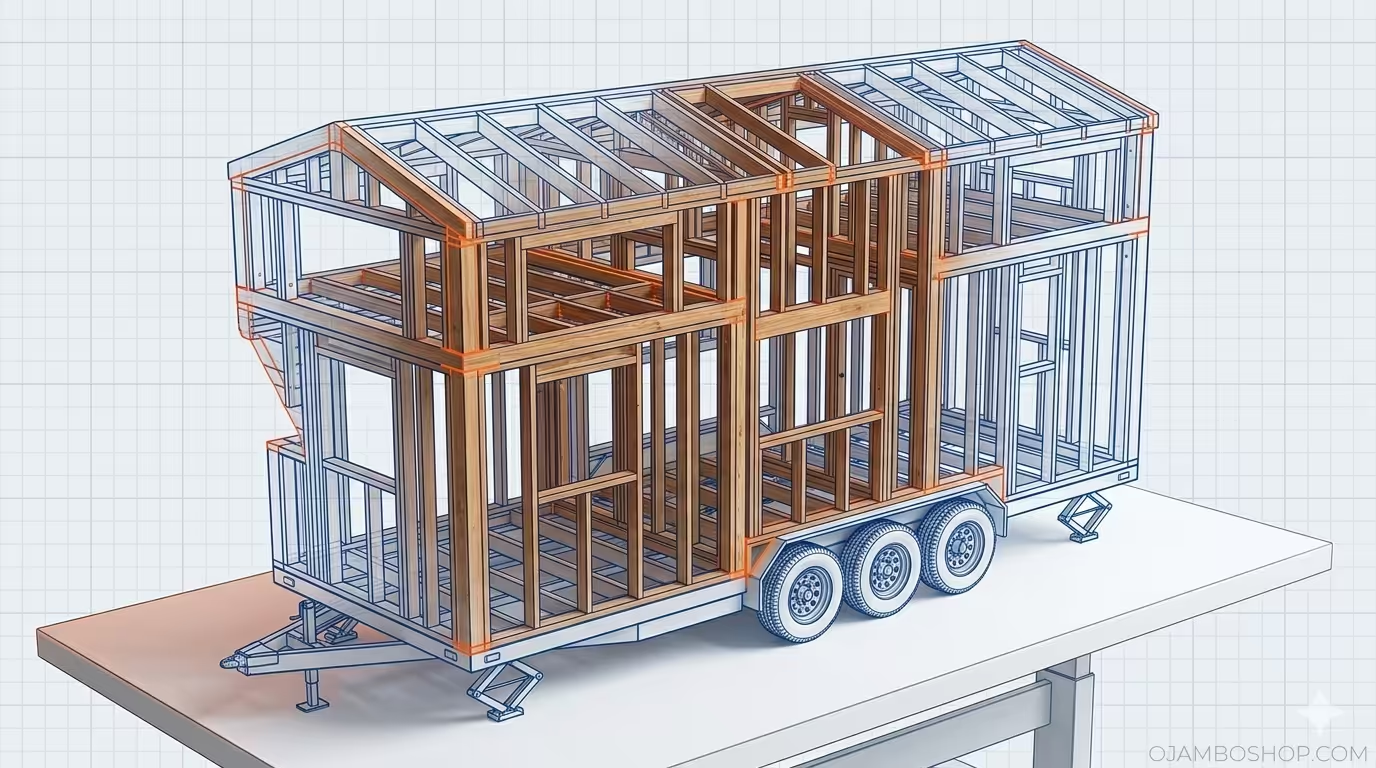
The framing of a 28ft dual loft tiny house must account for dynamic loads experienced during transport. We utilize a continuous header design over large window openings to distribute weight effectively across the trailer’s steel outriggers. The primary loft spans 8 feet at the rear, while the secondary loft spans 6 feet at the front, leaving a 14 foot vaulted ceiling in the kitchen and living area. Each loft joist is notched or seated in a specialized rim joist pocket to minimize vertical profile while maintaining a 40 pound per square foot live load capacity.
Standard residential framing spacing of 16 inches on center is maintained, but every stud is mechanically fastened to the trailer frame using 1/2 inch grade 8 carriage bolts and heavy duty tie downs. This creates a monolithic structure where the house and trailer act as a single unit. The roof pitch is set at a 3/12 slope to provide adequate rain runoff while staying under the 13.5 foot maximum height clearance for interstate travel. Lateral bracing is achieved through the use of structural rated sheathing, which is glued and nailed to prevent racking during high wind events or highway speeds.
Step-by-Step Instructions
Phase 1: Foundation and Subfloor Preparation
The first step is leveling the 28ft triple axle trailer on a concrete pad or compacted gravel. Once level, you must install a flashing membrane between the steel frame and the pressure treated bottom plates to prevent galvanic corrosion. We then install 2×4 floor joists within the trailer frame, followed by rigid foam insulation and the 3/4 inch subfloor. Ensure all seams are glued with a high strength subfloor adhesive to prevent squeaking.
Phase 2: Wall Framing and Hardware Installation
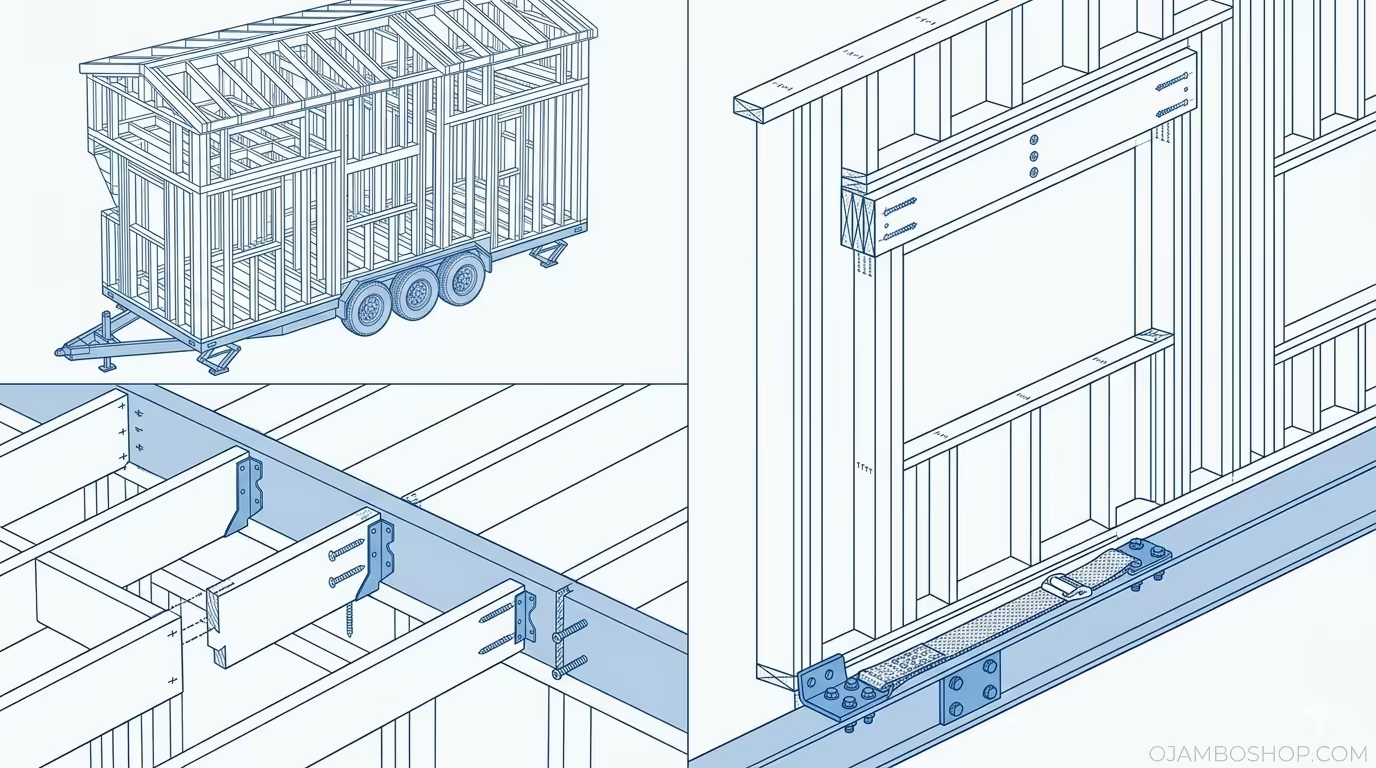
Construct the long side walls on the flat ground before winching them into a vertical position. Use a double top plate to provide extra rigidity for the loft joists and the roof rafters. Every 4 feet, install a Simpson Strong-Tie HDU tension tie to bolt the wall plates directly through the trailer frame. This mechanical connection is the most critical safety feature of the entire build.
Phase 3: Loft Joist and Mezzanine Construction
Install the 2×6 loft joists at the designated heights, typically allowing for 6.5 feet of head clearance below. The joists must be blocked every 2 feet to prevent rotation and to provide a solid nailing surface for the loft flooring. Use structural screws instead of nails for these connections to handle the vibration of travel. Check for squareness across the entire 28 foot span before proceeding.
Phase 4: Rafters and Roof Sheathing
Cut your rafters using a template to ensure the 3/12 pitch remains consistent across the entire length of the house. The ridge board should be a 2×8 to allow for full bearing of the 2×6 rafters. Once the rafters are installed, apply the roof sheathing immediately to provide lateral stability to the walls. Cover the sheathing with a synthetic underlayment to protect the interior from sudden rain.
Phase 5: Exterior Sheathing and House Wrap
Apply the wall sheathing, ensuring that the sheets overlap the trailer frame slightly to create a drip edge. Use a 6-inch nailing pattern on the edges and a 12-inch pattern in the field. After sheathing, wrap the entire building in a high quality vapor permeable house wrap. Tape all seams with manufacturer approved flashing tape to create an airtight building envelope.
Phase 6: Window and Door Installation
Install your windows using a pan flashing method to ensure any water that bypasses the trim is directed outward. Use tempered glass for all windows to comply with transport safety regulations. Shimming the windows correctly is vital so that they do not bind when the trailer is moved. Apply a high quality polyurethane sealant around the exterior flanges.
Phase 7: Roofing and Siding
Install the standing seam metal roofing, starting from the downward slope and working up. This type of roofing is preferred because it has no exposed fasteners that can back out over time. For siding, a lightweight cedar or engineered wood product is ideal. Maintain a 1/4 inch gap at all trim junctions to allow for material expansion and contraction.
Phase 8: Rough-In Plumbing and Electrical
Run your PEX plumbing lines and electrical Romex through the center of the studs to avoid accidental nail punctures. Use a manifold system for plumbing to allow for easy winterization of the tiny home. Ensure all electrical boxes are securely fastened to the studs. This phase must be inspected thoroughly before the insulation is applied.
Phase 9: Insulation and Vapor Barrier
We recommend closed cell spray foam for a 28ft tiny house because it adds significant structural rigidity to the walls. If using Rockwool, ensure a dedicated 6-mil vapor barrier is installed on the warm side of the studs. Proper insulation is the key to preventing condensation and mold in small, airtight spaces. Make sure to fill every cavity completely without overpacking the material.
Phase 10: Interior Finishes and Cabinetry
Install lightweight tongue and groove boards on the walls and ceiling to save weight compared to traditional drywall. Build your cabinetry into the wall studs to ensure they remain secure during transit. Finally, install your flooring and trim to complete the aesthetic. The dual lofts can now be finished with custom railings or storage stairs.
Common Mistakes
A frequent error in tiny house construction is neglecting the weight distribution over the axles. If you place all your heavy appliances and the bathroom at one end of the 28ft trailer, you risk dangerous swaying while towing. Always aim for 10 to 15 percent of the total weight to be positioned on the tongue of the trailer.
Another mistake is using standard residential windows that are not tempered or rated for high wind loads. Highway speeds can create pressure differentials that shatter standard glass or blow out poorly installed sashes. Spending the extra money on tempered units is a non negotiable safety requirement for mobile living.
Finally, many DIY builders fail to account for the thermal bridge created by the steel trailer frame. If you do not install a thermal break between the metal and your flooring, you will experience cold spots and potential rot due to condensation. Use a high density foam gasket or specialized tape to decouple the wood from the steel.
Maintenance and Safety
Pro-Tip: For long term structural integrity, use hot-dipped galvanized fasteners for all exterior connections and stainless steel screws for any cedar trim. Standard zinc plated screws will corrode within a few years due to the tannins in the wood and exposure to road salt. This simple upgrade can double the lifespan of your exterior siding and trim.
Safety should be your primary concern during the framing and roofing phases of the build. Use a sturdy scaffolding system rather than relying solely on ladders when working at the 13.5 foot height limit. Always wear a high quality respirator when cutting treated lumber or installing insulation.
Regular maintenance involves checking the roof seals and window caulking every six months. Because the house is on a trailer, the vibrations from moving can cause small cracks in sealants that lead to water intrusion. Treat any exposed wood with a UV resistant stain annually to prevent silvering and fiber degradation.