

Building a solar-powered micro cabin represents the ultimate intersection of modern engineering and traditional craftsmanship. This project serves as a versatile sanctuary that enhances property value while providing a functional space for guests or creative work. By integrating renewable energy and water collection, you create a structure that operates independently from municipal utilities.
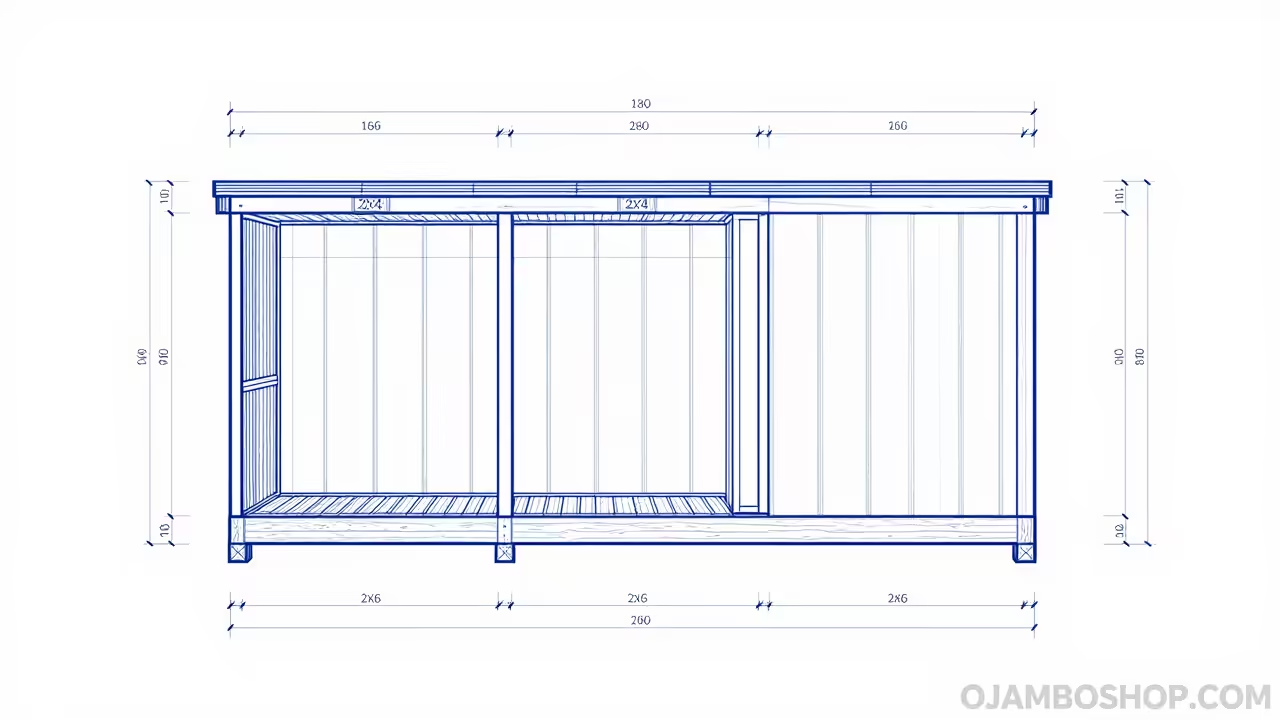
The 8 foot by 12 foot footprint is specifically chosen to maximize interior utility while remaining under most local permit thresholds. You will find that the vertical gain of the 10/12 pitch roof offers a spacious loft area for sleeping or storage. This design prioritizes structural longevity through advanced moisture management and robust timber framing techniques.
As a master carpenter, I have designed this cabin to be approachable for the dedicated amateur yet technically sound for the professional. The following blueprint focuses on a skid-mounted foundation to allow for portability and minimal site impact. We will utilize high-efficiency insulation and strategic solar orientation to ensure year-round comfort in various climates.
Quick Specs
Dimensions: 8 Feet Wide by 12 Feet Long by 13 Feet High
Estimated Cost: 4,500 to 6,200 USD depending on local lumber prices
Difficulty Level: Intermediate to Advanced
Estimated Build Time: 80 to 120 Man-Hours
Materials and Tools
Lumber and Sheathing
- 4×4 Pressure-Treated Skids: 3 pieces at 12 feet
- 2×6 Pressure-Treated Floor Joists: 10 pieces at 8 feet
- 2×4 Wall Studs: 45 pieces at 92-5/8 inches
- 2×6 Roof Rafters: 14 pieces at 8 feet
- 3/4 inch Tongue and Groove Subflooring: 3 sheets
- 7/16 inch OSB Wall Sheathing: 10 sheets
- 5/8 inch CDX Plywood Roof Sheathing: 5 sheets
- 1×6 Cedar Tongue and Groove Siding: 450 linear feet
Hardware and Systems
- 3-inch Framing Nails: 1 box (2,500 count)
- 2-inch Siding Nails: 1 box (1,000 count)
- Hurricane Ties (H2.5A): 14 pieces
- 100-Watt Monocrystalline Solar Panels: 2 units
- 40-Amp MPPT Charge Controller: 1 unit
- 100Ah Deep Cycle LiFePO4 Battery: 1 unit
- 50-Gallon Food-Grade Rain Barrel: 1 unit
- EPDM Rubber Roofing Membrane: 150 square feet
Required Tools
- Sliding Miter Saw
- Circular Saw with Framing Blade
- Cordless Drill and Impact Driver Set
- Pneumatic Framing Nailer
- 4-foot Spirit Level
- Speed Square and Chalk Line
- Safety Glasses and Hearing Protection
Technical Layout
The structural integrity of this micro cabin relies on a modified balloon framing system that integrates the loft joists directly into the wall studs. This method reduces the overall material count while increasing the resistance to lateral wind loads, which is critical for a high-profile small structure. We utilize a 2×6 floor rim joist assembly capped with 3/4 inch subflooring to create a rigid diaphragm that prevents racking over time.
The roof system is engineered with a 10/12 pitch to facilitate rapid snow shed and optimal solar gain for the roof-mounted panels. Each rafter is notched with a precise birdsmouth cut to ensure full bearing on the double top plates of the side walls. We use 16-inch on-center spacing for all primary framing members to accommodate standard insulation batts and maximize load distribution. The rainwater harvesting system is integrated into the eave design, utilizing a seamless gutter run that feeds directly into a filtered storage vessel located on the shaded northern side of the cabin.
Step-by-Step Instructions
Phase 1: The Foundation and Floor Frame
Begin by leveling the site and laying down a 4-inch bed of compacted gravel to ensure proper drainage. Lay the three 4×4 pressure-treated skids parallel to each other, spaced 4 feet apart, and verify they are perfectly level across their lengths. Construct the 8×12 floor frame using 2×6 pressure-treated lumber, ensuring the box is perfectly square by measuring the diagonals. Install the joists at 16 inches on center and secure them with 3-inch galvanized nails.
Apply a bead of subfloor adhesive to the top of the joists before laying your 3/4 inch tongue and groove plywood. Stagger the seams of the plywood sheets to increase the floor’s overall rigidity and prevent future squeaking. Drive 2-inch floor screws every 6 inches along the perimeter and every 12 inches through the field. This solid base is the most important part of the build, so take your time to ensure it is dead level.
Phase 2: Wall Framing and Erection
Construct the two side walls first on the flat surface of your new floor to ensure accuracy. The side walls should be 8 feet tall with a double top plate to support the heavy roof rafters. Frame the front wall with a rough opening for a 36-inch entry door and a 24-inch square window. The rear wall should feature a larger window opening to allow for cross-ventilation and natural light.
Once the frames are built, tilt the walls into place and temporarily brace them with scrap 2×4 lumber. Use a 4-foot level to plumb the corners and nail the bottom plates through the subfloor into the joists below. Tie the corners together by overlapping the double top plates from the adjacent walls. Verify that the entire structure is plumb, level, and square before moving to the sheathing phase.
Phase 3: Sheathing and House Wrap
Apply 7/16 inch OSB sheathing horizontally to the exterior walls, starting from the bottom plate and working upwards. Leave a 1/8 inch gap between sheets to allow for natural expansion and contraction caused by humidity changes. Secure the sheathing with 2-inch nails spaced 6 inches apart on the edges and 12 inches in the middle. Cut out the window and door openings using a reciprocating saw or a circular saw set to the proper depth.
Wrap the entire structure in a high-quality breathable house wrap to protect the framing from moisture during the rest of the build. Overlap the seams by at least 6 inches and seal them with specialized construction tape. Integrate the wrap into the window and door openings using a “Y” cut pattern to ensure water sheds away from the interior. This step is vital for preventing rot in the wall cavity over the lifespan of the cabin.
Phase 4: Roof Rafter Installation
Cut your 2×6 rafters with a 10/12 pitch, ensuring each birdsmouth cut fits snugly over the double top plate. Install a 2×8 ridge board at the peak to provide a solid nailing surface for the rafter pairs. Space the rafters at 16 inches on center to match the wall studs for a direct load path to the foundation. Secure each rafter to the top plate using H2.5A hurricane ties to prevent uplift during high wind events.
Install 5/8 inch CDX plywood sheathing over the rafters, which provides better moisture resistance than OSB for roofing applications. Attach 1×6 fascia boards to the rafter tails to create a clean line for gutter installation later. Cover the roof sheathing with a synthetic underlayment immediately to protect the interior from rain. Pro-Tip: Use stainless steel fasteners for any exterior trim or roofing components to prevent rust streaks and hardware failure in coastal or high-moisture environments.
Phase 5: Doors, Windows, and Exterior Finish
Install the pre-hung entry door and windows, ensuring they are shimmed for a perfect fit and smooth operation. Apply high-grade exterior caulk around the flanges before installing the exterior casing to create a secondary water barrier. Install the cedar tongue and groove siding, starting from the bottom and working your way up with blind-nailing techniques. Treat the cedar with a UV-resistant clear coat or stain to preserve its natural color and prevent silvering.
Finish the corners with 1×4 cedar trim boards to create a professional, polished look. Install the EPDM rubber roofing membrane according to the manufacturer’s specifications, ensuring it laps over the drip edge. This roofing material is ideal for low-maintenance cabins and provides an excellent surface for rainwater collection. The dark color of the EPDM also helps with passive solar heating during the winter months.
Phase 6: Solar Power Integration
Mount the two 100-watt solar panels on the south-facing slope of the roof using adjustable tilt brackets. Run the PV wiring through a weather-tight roof entry gland and down to the interior mechanical closet. Connect the panels to the 40-amp MPPT charge controller, then link the controller to your 100Ah lithium battery bank. This system will provide enough power for LED lighting, laptop charging, and a small high-efficiency ventilation fan.
Install a 1000-watt pure sine wave inverter to convert the DC battery power into AC power for standard appliances. Use 12-gauge marine-grade wire for all internal DC circuits to minimize voltage drop and resist vibration. Ensure the battery is stored in a vented box to manage any potential heat buildup during heavy charging cycles. Label all breakers and fuses clearly to simplify future maintenance or troubleshooting.
Phase 7: Rainwater Harvesting System
Mount a 4-inch K-style gutter to the eave on the low side of the roof pitch. Connect the downspout to a first-flush diverter, which discards the initial contaminated runoff from the roof. The clean water then flows into a 50-gallon food-grade rain barrel equipped with a debris screen. Install an overflow pipe at the top of the barrel to direct excess water away from the cabin’s foundation.
Place the rain barrel on a platform of cinder blocks to provide gravity-fed pressure for an exterior faucet. If you plan to use this water for interior sinks, install a 12-volt demand pump and a 5-micron sediment filter. Always treat harvested rainwater before consumption using a UV sterilizer or high-grade filtration system. This setup provides a sustainable water source for cleaning, gardening, or basic hygiene.
Phase 8: Interior Insulation and Finishing
Install R-15 mineral wool insulation in the wall cavities and R-21 in the ceiling to maximize thermal performance. Mineral wool is preferred for small cabins because it is fire-resistant, mold-resistant, and provides excellent sound dampening. Install a 6-mil poly vapor barrier over the insulation on the warm side of the wall to prevent condensation. Finish the interior walls with lightweight 1×6 pine boards or birch plywood for a modern, clean aesthetic.
Install the final flooring, such as luxury vinyl plank, which is durable and handles temperature fluctuations well. Build out the loft area with a simple ladder access and a safety railing. Install the LED lighting fixtures and outlets to complete the electrical circuit. Your micro cabin is now a fully functional, off-grid living space ready for its first occupants.
Material Comparison Table
| Material Type | Pros | Cons | Best Use Case |
|---|---|---|---|
| Pressure Treated Pine | Rot resistant, cost-effective | Heavy, can warp | Foundations and floor joists |
| Western Red Cedar | Naturally beautiful, insect-resistant | Expensive, requires maintenance | Exterior siding and trim |
| Mineral Wool | Fireproof, great R-value | Dusty installation, higher cost | Wall and ceiling insulation |
| EPDM Rubber | Extremely durable, easy to repair | High initial cost, industrial look | Low-slope or solar-ready roofs |
| Lithium (LiFePO4) | Long life, deep discharge | High upfront cost | Off-grid solar battery banks |
Common Mistakes
One of the most frequent errors is failing to properly level the foundation skids before building upward. Even a quarter-inch slope at the base will result in doors that won’t close and windows that bind in their frames. Always use a transit level or a long spirit level to check the skids during the first hour of the build.
Another mistake is neglecting the “first-flush” diverter in the rainwater system. Without this, bird droppings and roof debris end up in your storage tank, leading to bacterial growth and foul odors. A simple PVC diverter kit is a small investment that significantly improves the quality of your harvested water.
Lastly, builders often undersize their solar wiring, leading to significant power loss. Using thin automotive wire instead of thick-gauge solar wire creates resistance and heat. Always calculate your voltage drop and use at least 10-gauge wire for the run from the panels to the controller to ensure maximum efficiency.
Maintenance and Safety
Inspect your cabin every six months for signs of moisture intrusion or pest activity. Pay close attention to the roof seals around the solar panel mounts and the gutter connections. Re-apply a protective sealer to the cedar siding every two to three years to prevent UV damage and maintain the wood’s structural integrity. Clear the gutters and the rain barrel screen after every major storm to prevent blockages.
When working on the roof or handling heavy lumber, always wear a hard hat and use a fall protection harness. Ensure your power tools are in good working order and never bypass safety guards on your saws. If you are unfamiliar with electrical wiring, consult a licensed professional to review your solar connections before powering the system. Building a cabin is a rewarding experience, but staying safe is the highest priority on any job site.